
Better rib mobility = stronger core
Did you know that rib tension could be impacting your core and pelvic floor function?
Our core is like a tube of toothpaste: too much squeezing from the top down (ie rib gripping and lack of mobility) creates excess pressure out on the abdominal wall and down on your pelvic floor.
If your ribs don’t move well, your diaphragm can’t move well. And your pelvic floor works in sync with your diaphragm to form the foundation of your core.
Restoring lateral and posterior rib expansion, as well as thoracic rotation, are what your core needs to manage pressure and restore optimal function postpartum.
These are 7 poses I love to give clients struggling with rib tension and restricted thoracic mobility:
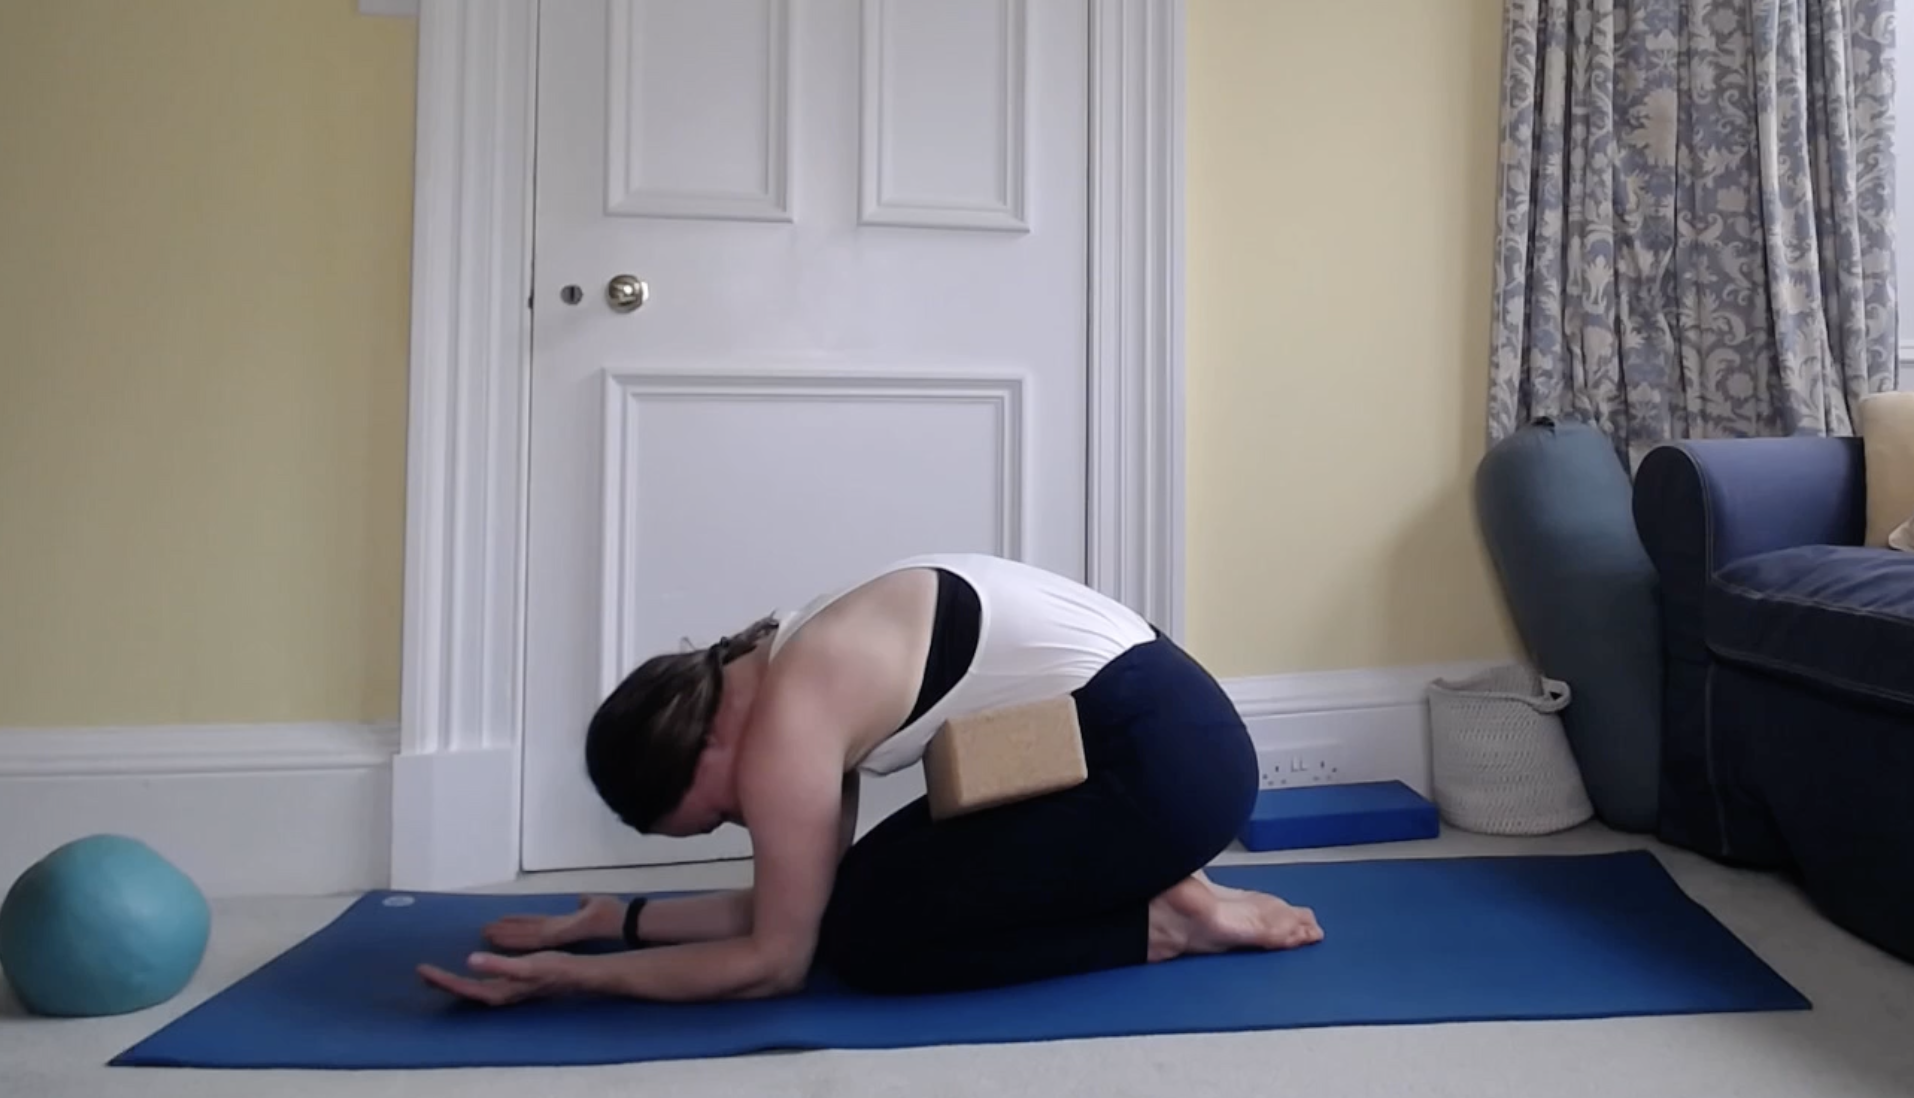
Child’s Pose back expansion
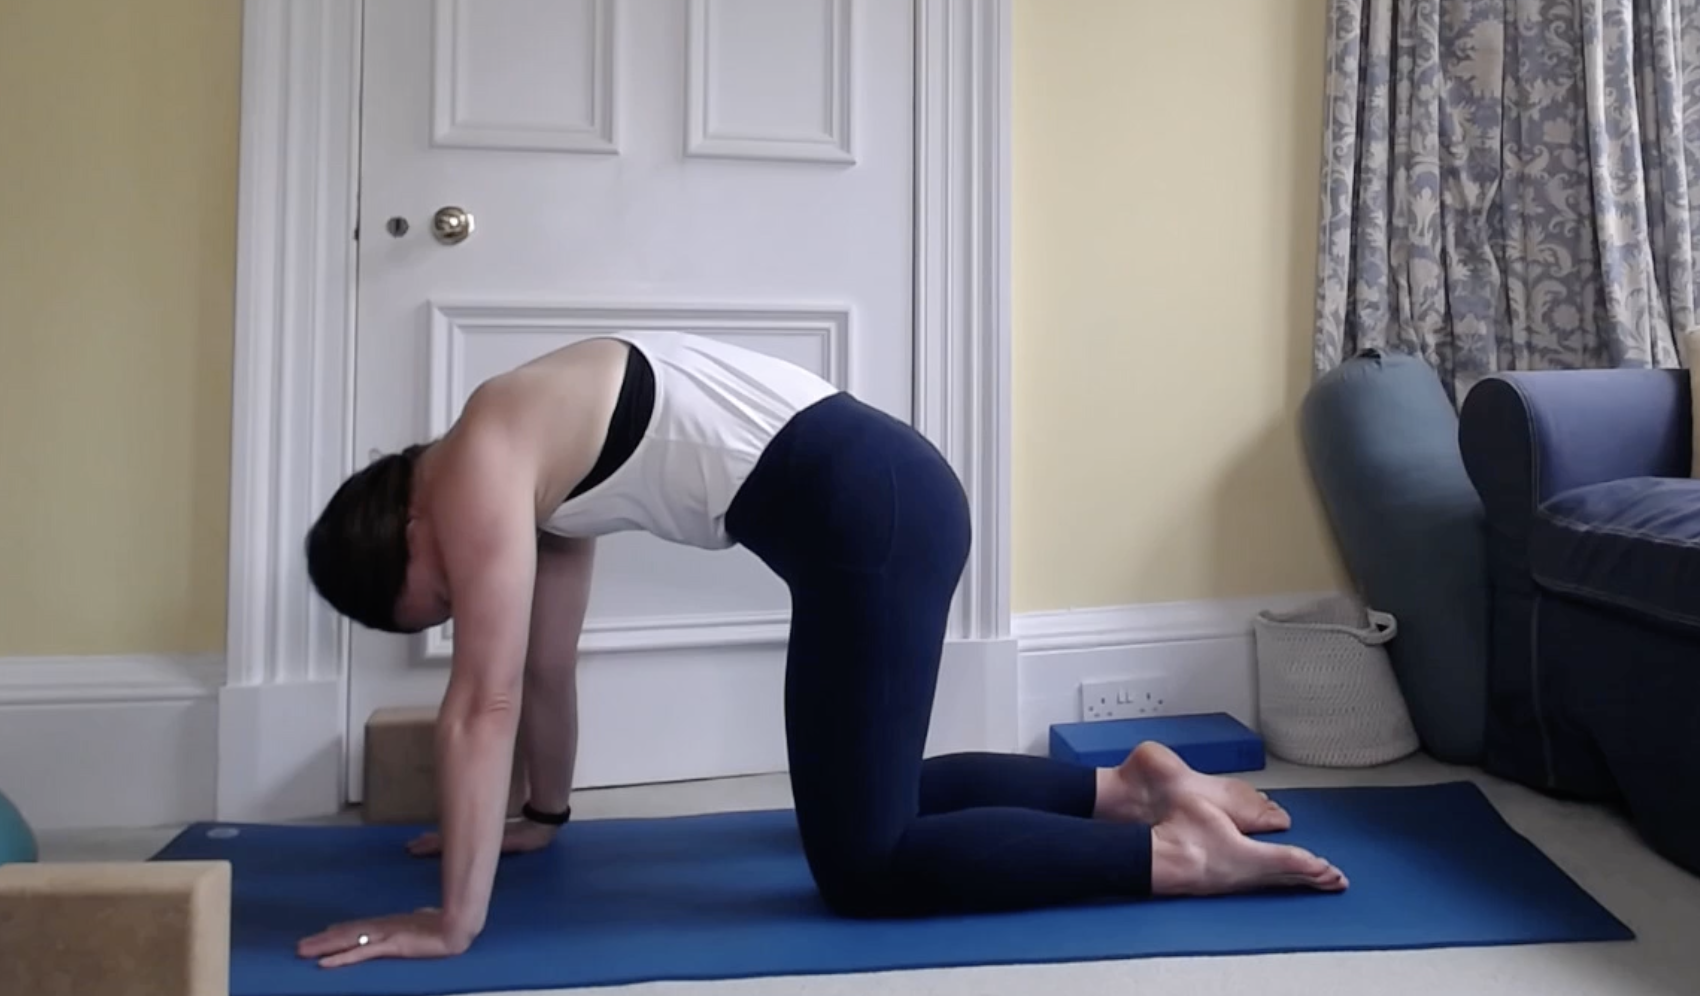
Cat cow + barrel rolls
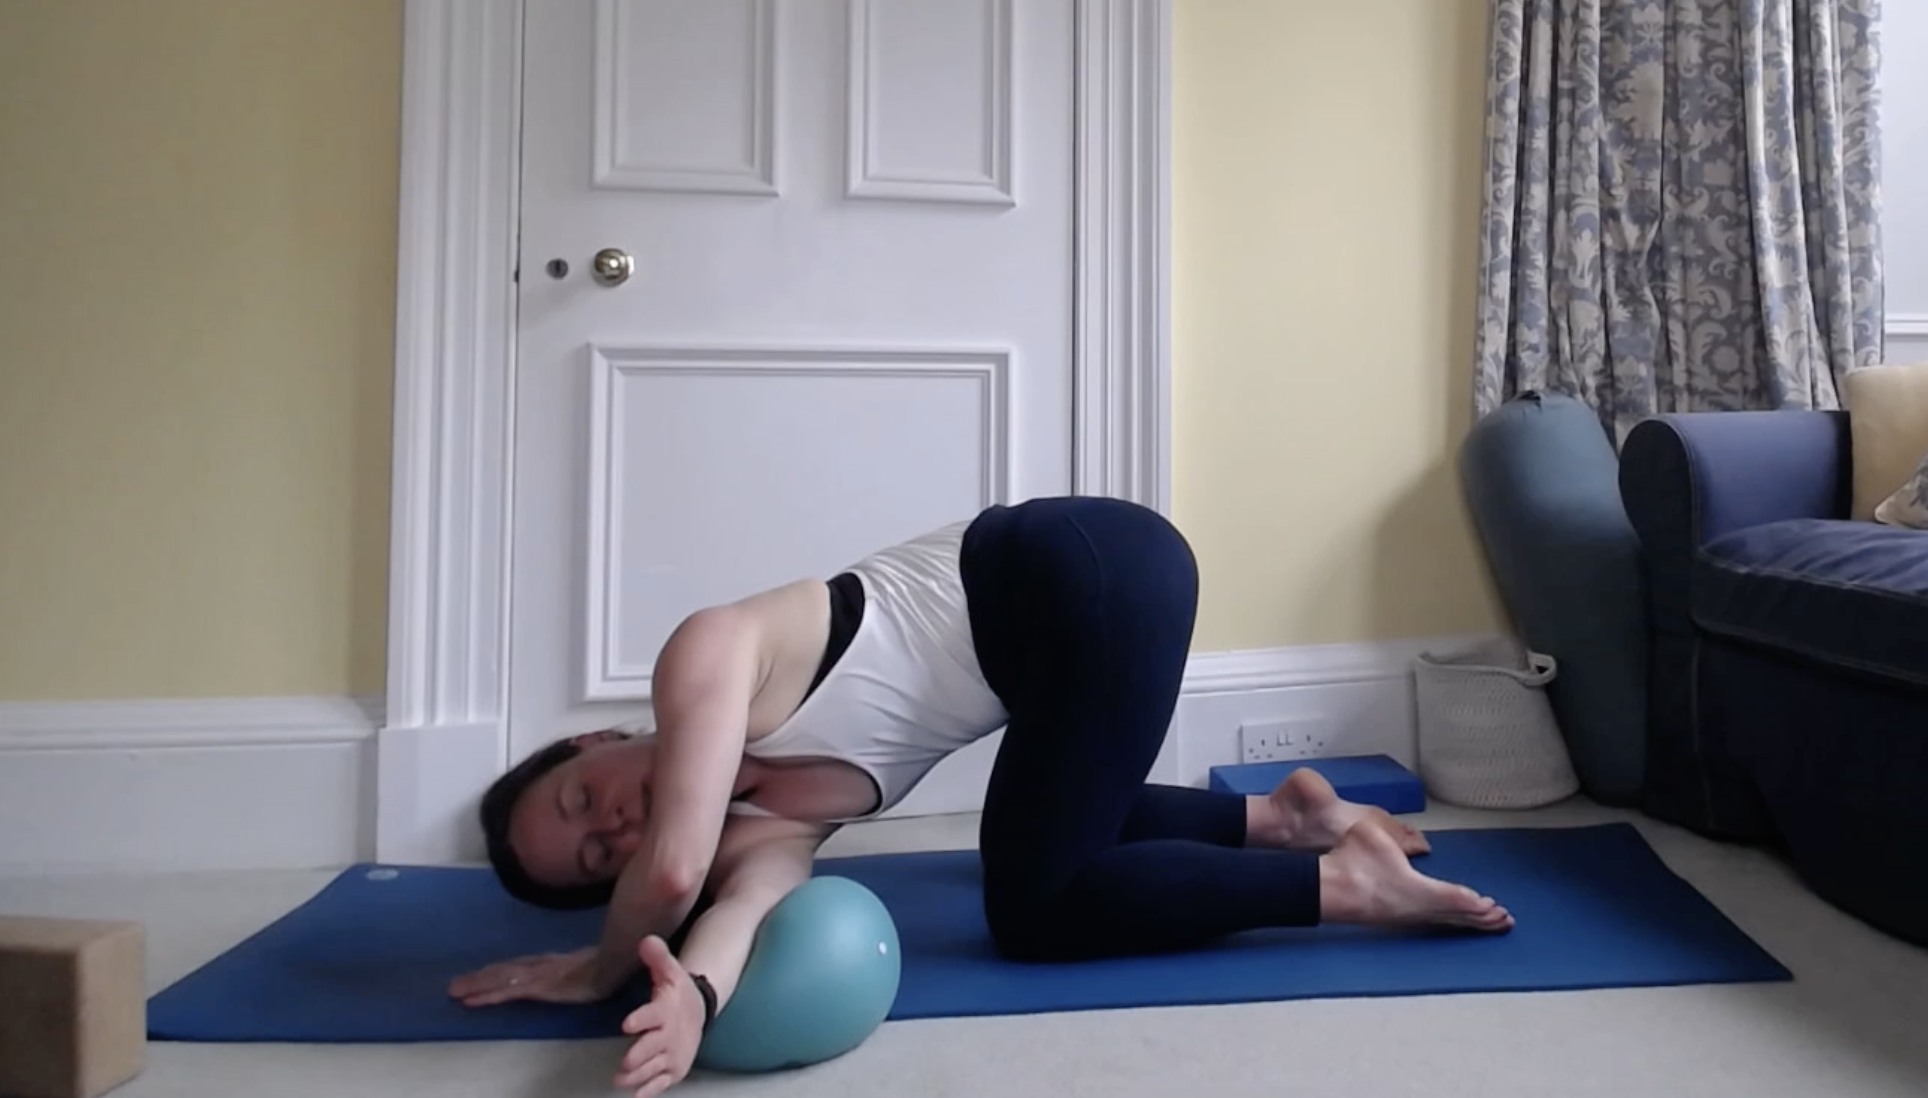
Thread the needle
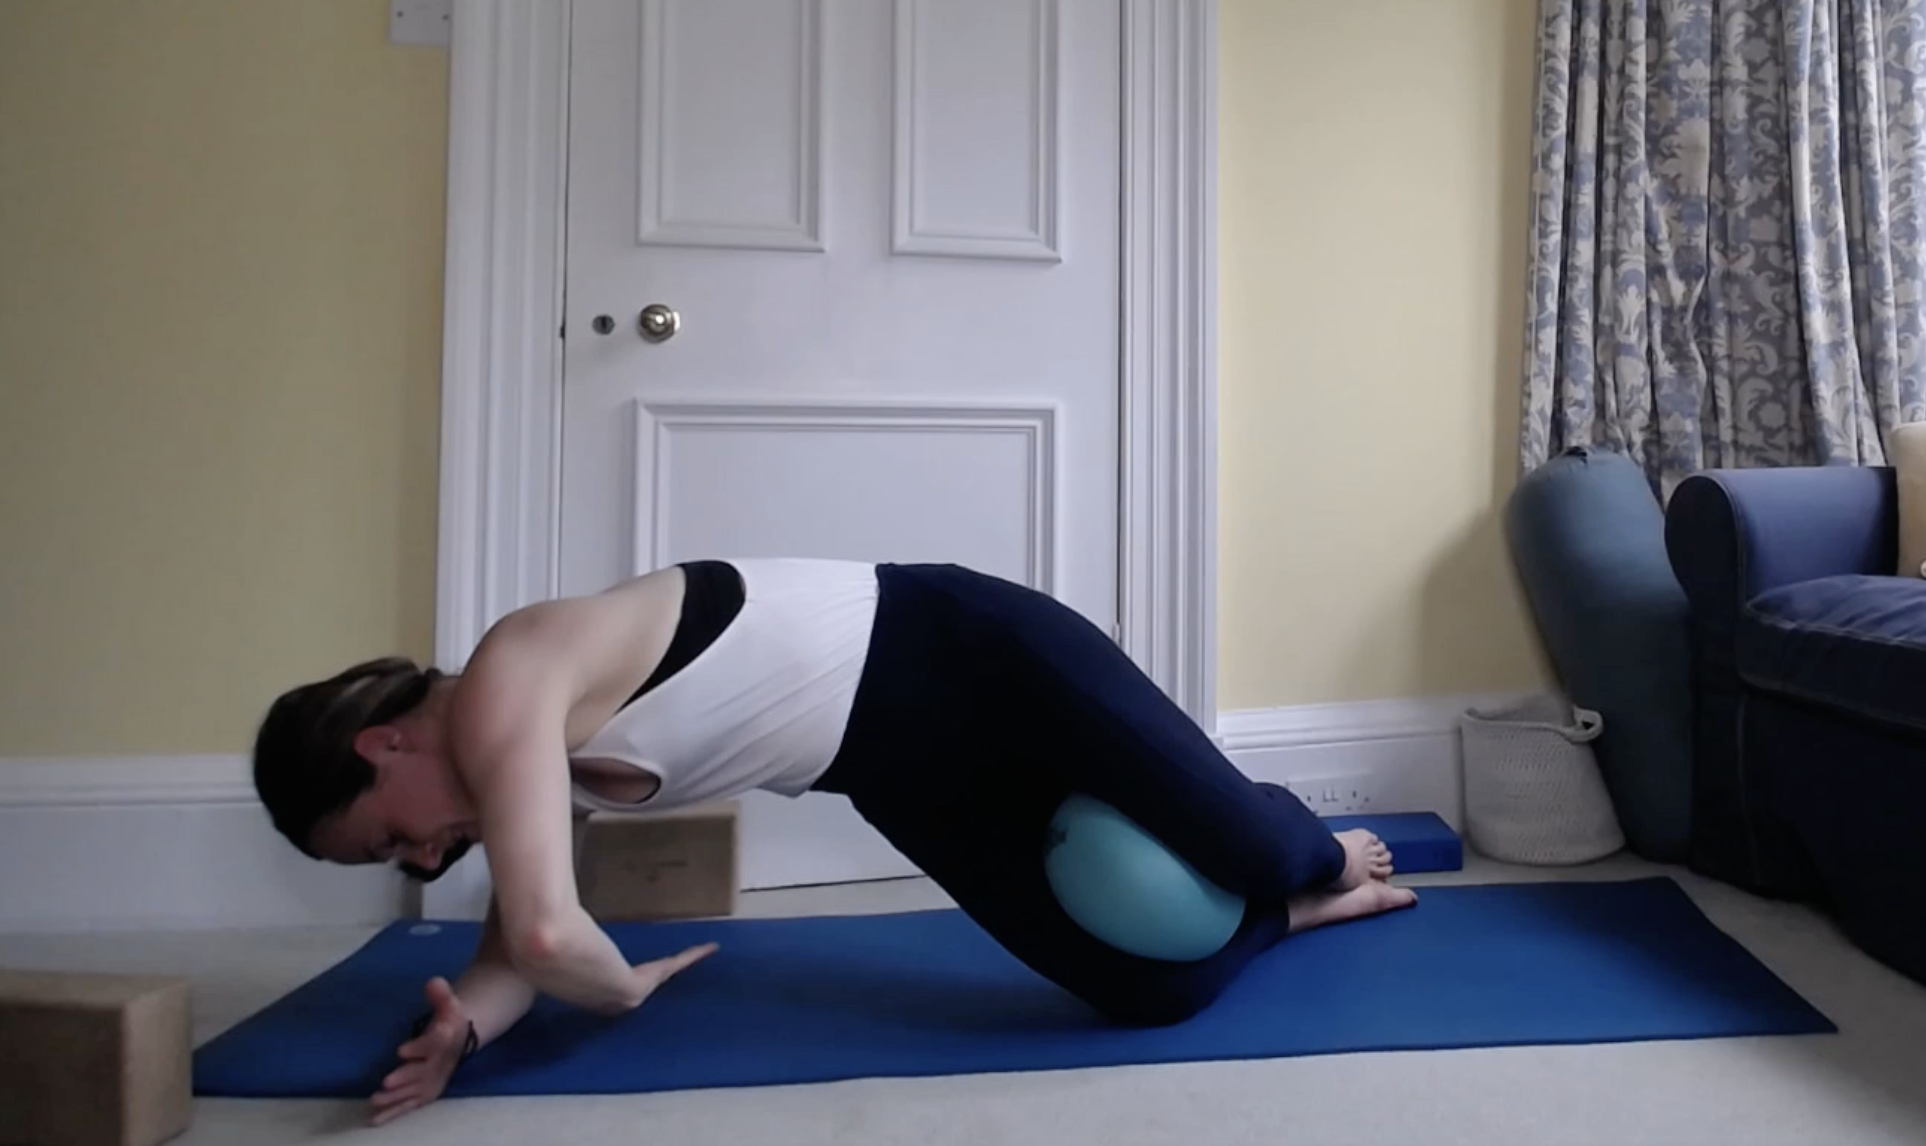
Side plank with rotation
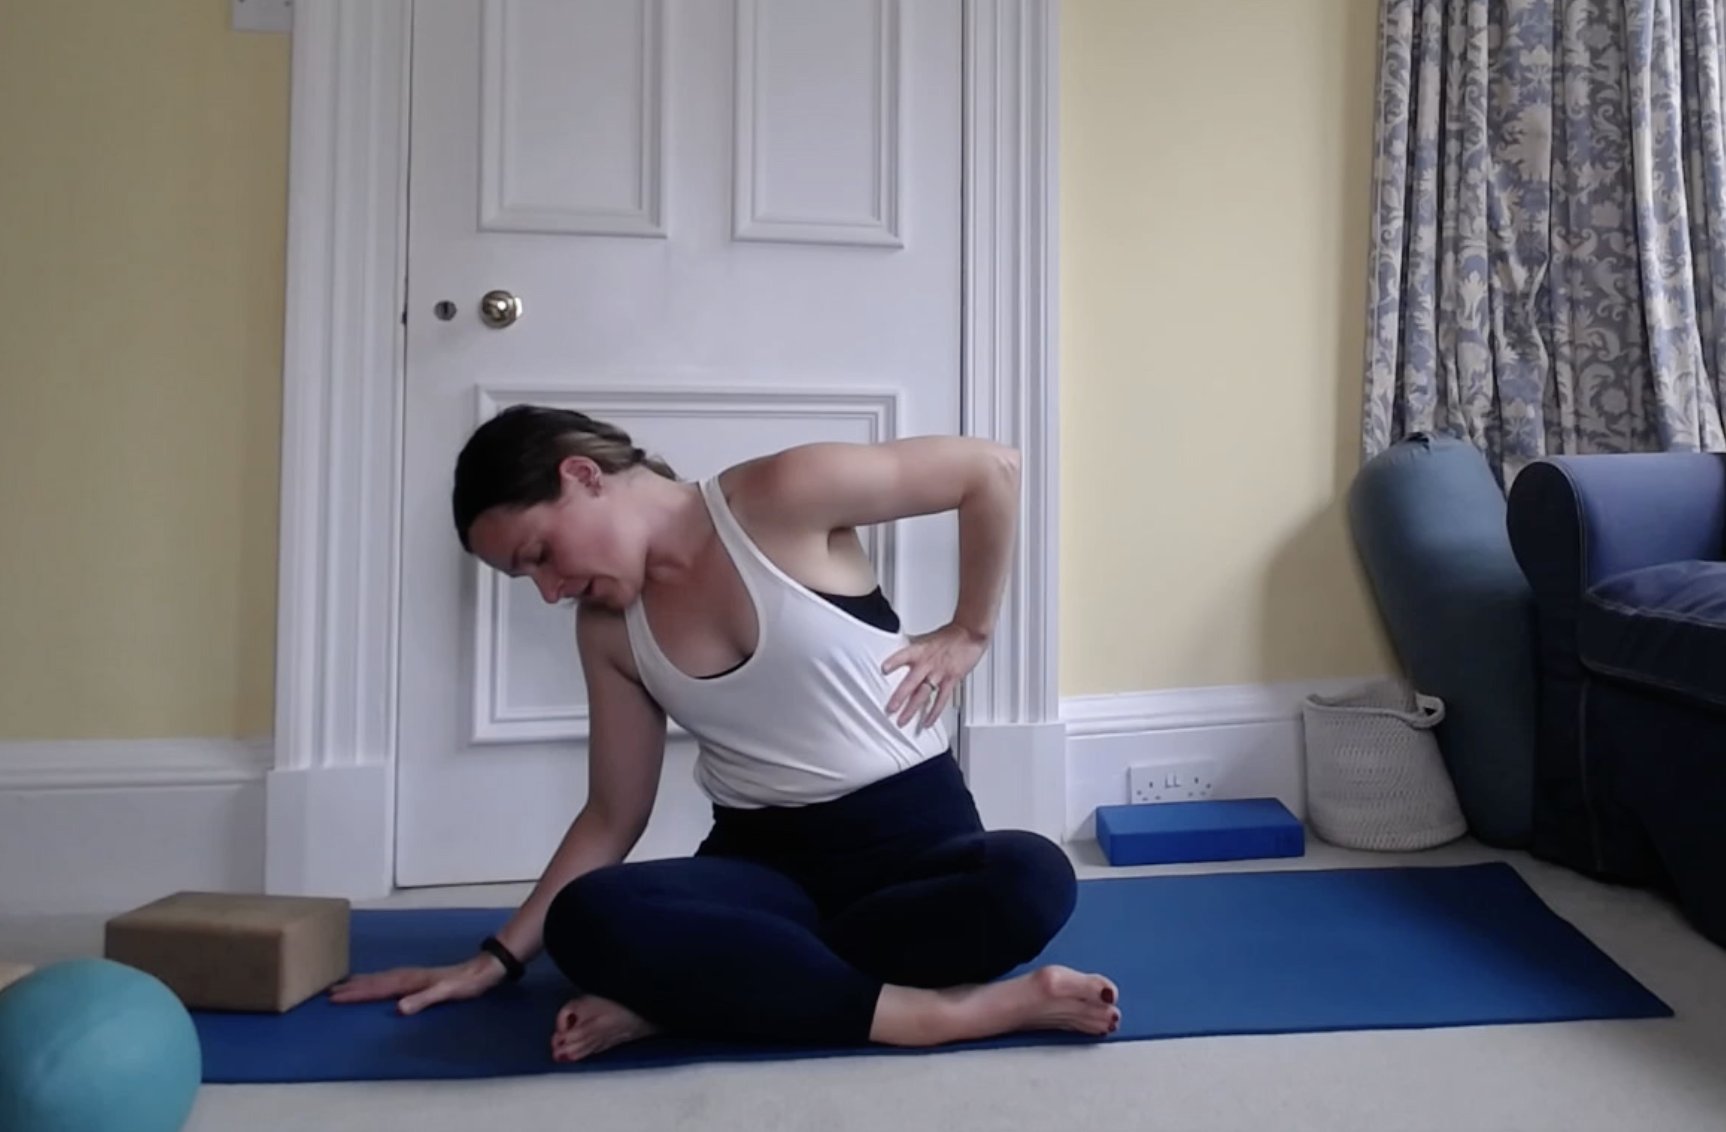
Teapot breathing
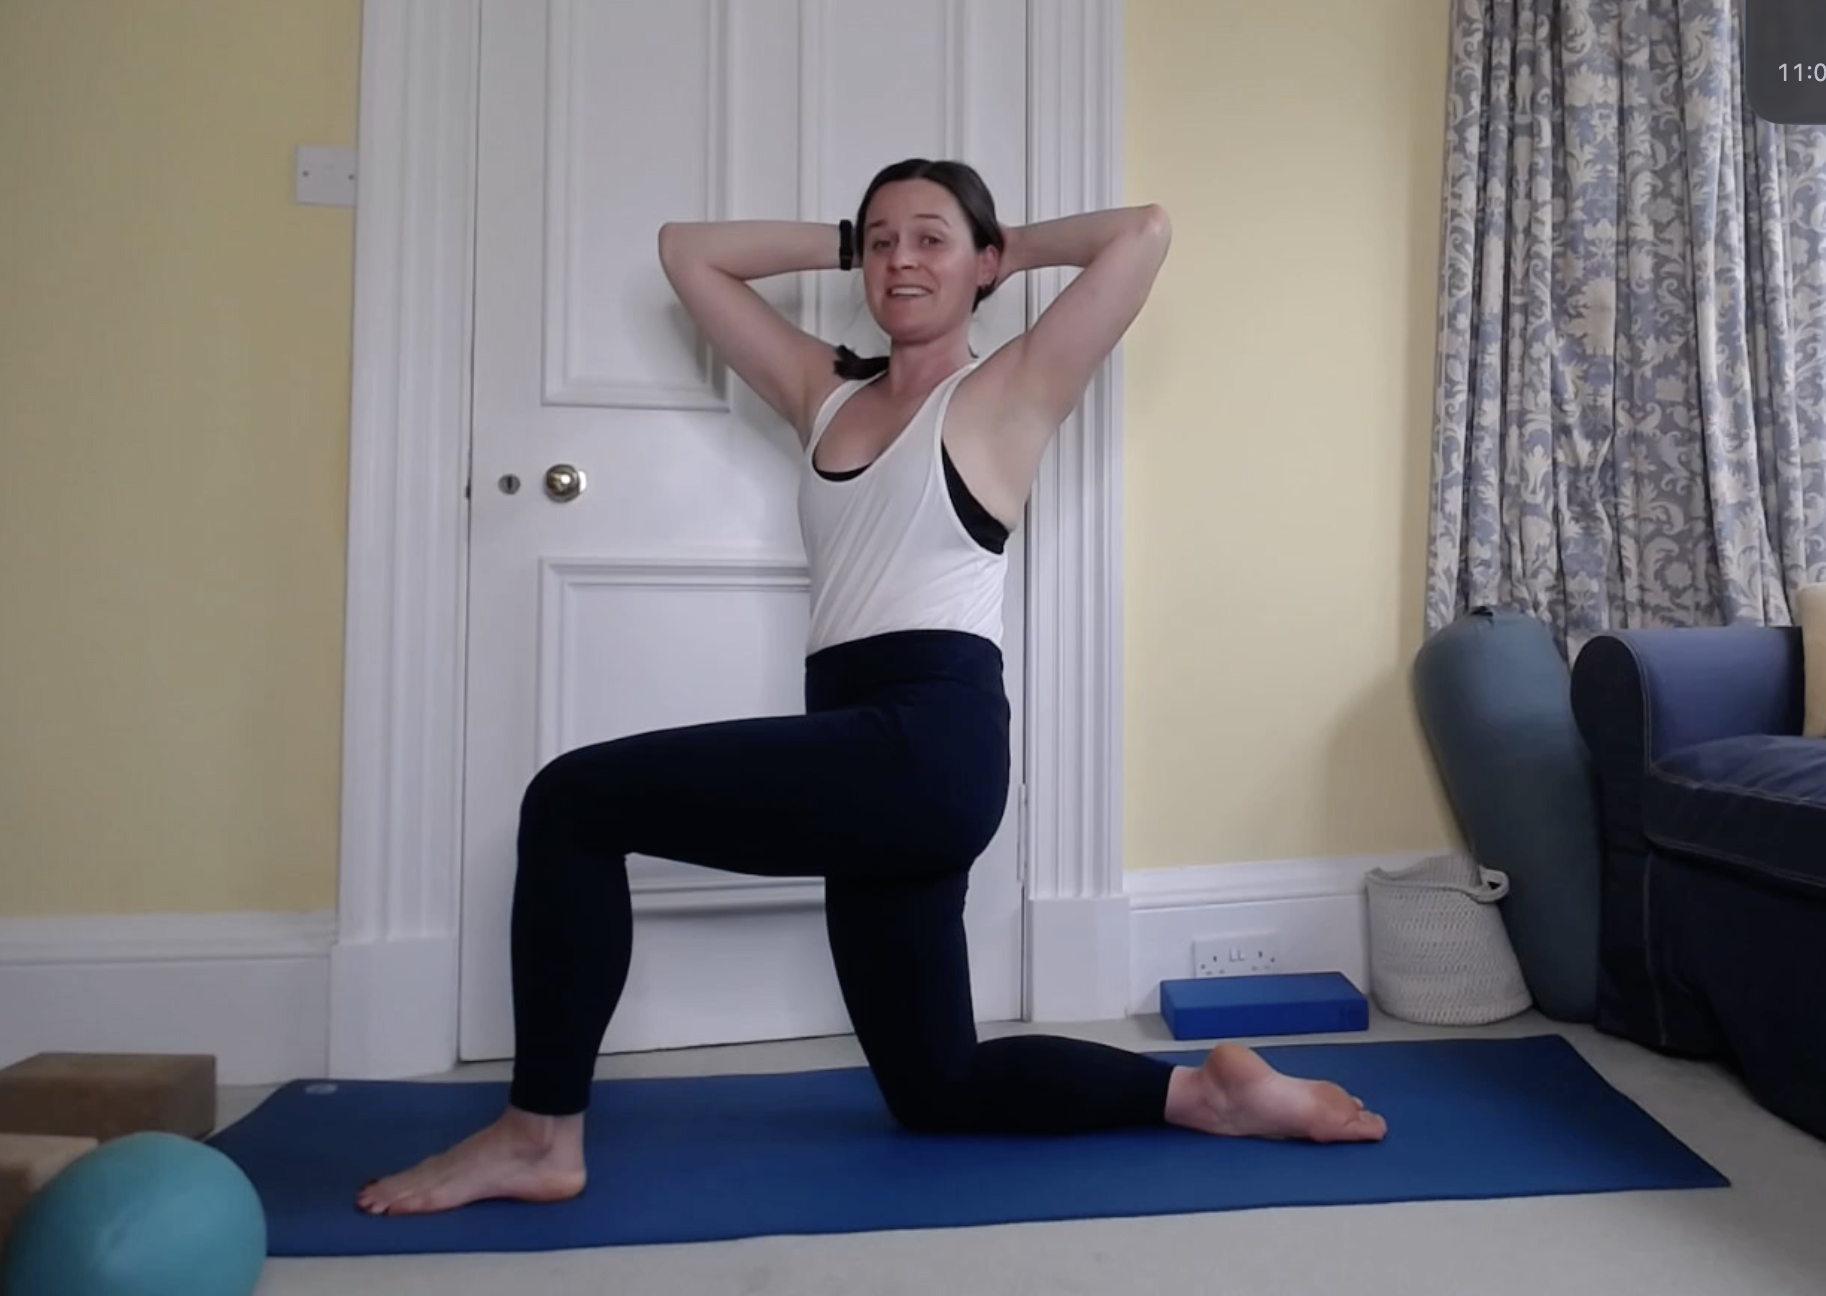
Low lunge with rotation
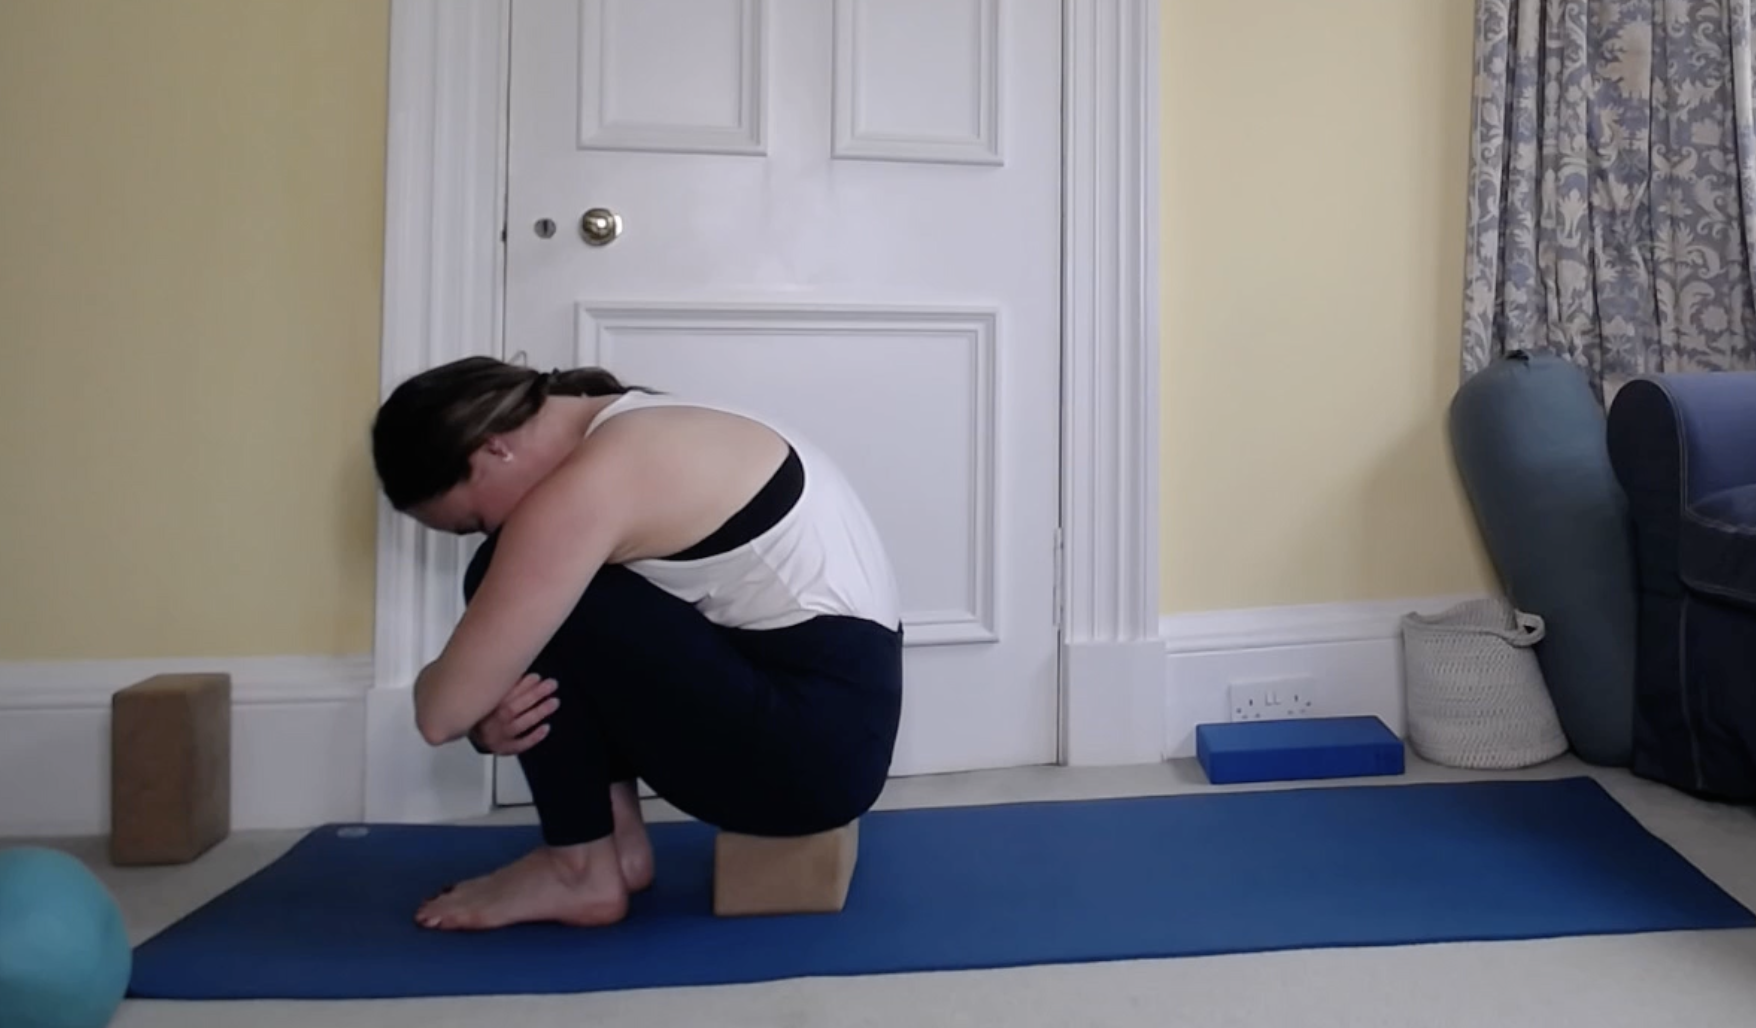
Supported squat with back expansion
Practice along below, and join me for postnatal yoga every Tuesday and Thursday, 1-2pm, at the Lifecare Centre in Stockbridge, Edinburgh, or join my online postnatal program Restore Your Core + Pelvic Floor. Click here for info and to register your interest.
5 Yoga Poses For Hip Strength
For the month of June we’ve been focusing on hip strength and stability in class.
Why? Because so many of my clients have ‘tight’ hips, but passive stretching is only part of the picture.
A tight muscle is usually also a weak muscle, and one that is calling out for more strength.
Modern life, especially if you sit a lot, has a habit of creating tension in the hip flexors and pelvic floor, as well as switching off our posterior chain (glutes and hamstrings).
We want our hips to be strong because they support our pelvis and spine in pretty much everything we do daily: walking, cycling, running, getting up to stand unaided, chasing around after pets/kids/grandchildren (delete as appropriate).
Greater hip strength usually equals happier, more supported joints (there is a huge correlation between decreased glute strength and chronic lower back pain (Amabile & Bolte, 2017).
These are 5 yoga poses I love to teach for greater hip stability.
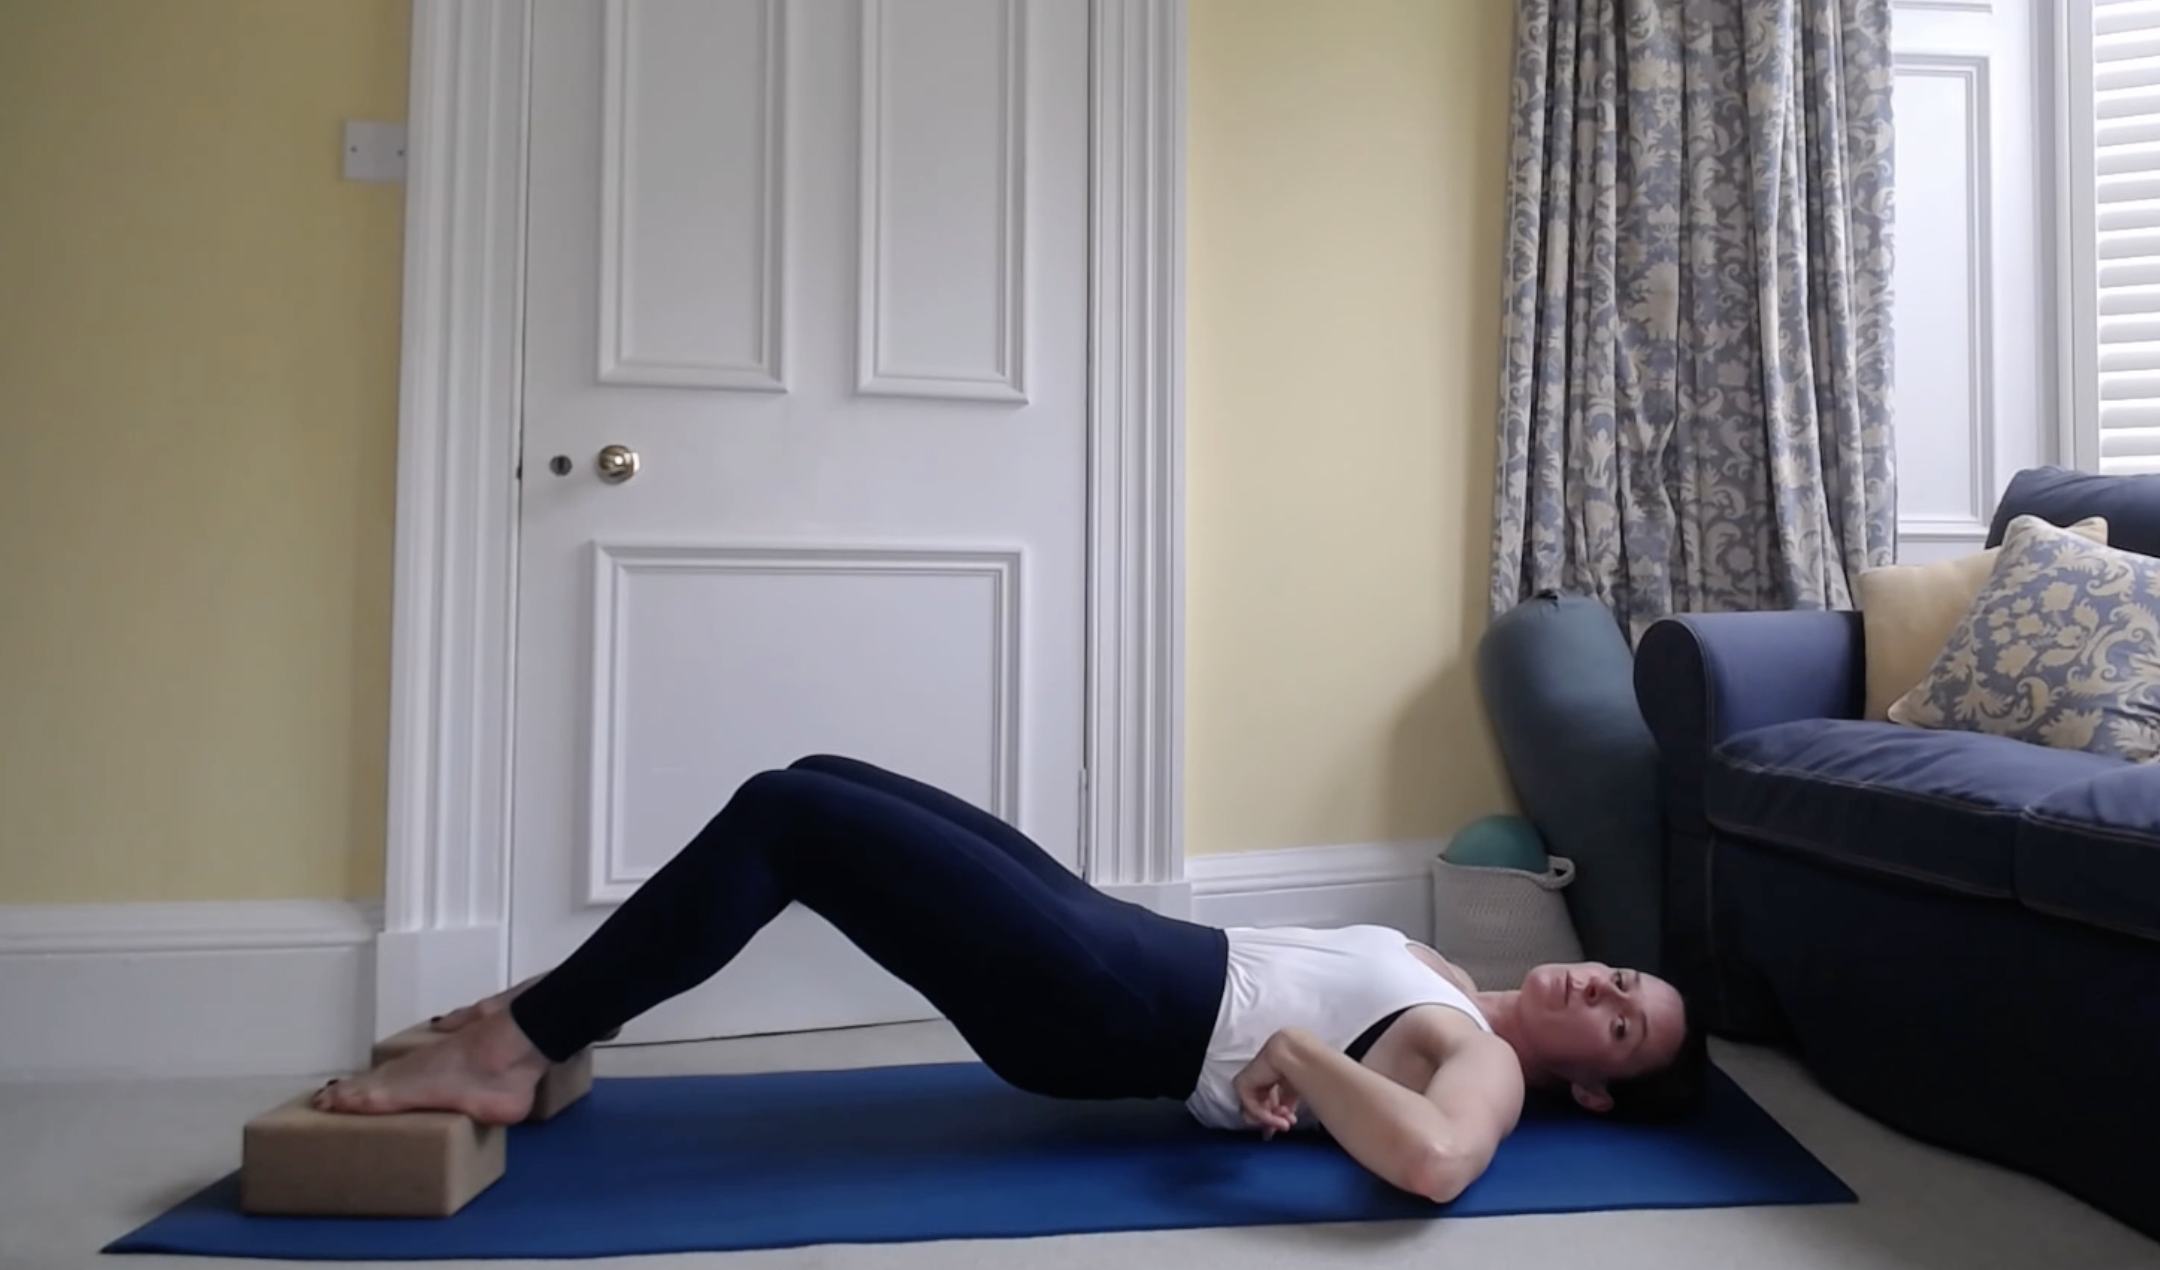
Hamstring bridge
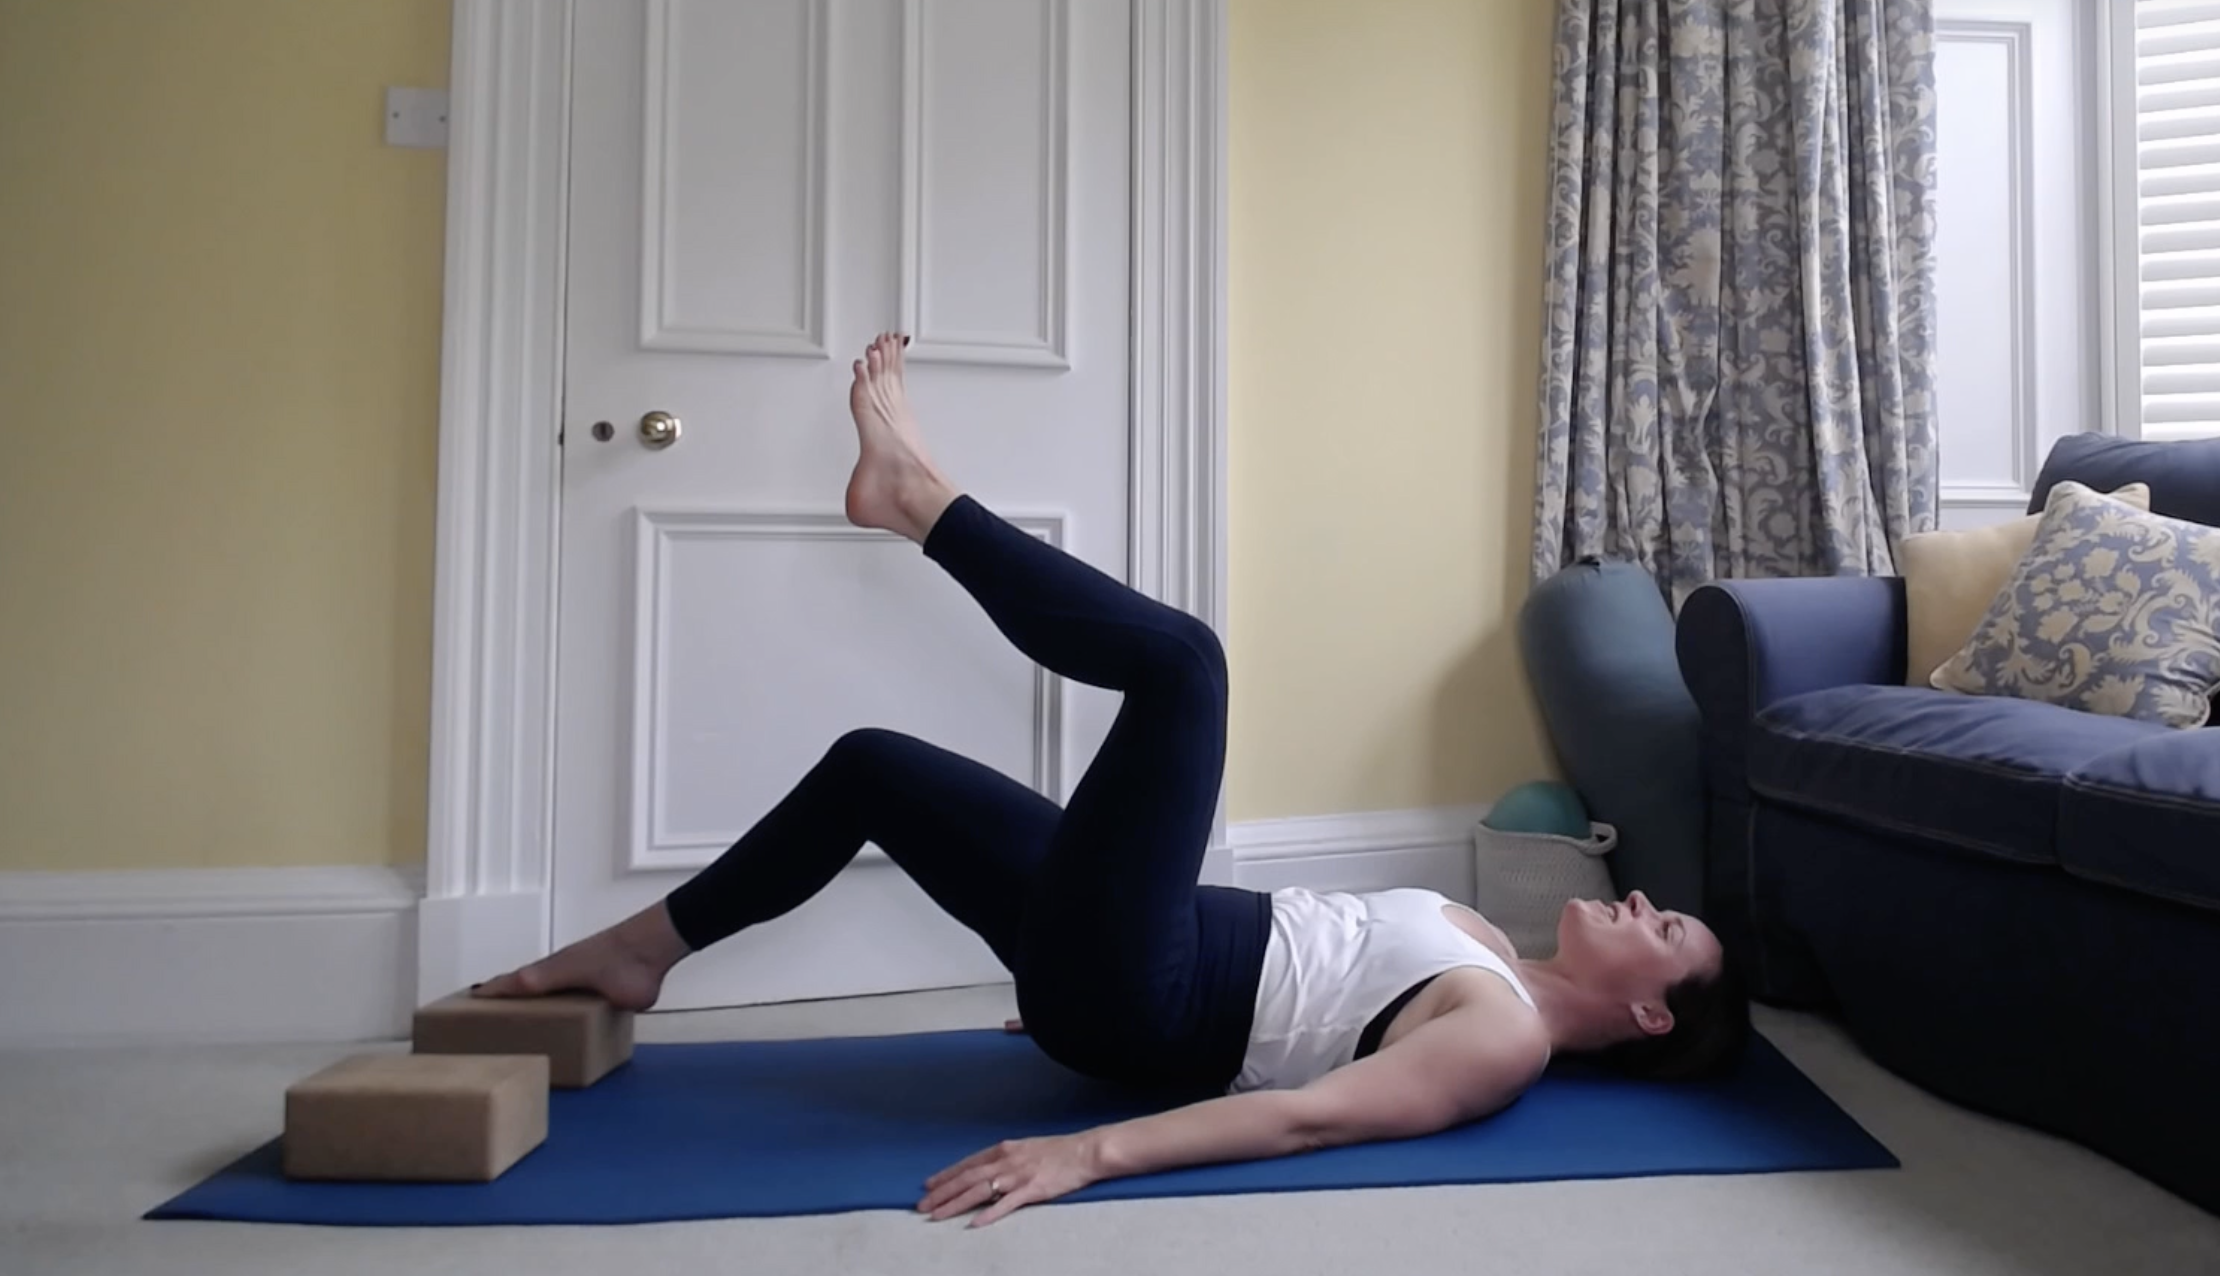
Single leg bridge
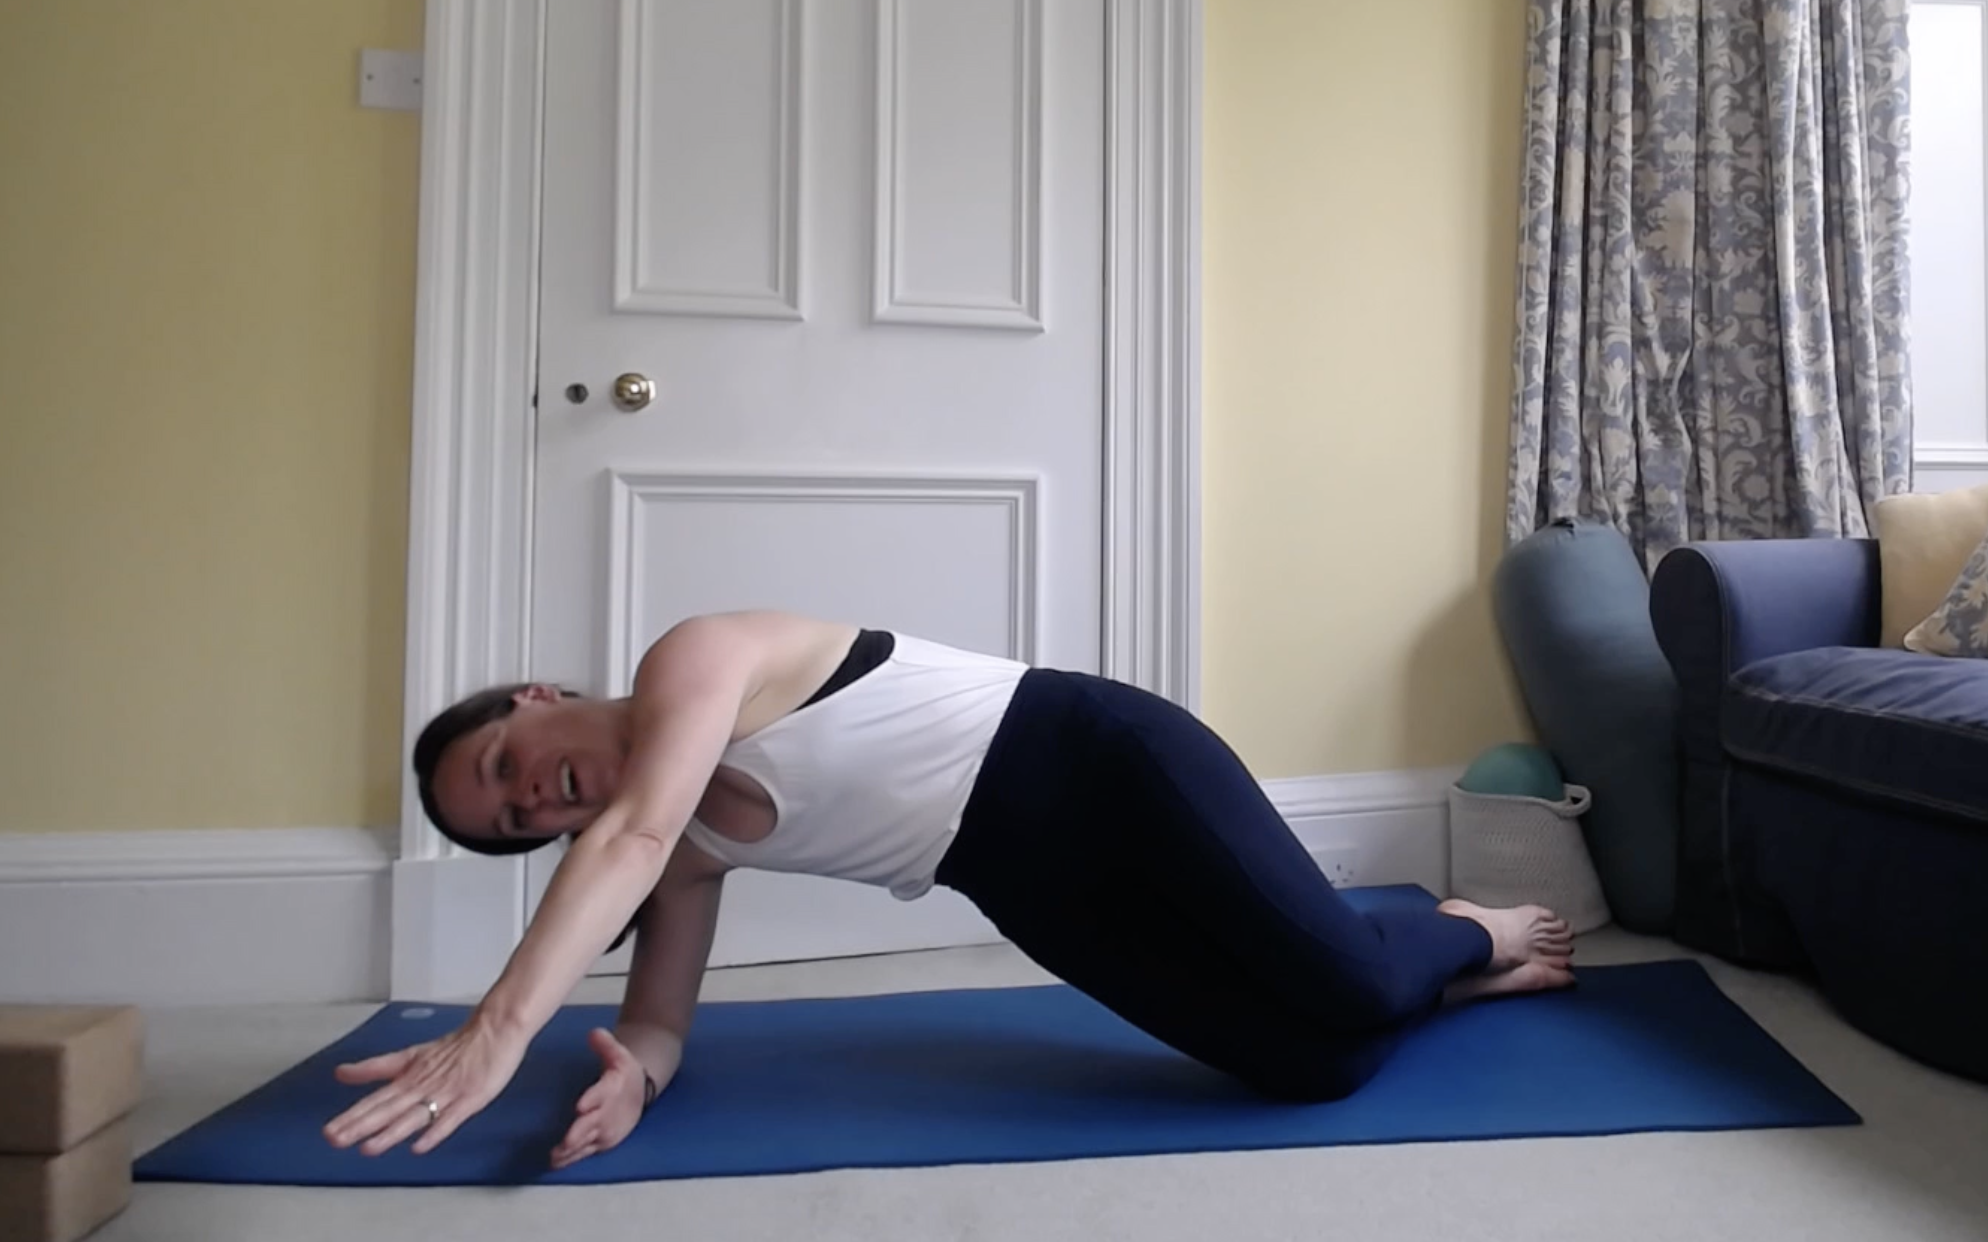
Short lever side plank
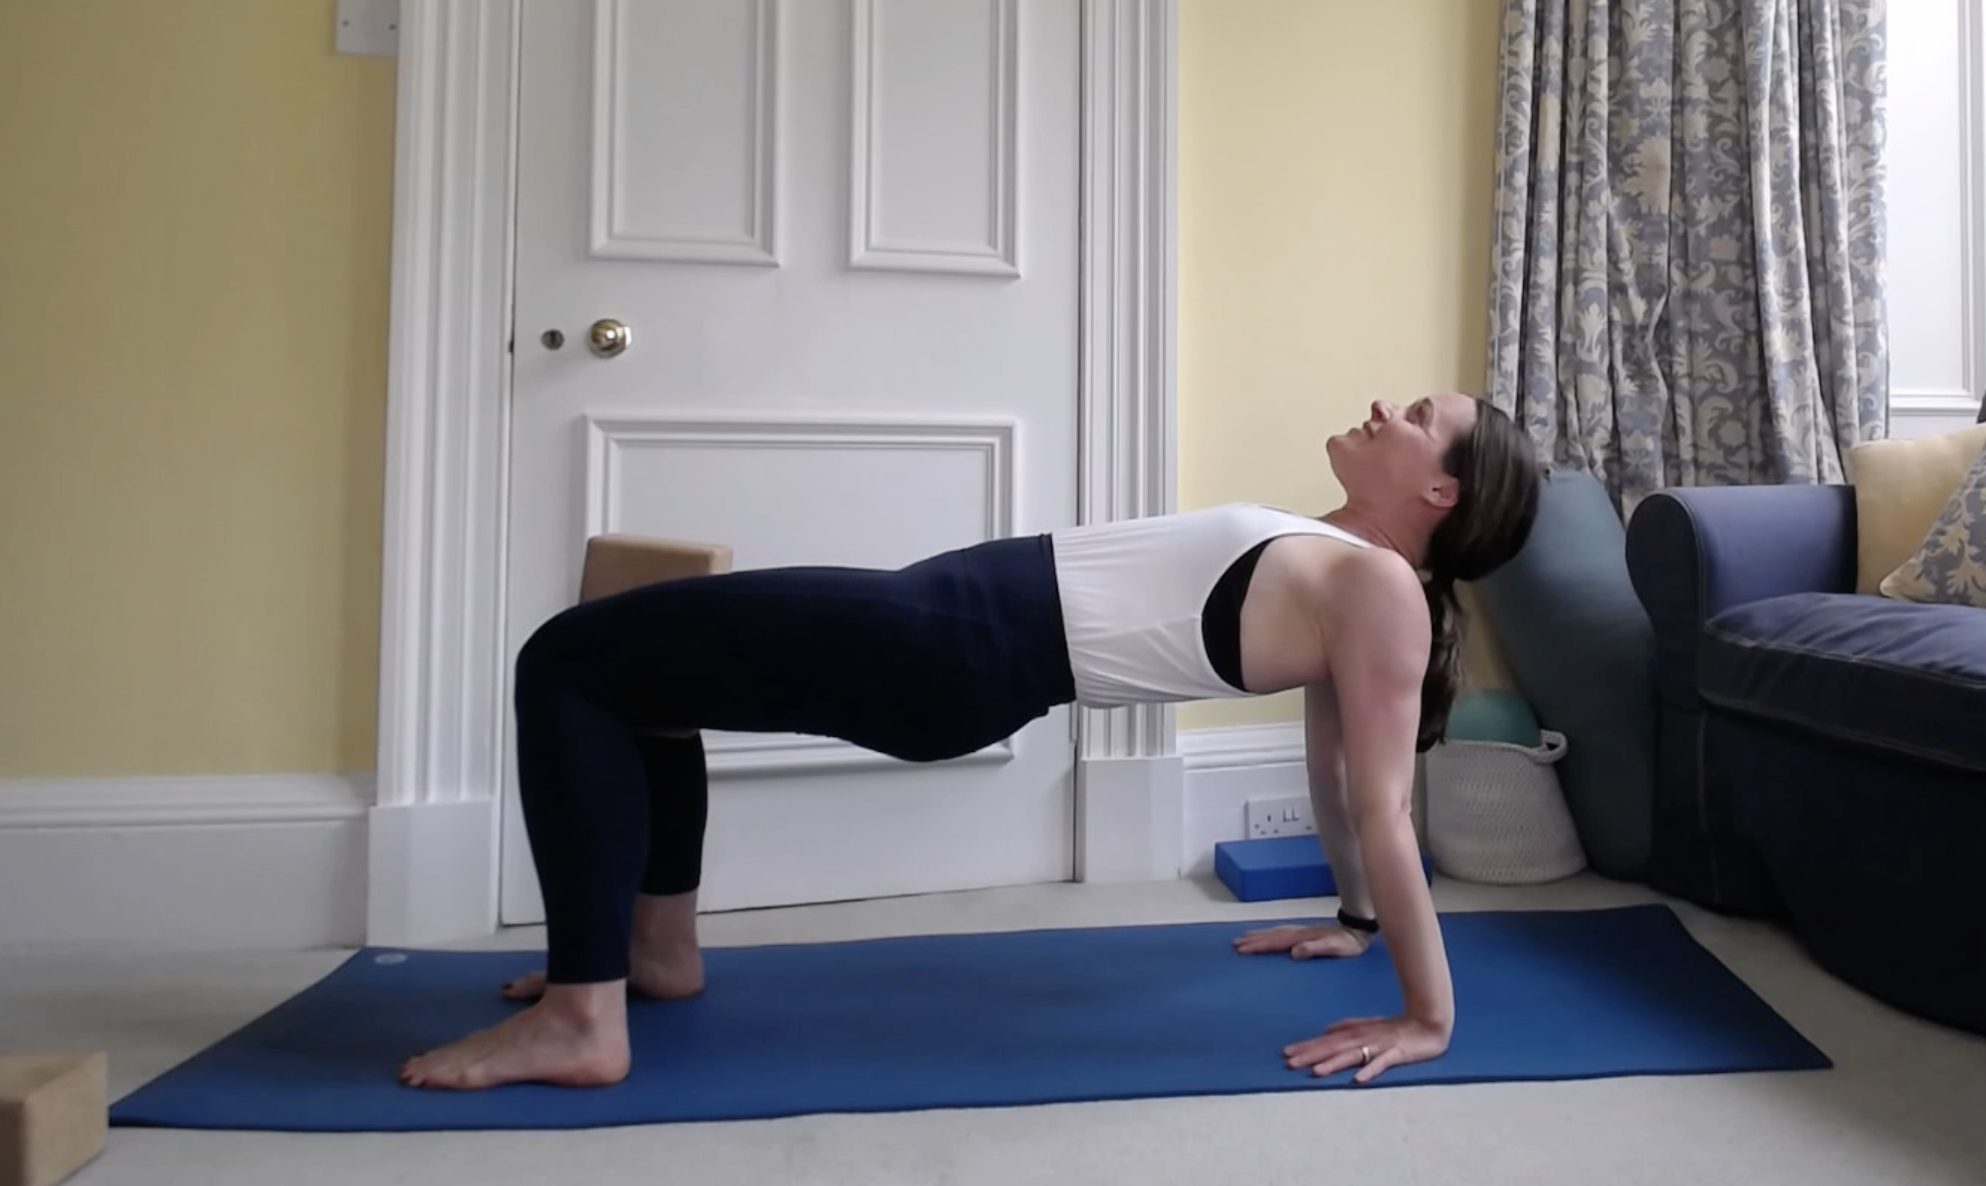
Reverse tabletop
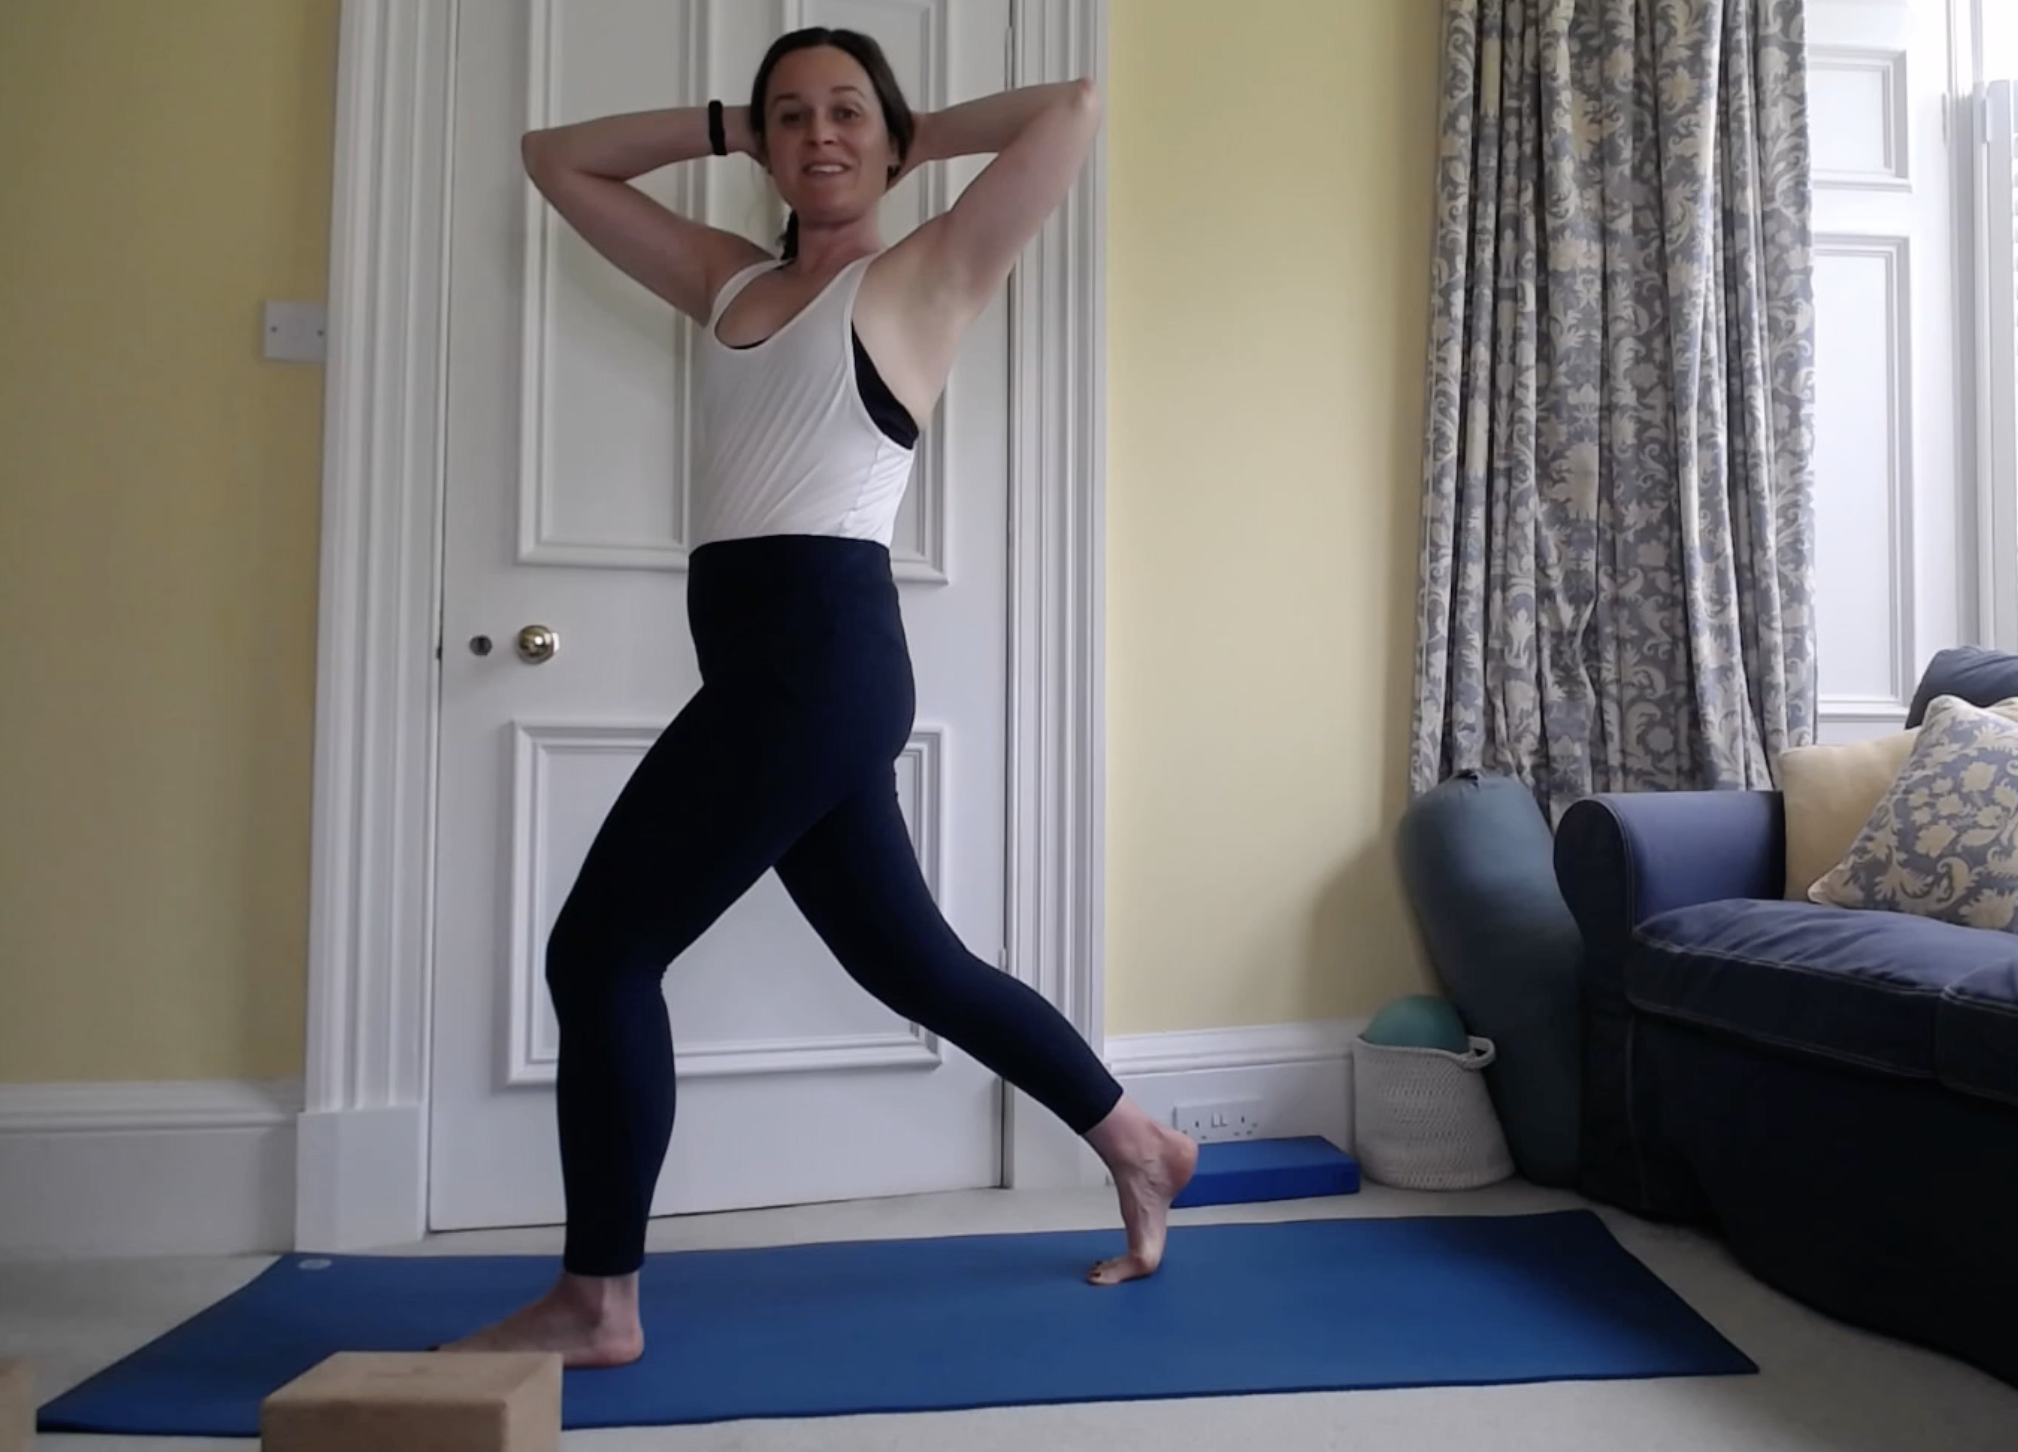
Lunge with rotation
Find the full practice below and save and share with anyone you feel would benefit. Stay tuned for my favourite poses for balanced hip mobility…
Yoga For Glute Strength
Our glutes are the largest and most powerful muscle in our body.
They play a key role in stabilising the pelvis, supporting our upper body, and controlling our lower limbs. They act on the hip joint, and are our most powerful hip extensor.
There is also a huge correlation between decreased glute strength and chronic lower back pain (Amabile & Bolte, 2017).
Put simply, we want strong, well functioning glutes to support us in daily life!
Let’s take a quick look at their anatomy, then delve into yoga poses I love to strengthen the glutes.
We actually have three glute muscles:
Glute maximus: largest and most powerful muscle in body, responsible for hip extension and external rotation. Helps with stability, locomotion and explosive power. Helps us walk, run, climb stairs, go from seated to standing.
Glute medius: a broad, fan-shaped muscle on the lateral (outer) side of the pelvis. Works to abduct and internally rotate the thigh, and is a primary stabiliser of the pelvis during single leg work (eg balance poses such as tree pose, and walking!).
Glute minimus: the smallest and deepest of the glute muscles, it works with the glute medius to abduct (move leg away from midline) and internally rotate the thigh.
With all that in mind, it seems obvious that strong glutes equals a happier, better functioning body, doesn’t it?
Here are some of my favourite yoga poses to wake up and strengthen your glutes…
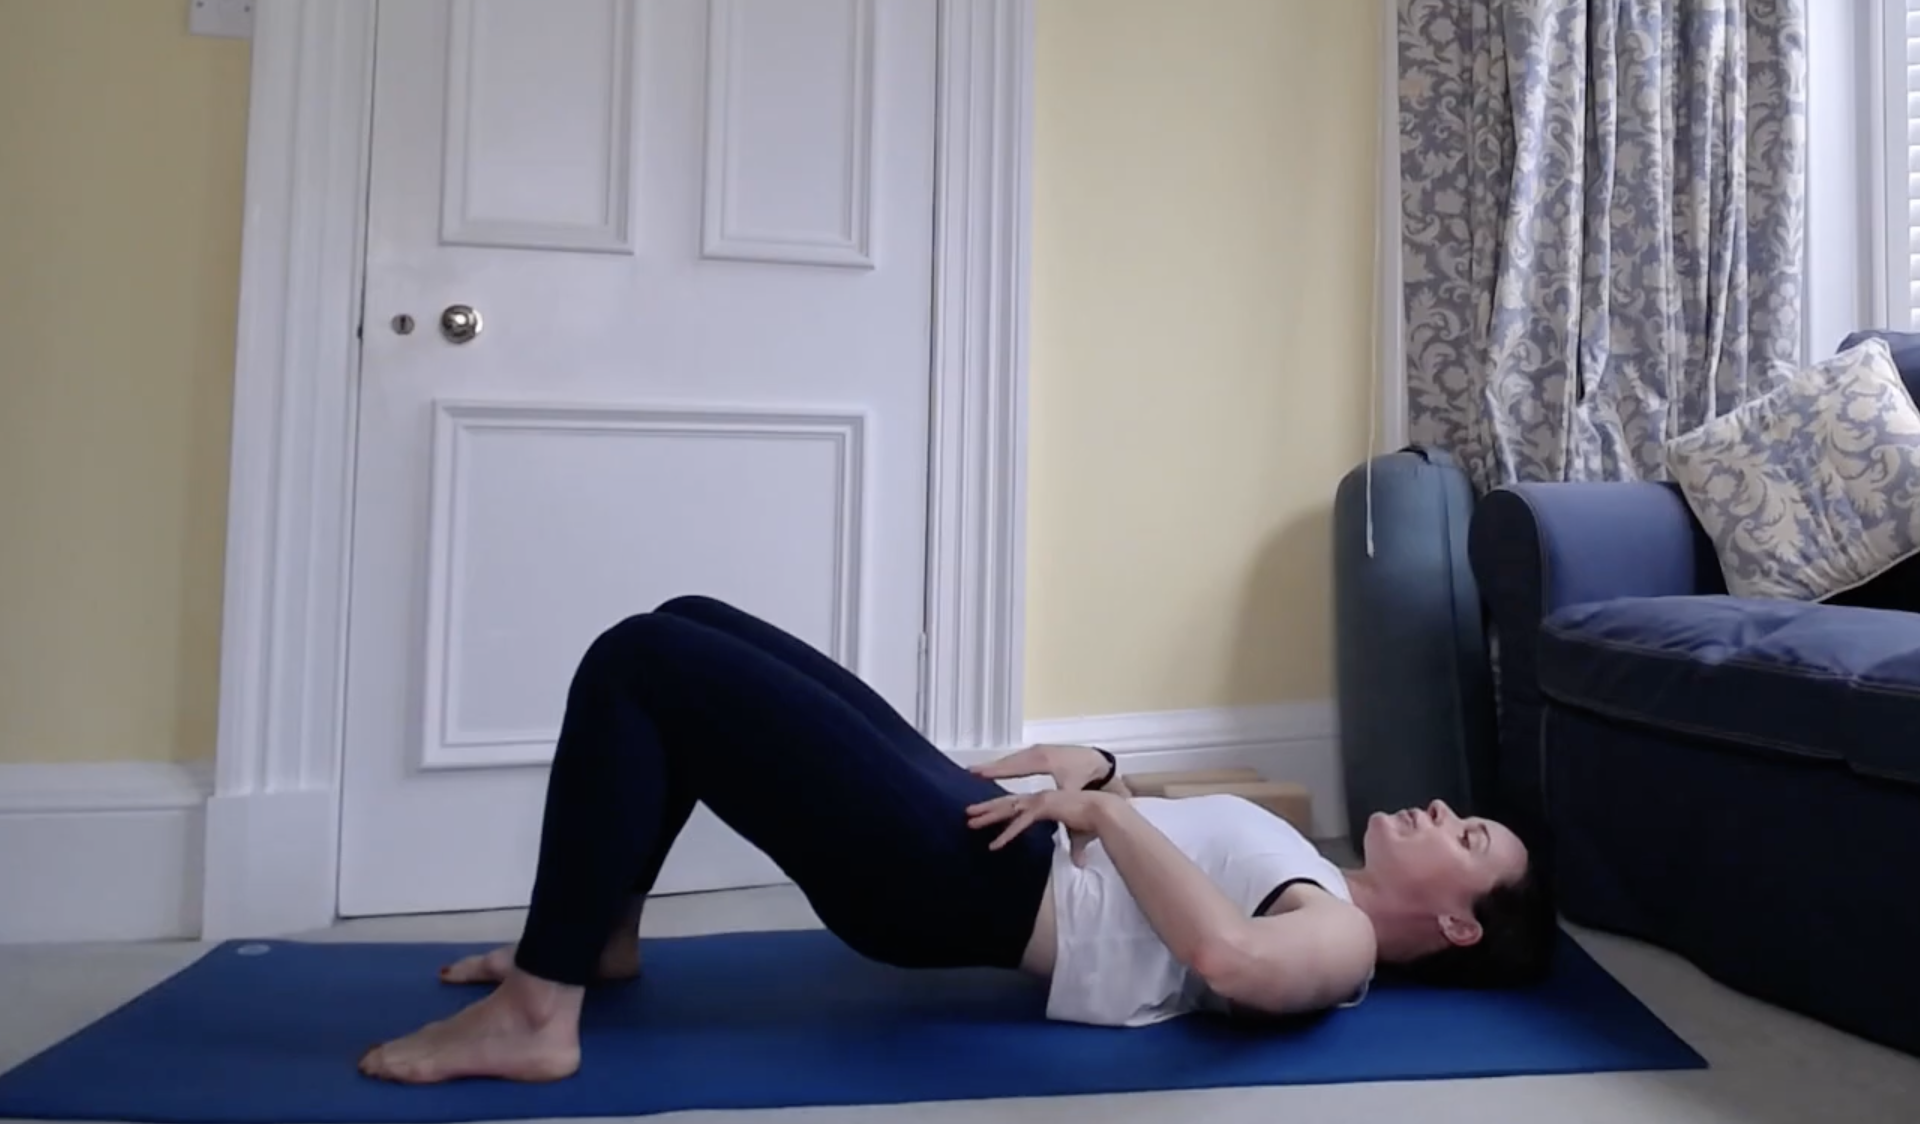
Bridge Pose
Lie on your back, knees bent and feet hip-width apart. Bring your fingertips to your lower ribs and thumbs to front hip bones. Press down through feet to lift hips into low bridge, keeping ribs down and connected to pelvis. Hold for 3-5 breaths.
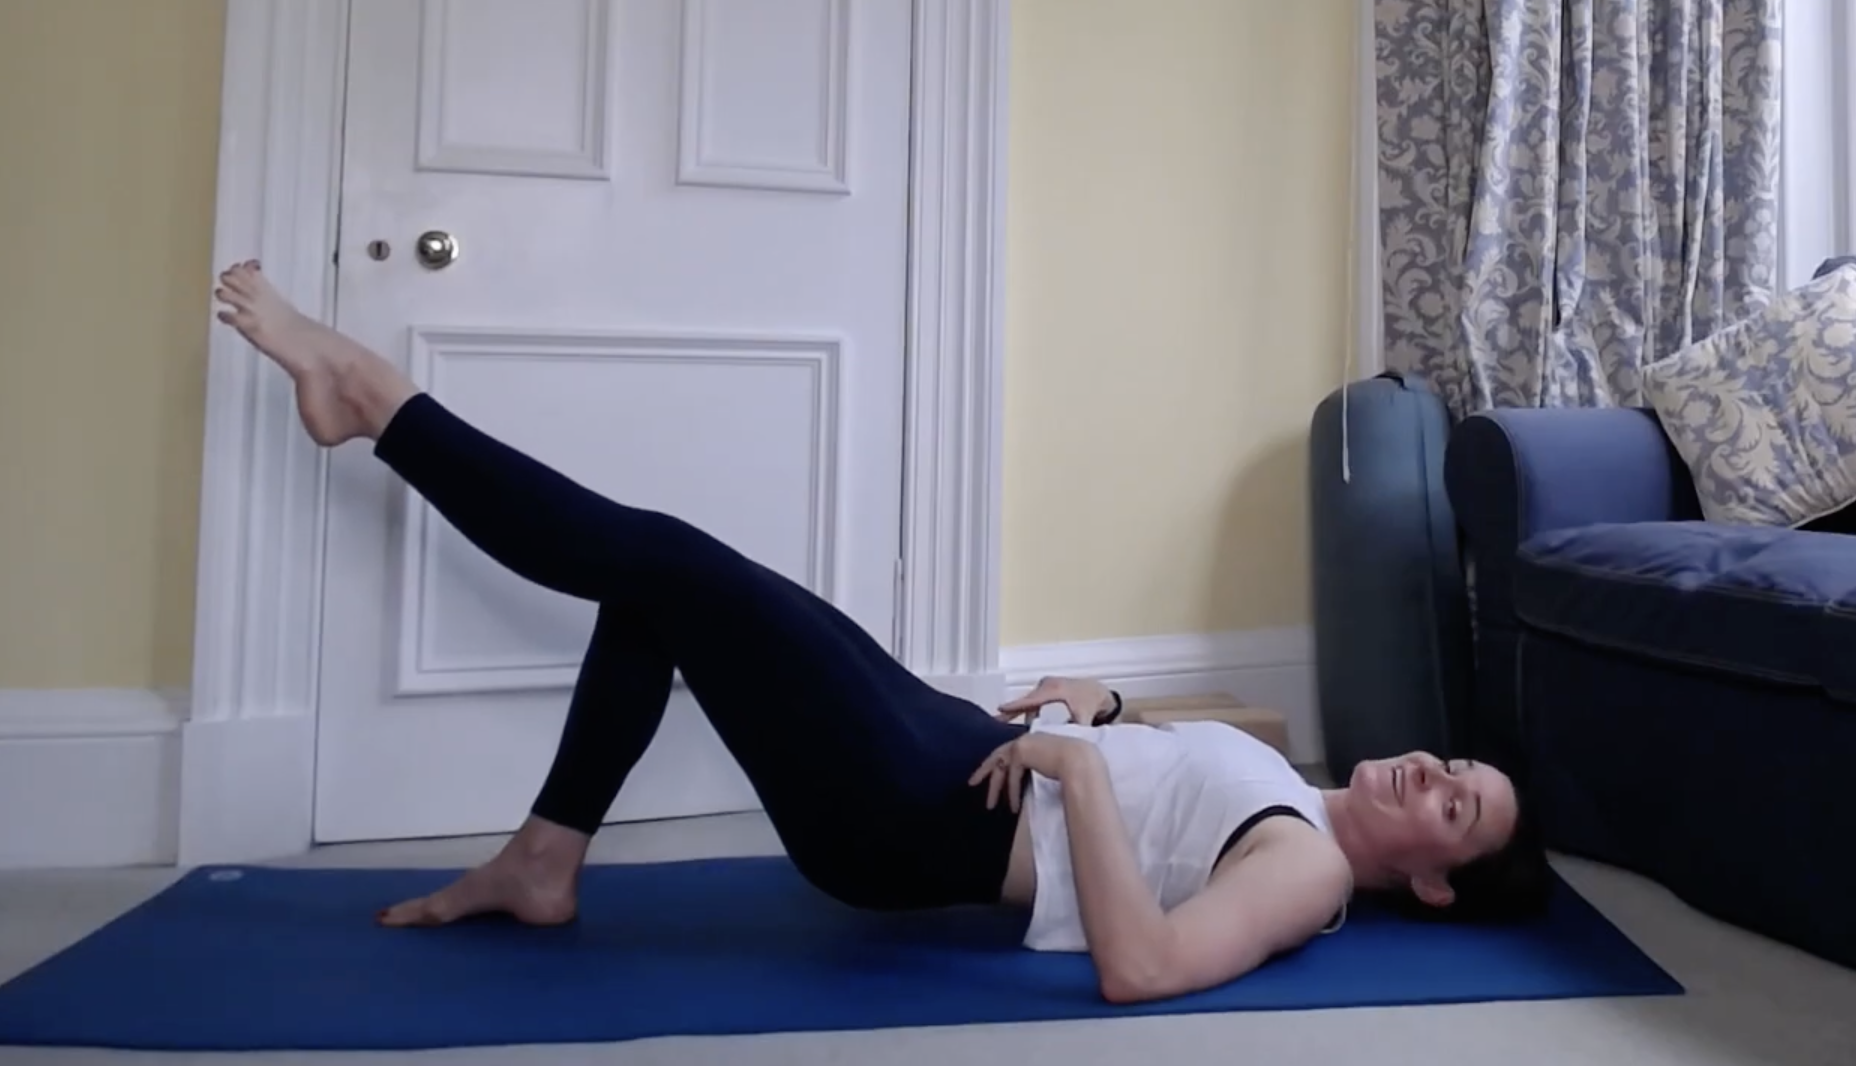
Single Leg Bridge
Set up for bridge pose, then bring feet slightly closer together. Lift into a low bridge pose, fingers on lower ribs and thumbs on front hip bones, then press through right foot and lift left leg straight, keeping thighs parallel. Keep pressing through right heel and hugging right hip in to stabilise pelvis. Hold for 3-5 breaths, switch legs and lower.
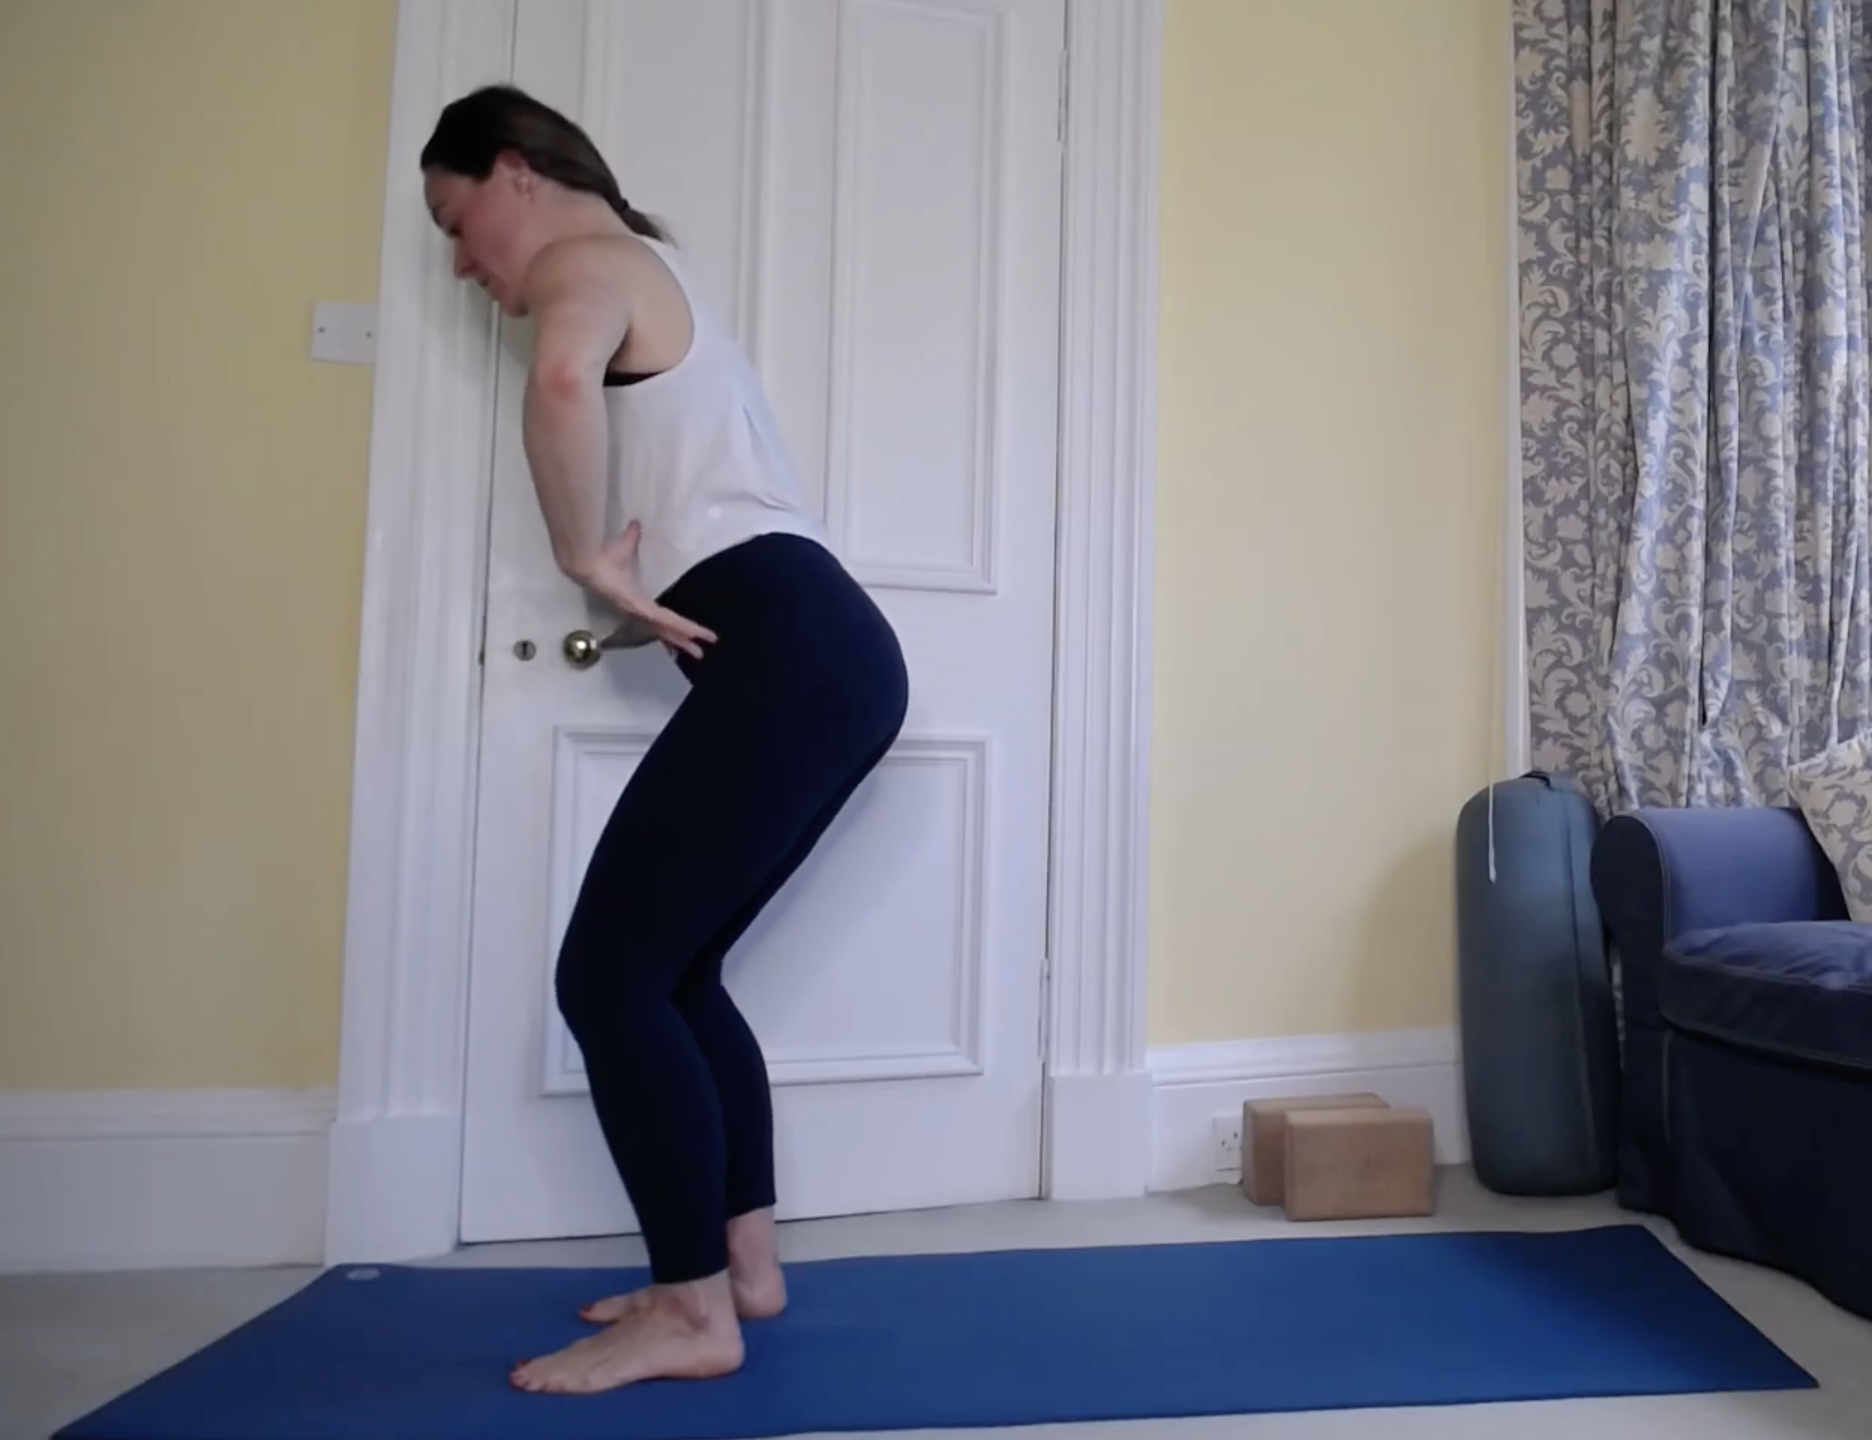
Chair Pose
Stand tall, feet a comfortable width for you, then bend your knees and lower your hips as if you were going to sit in a chair. See if you can keep ribs and pelvis stacked, really opening up through back of glutes while keeping space in the lower back. Press the thighs outwards into an imaginary belt. Can you shift the weight back into the heels a bit more? Hold for 3-5 breaths.
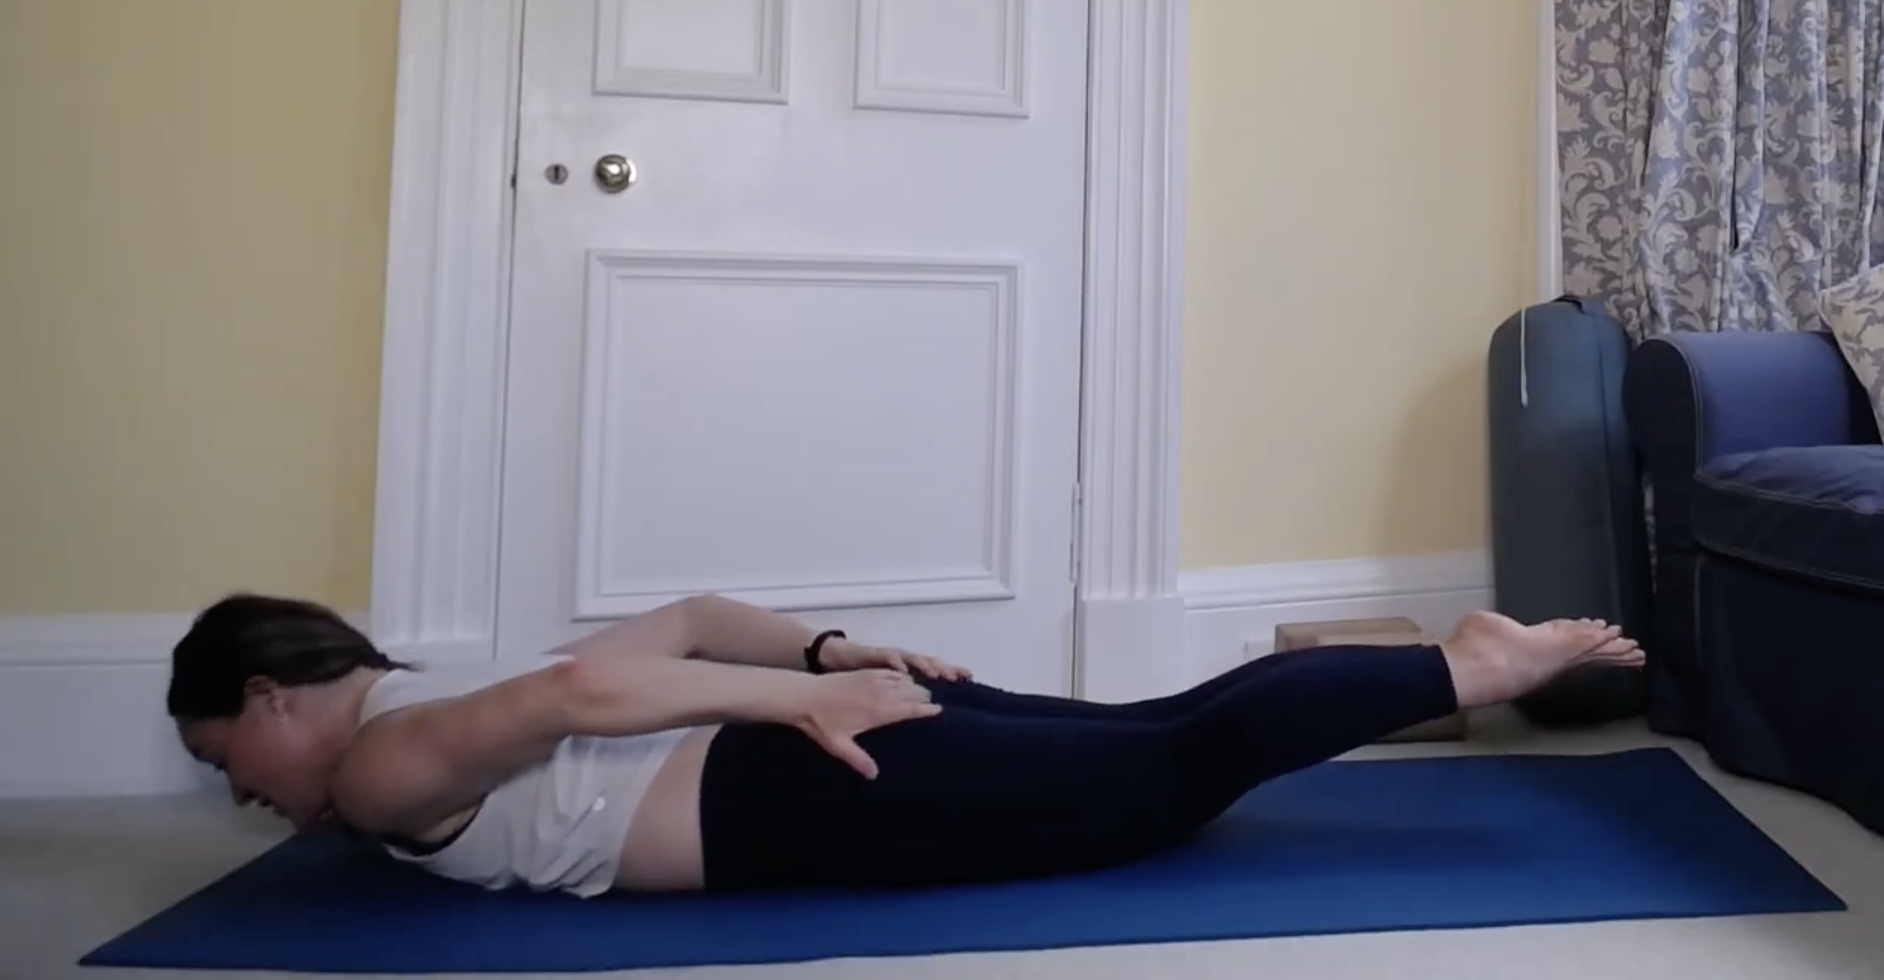
Locust Pose
Lying on your belly, bring your arms alongside you palm side down. Bring the inner edges of the feet to touch (can keep feet hip-width if more comfortable), exhale and lift your legs. Keep drawing the front hip bones towards the ribs, focusing on the lift coming from the glutes rather than the lower back and pelvis tipping forward. This can be humbling, I know firsthand! You can also bring your hands to your glutes to really connect to and wake them up.
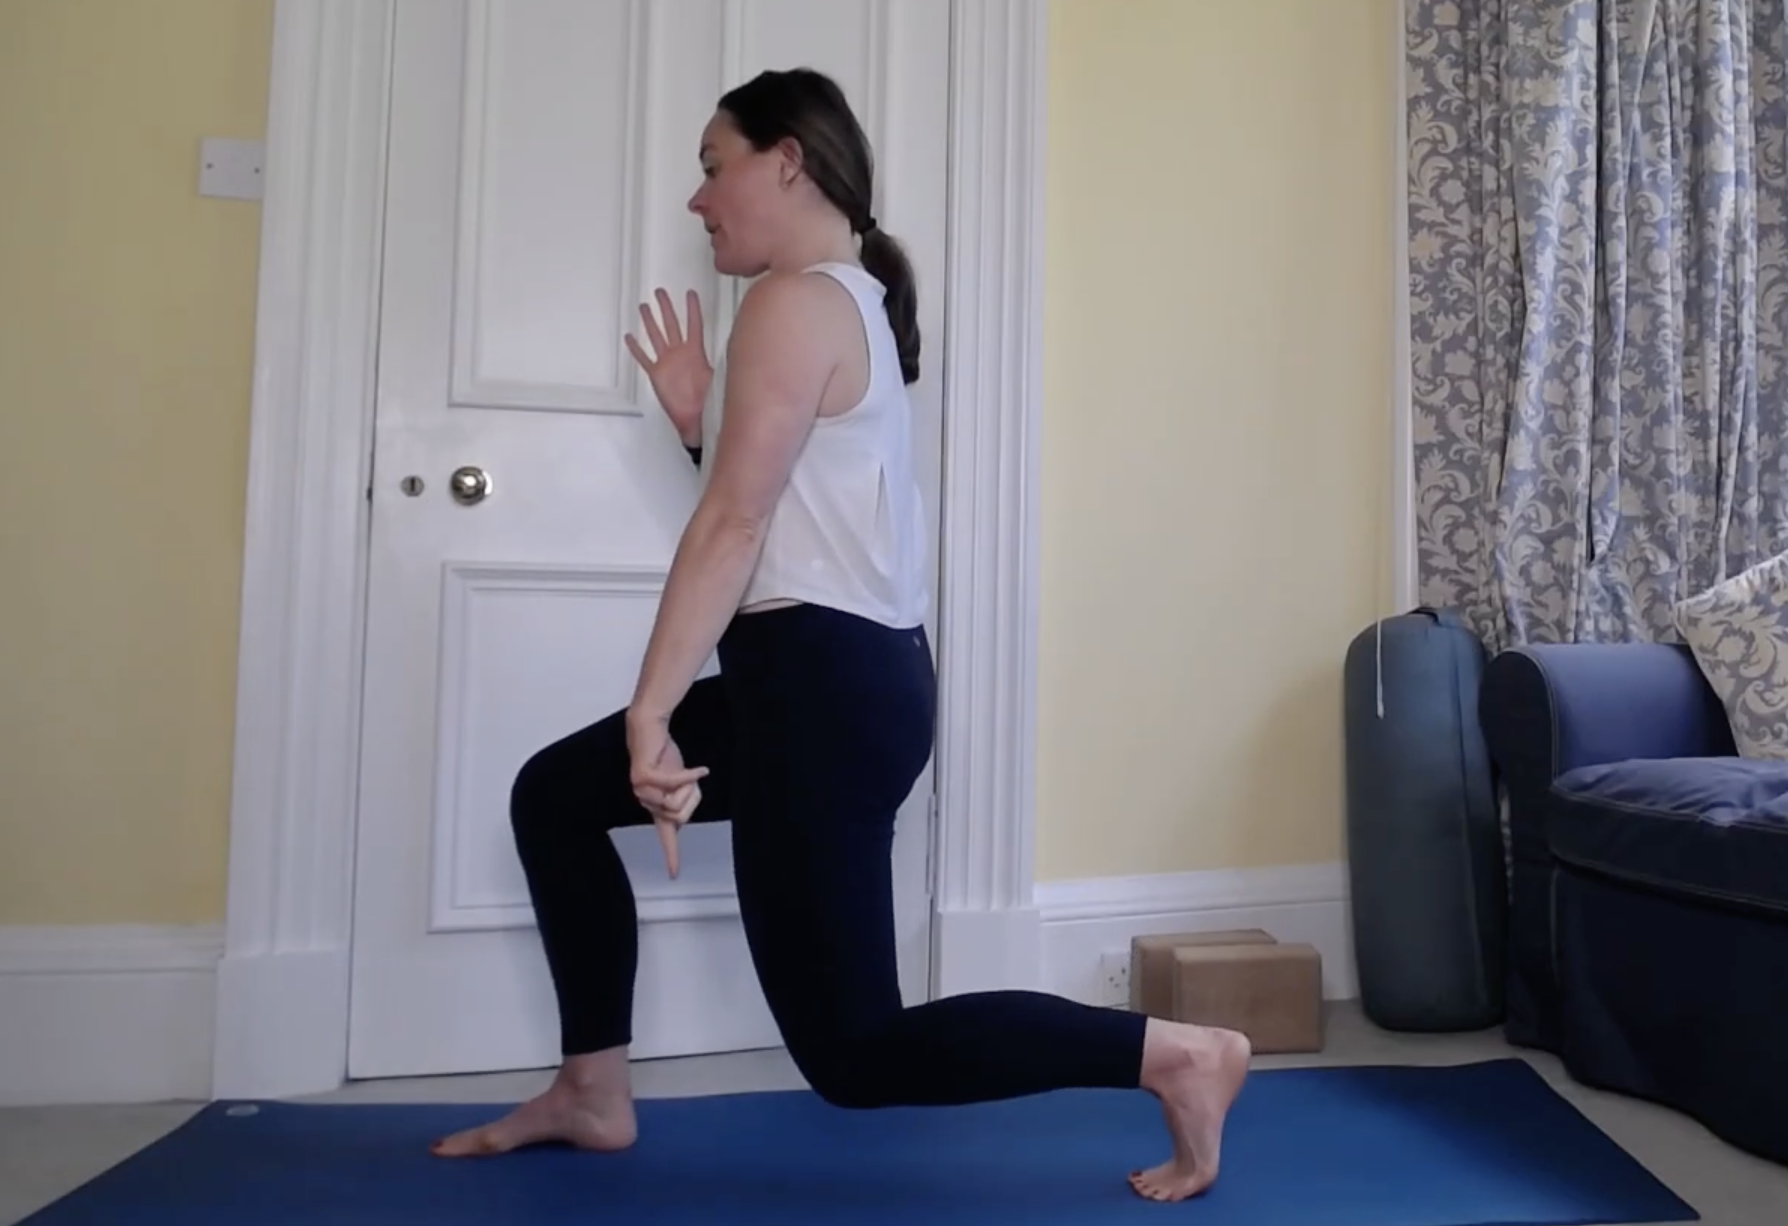
Lunge Pulses
Come into a crescent lunge. Inhale and bend the back knee straight down. Exhale and press through heel and big toe of front foot to come back up. Repeat 5 times, moving with the breath and focusing on that foot to hip connection. Switch sides.
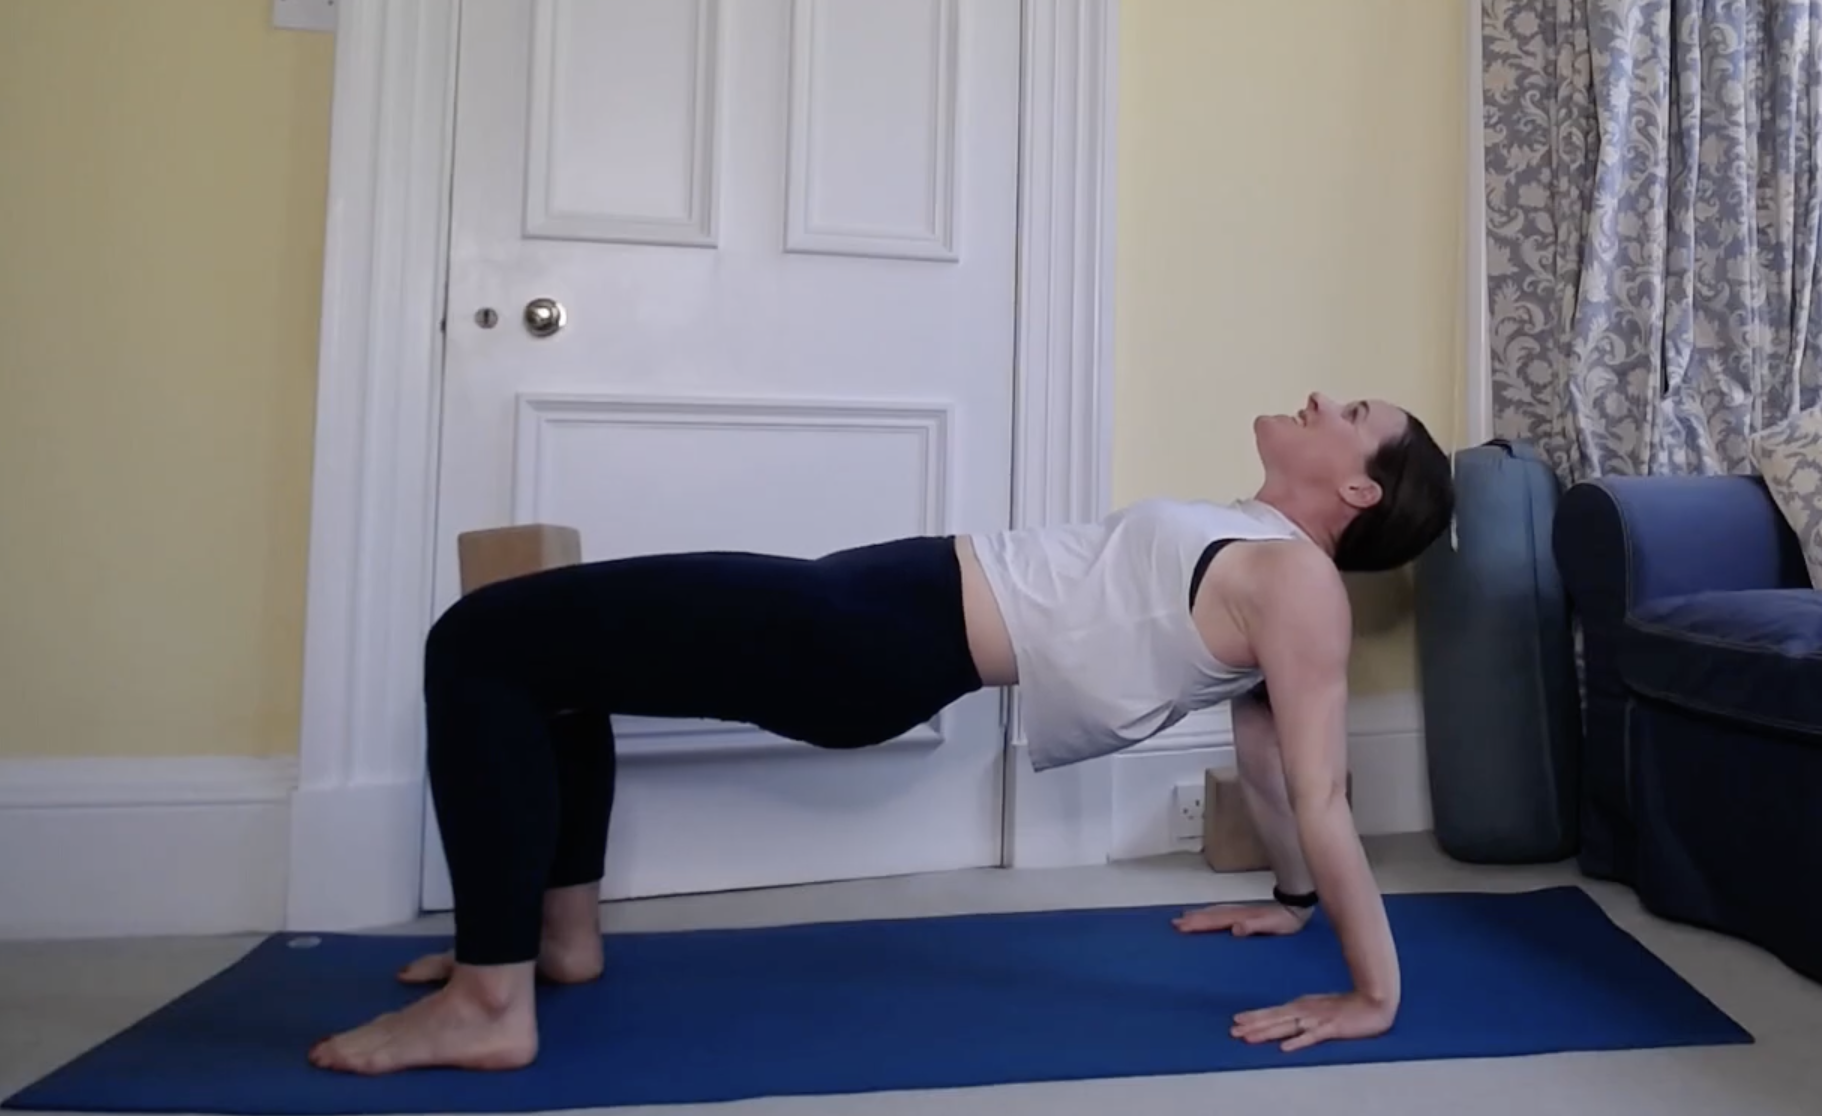
Reverse Tabletop
Sit with the knees bent, feet hip-width apart and bring your hands behind you, fingertips pointing forwards. Option to place a block or cushion between the thighs. As you exhale, lift the hips, driving down through the heels to firm the glutes and open the front of the hips.
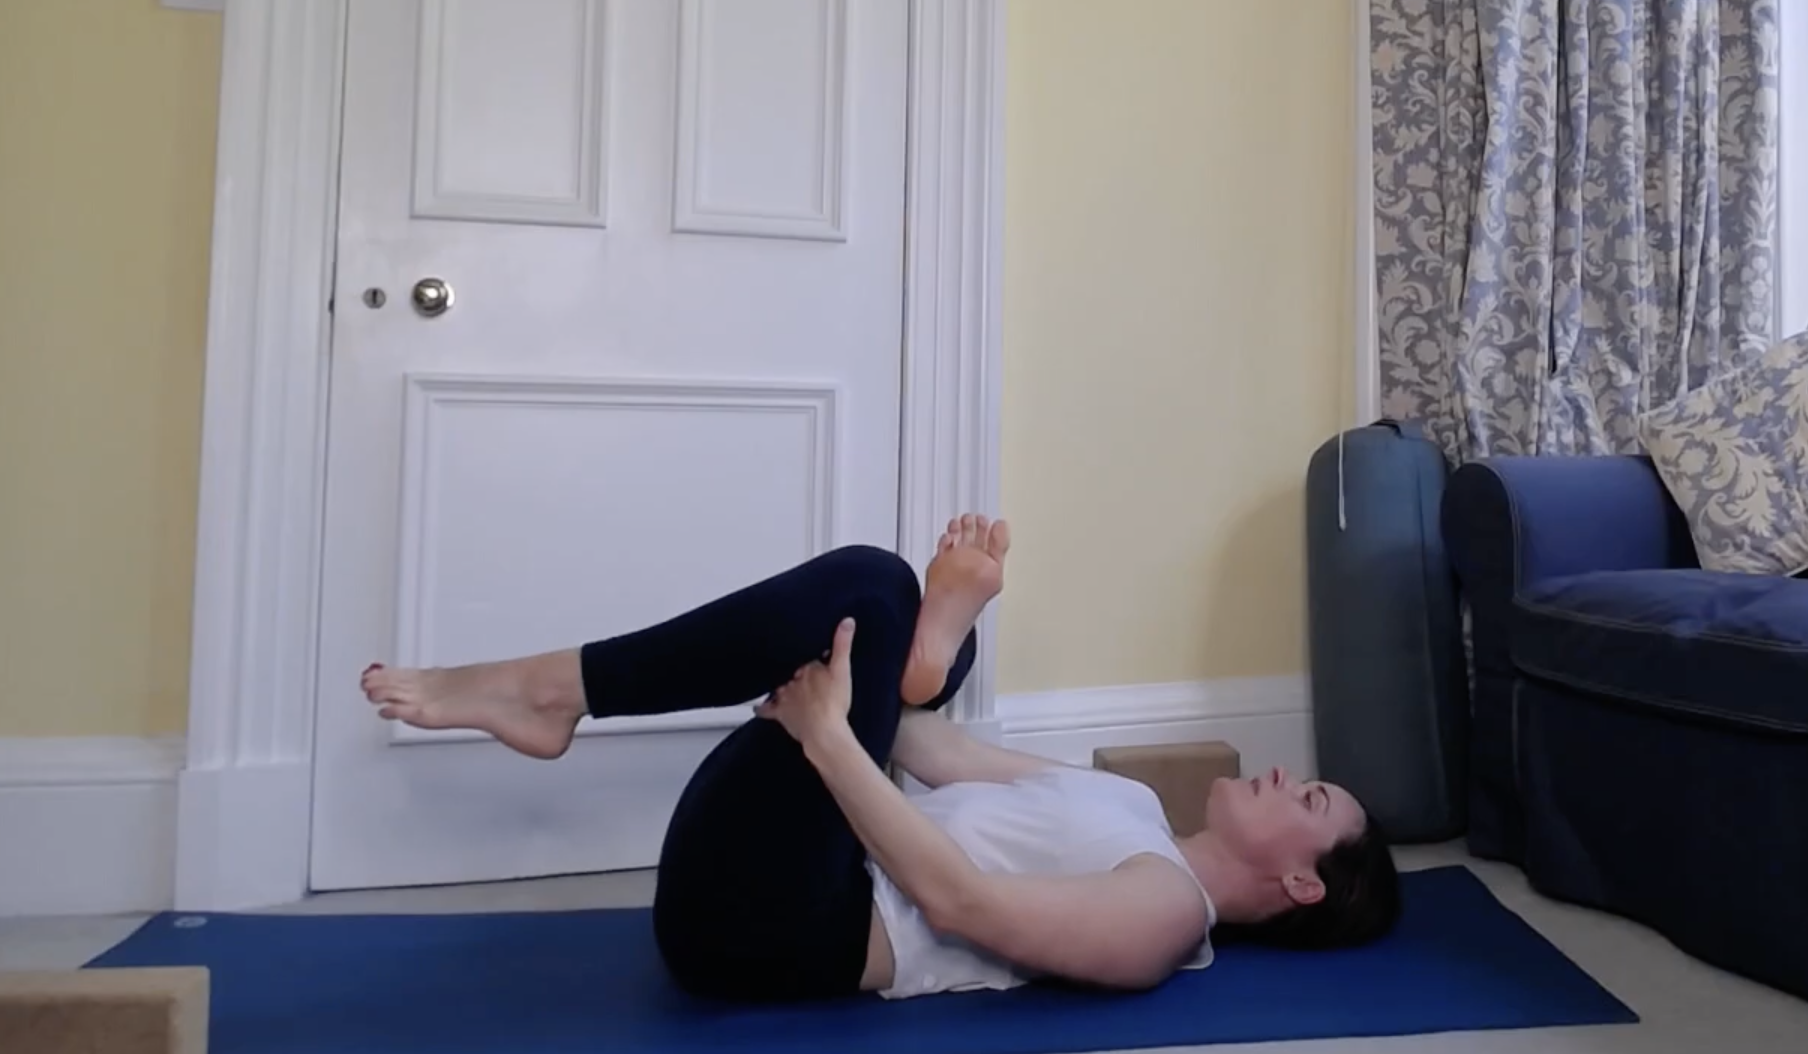
Reclined Pigeon
After all of that, lie on your back with your knees bent. Cross your right ankle over your left knee and draw the thigh in. Hold for 5 breaths, softening the jaw, relaxing the throat and letting the glutes unwind. Switch sides.
If you enjoyed that, try the short practice below!
Yoga For Hamstring Strength
Yogis, we need to talk about our hamstrings.
Vinyasa yoga tends to be full of poses that stretch our hamstrings, such as reclined hand-to-big toe, downward dog, pyramid pose, half splits, forward folds, splits (I could keep going…).
Granted, while this can feel great, it’s important to also consider function: for a muscle to be truly strong, we need that balance of strength and flexibility.
Firstly, let’s look at the anatomy. Then, we’ll explore a few ways we can wake up and strengthen the hamstrings in our yoga practice.
Our hamstrings are a group of three muscles – the semitendinosus, semimembranosus and biceps femoris – that run from the sitting bones, down the back of the thighs, crossing the knee and attaching into the lower leg.
Their primary job is to flex the knee, extend the hip, and they also help internally rotate the lower leg when the knee is bent (semimembranosus and semitendinosus), and externally rotate the lower leg when the knee is bent (biceps femoris).
They also play an important role in pelvic position, directly influencing our posture and back health.
So, while it is important to lengthen the hamstrings, we also want to learn how to engage them, to create balanced strength and aid the health of our knees, hips and lower back.
Here are five ways we’ve been waking up our hamstrings in class this week:
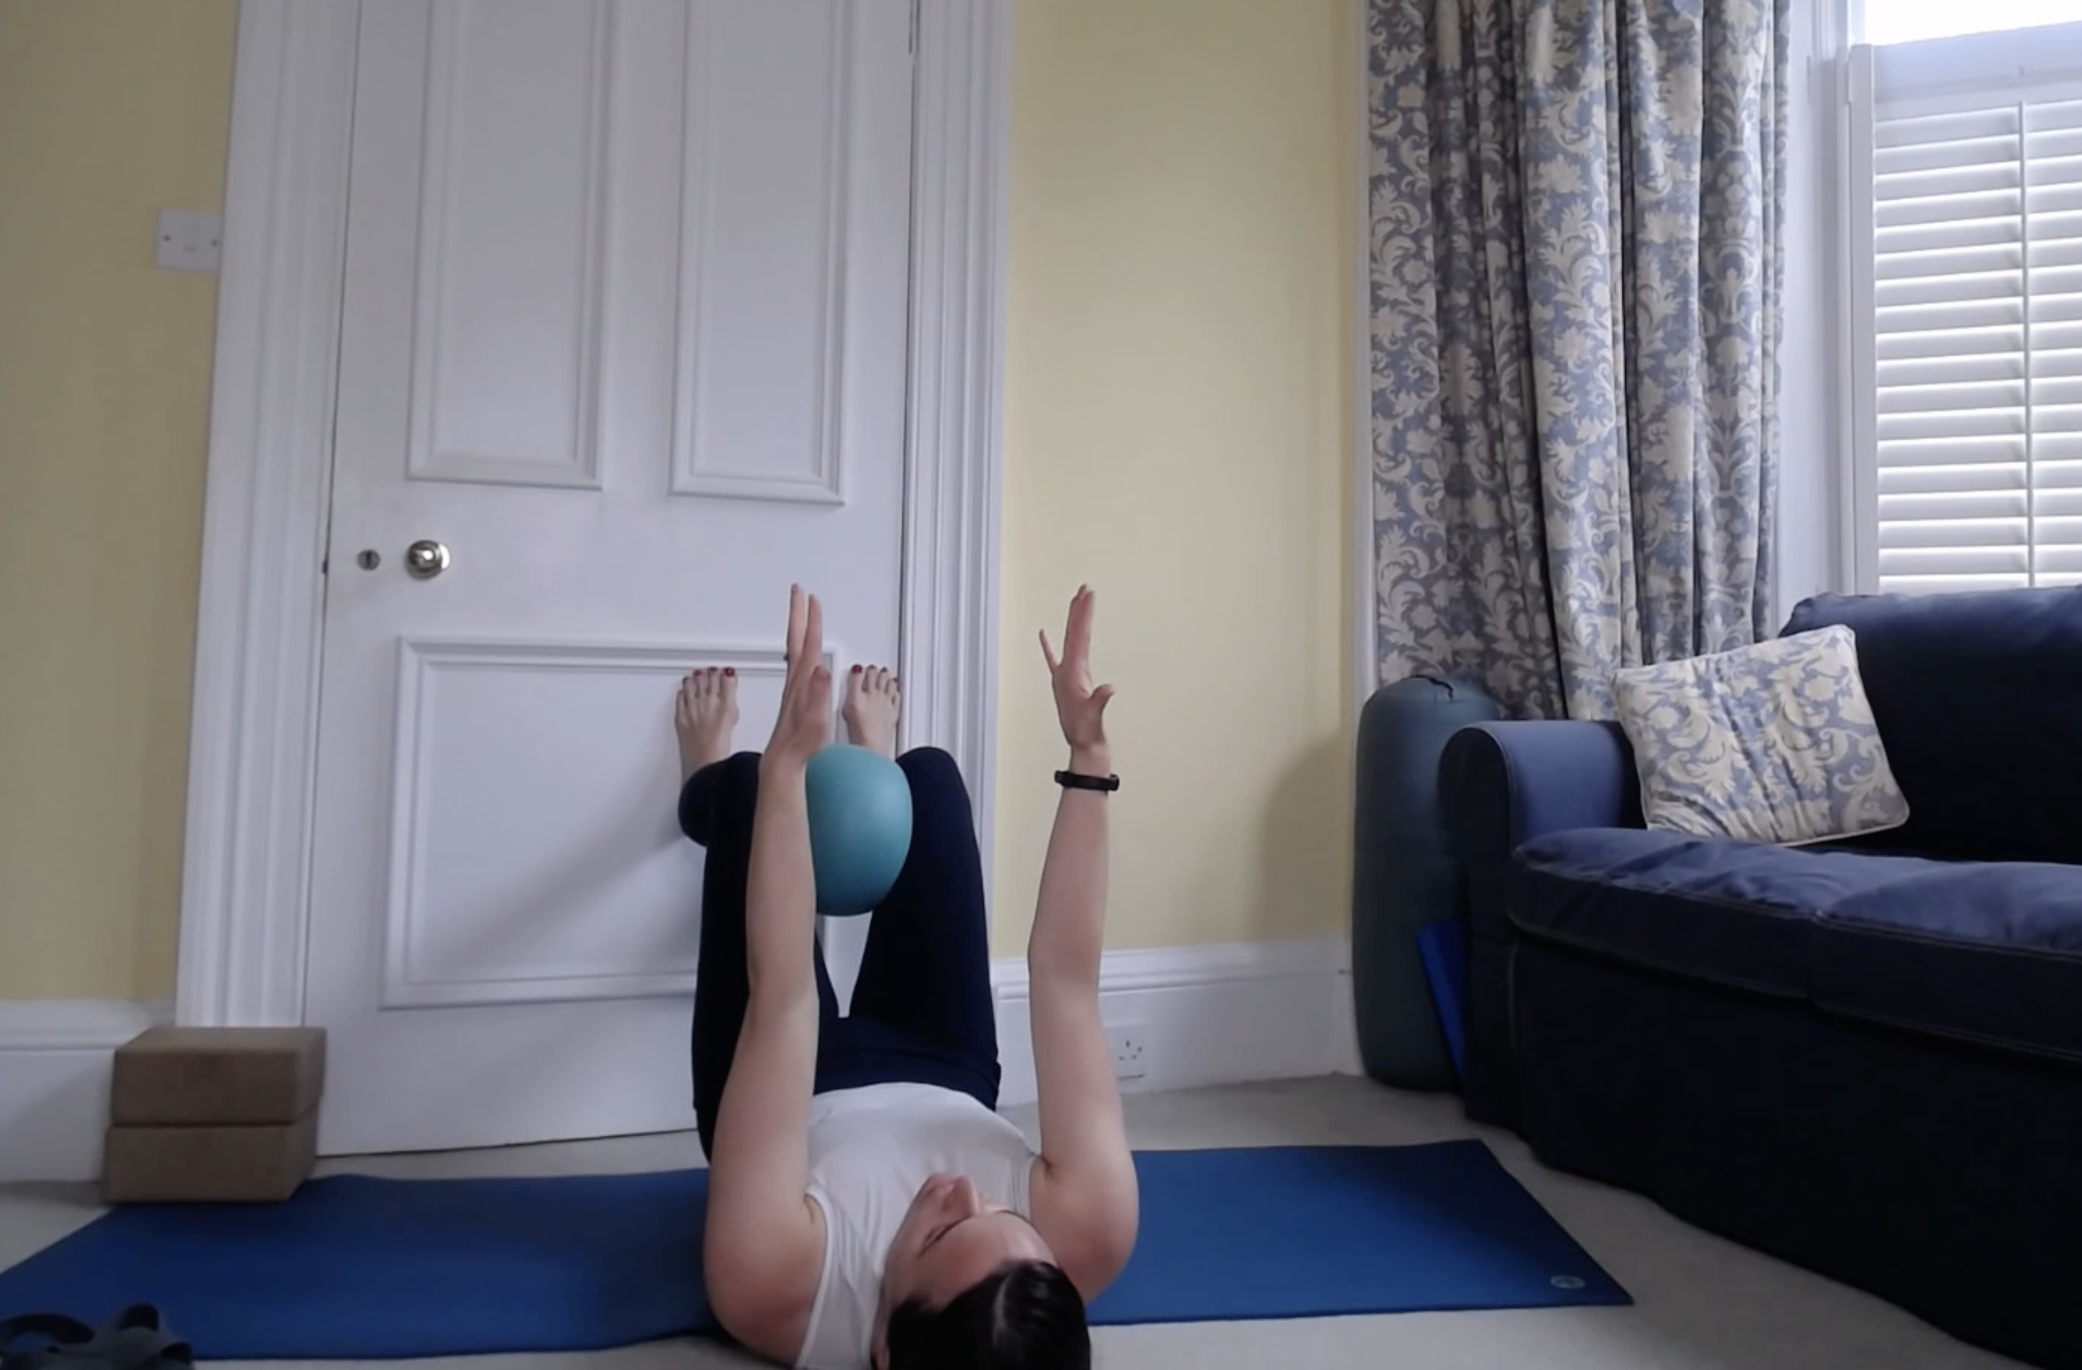
90/90 With Hamstring Drag
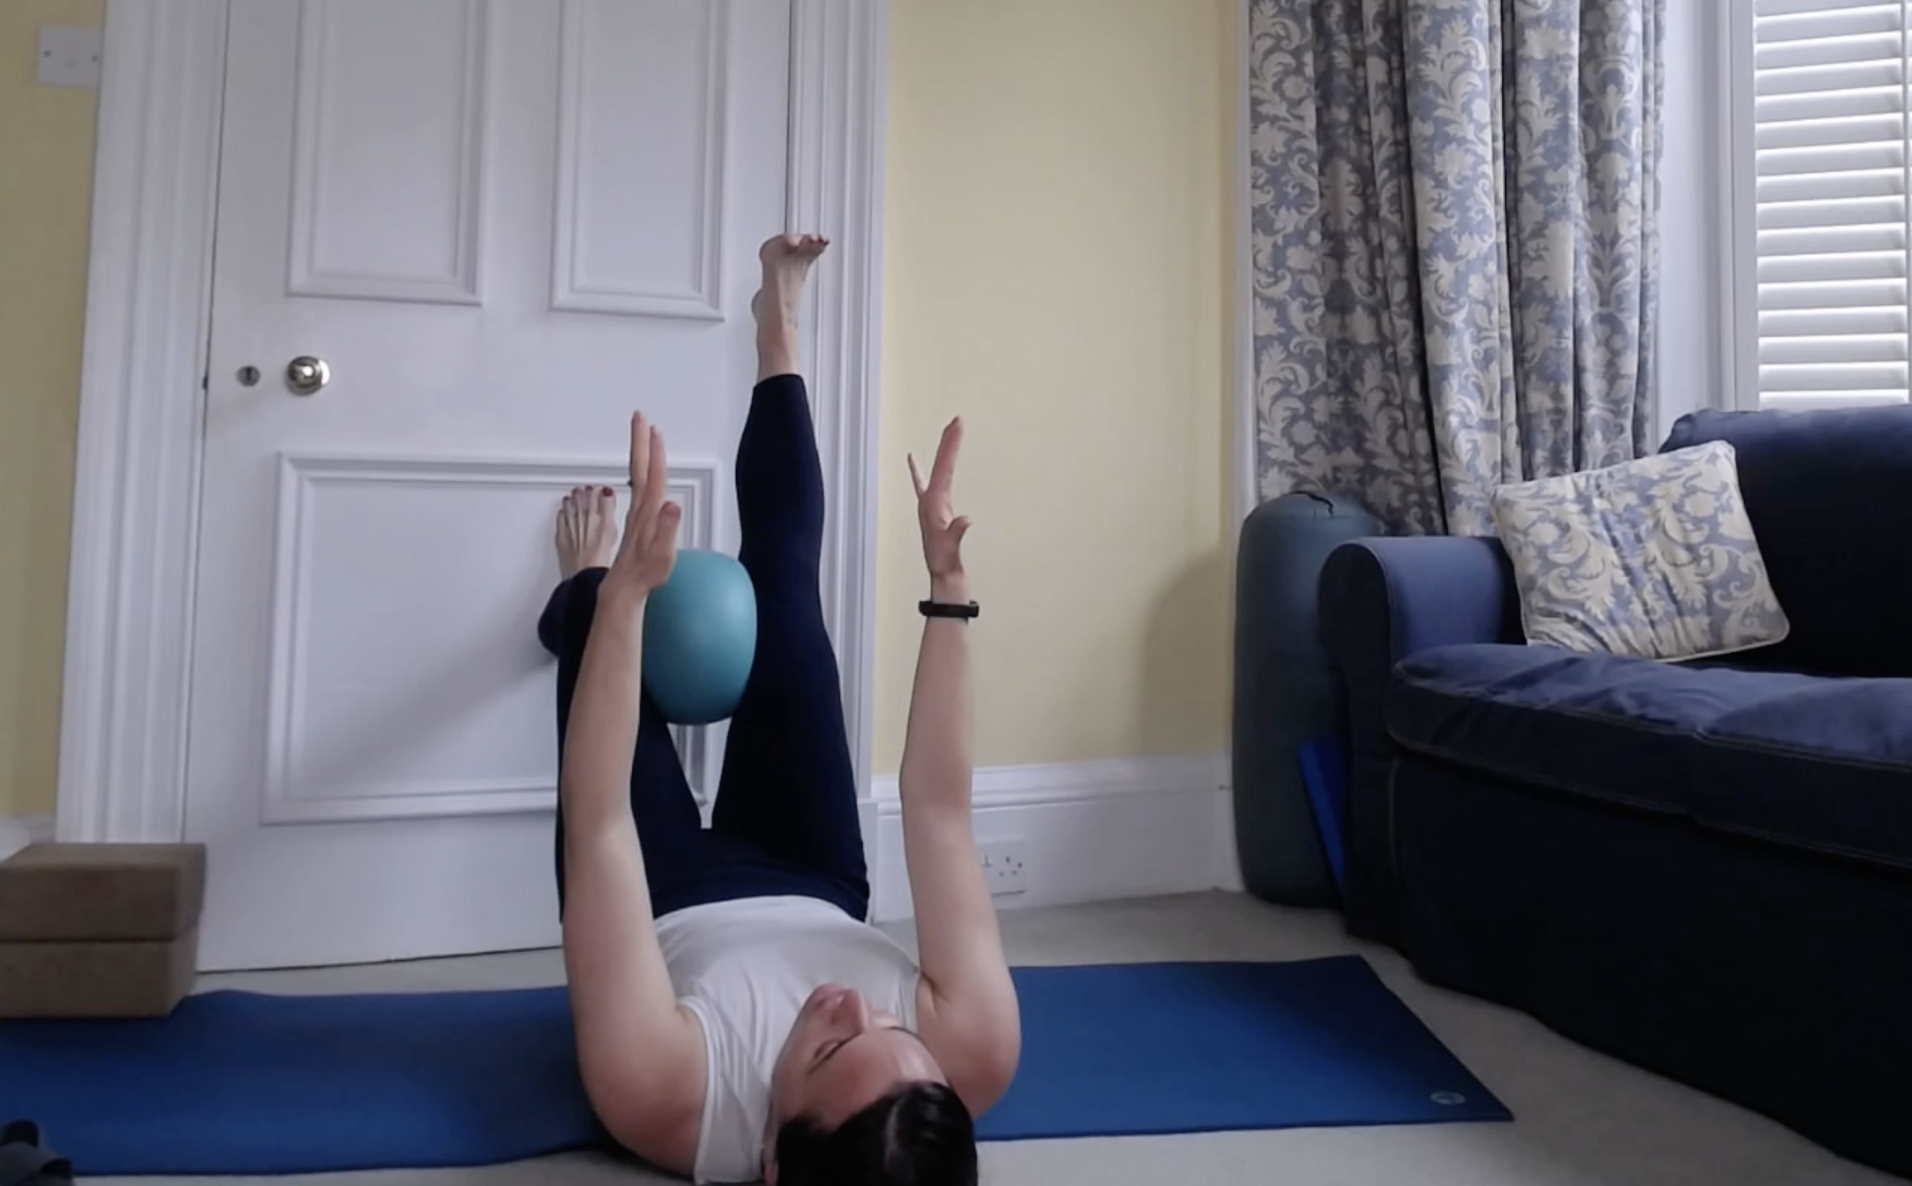
Come to the wall, and lie down with your legs at a 90 degree bend, knees stacked over hips and feet on the wall, shins parallel to the floor. Place a ball, yoga block, cushion or towel roll between the thighs, and an optional cushion under the head to support the neck. Press your feet into the wall, then ‘drag’ your heels down, peeling the back pelvis half an inch or so off the mat. Gently hug the ball, raise your arms to the sky to create back expansion, and hold for 3-5 breaths, lower and release.
90/90 with Single Leg Hamstring Drag
Come into the 90/90 set-up (as above). Press your feet into the wall, then ‘drag’ your heels down, peeling the back pelvis half an inch or so off the mat. Gently hug the ball, raise your arms to the sky to create back expansion, and point your left leg to the ceiling. Keep the pelvis stable and hold for 3-5 breaths, lower and release, then repeat with the second side.
Hamstring Bridge
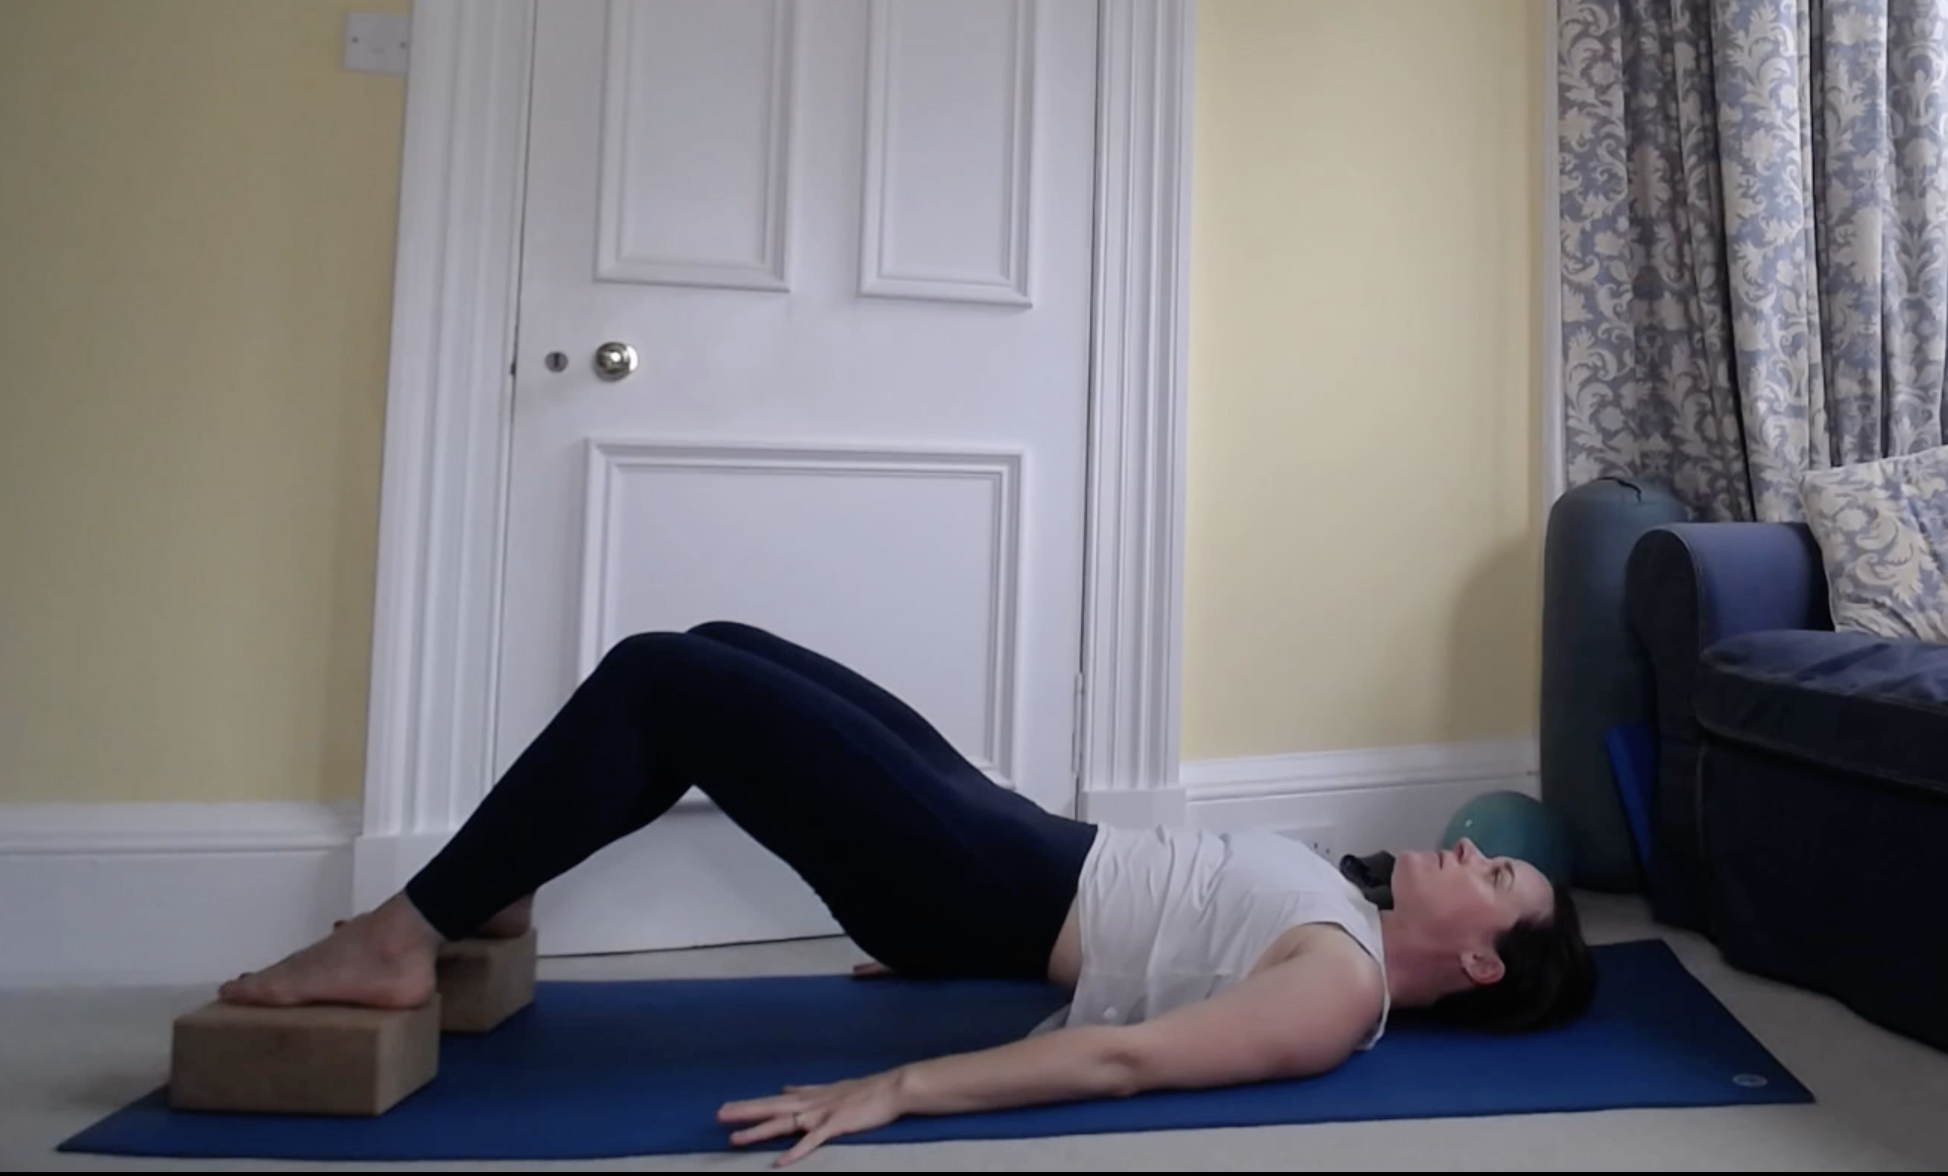
Place two yoga blocks (or firm books) at the top of your mat, hip-width apart. Lie down in an elongated bridge set-up, legs bent to about 45 degrees (rather than ankles under knees), with your feet on the blocks. As you exhale, lift yourself into a low bridge, lengthening the tailbone towards the knees, driving through the heels, and keeping ribs and pelvis connected. Hold for 3-5 breaths.
Single Leg Hamstring Bridge
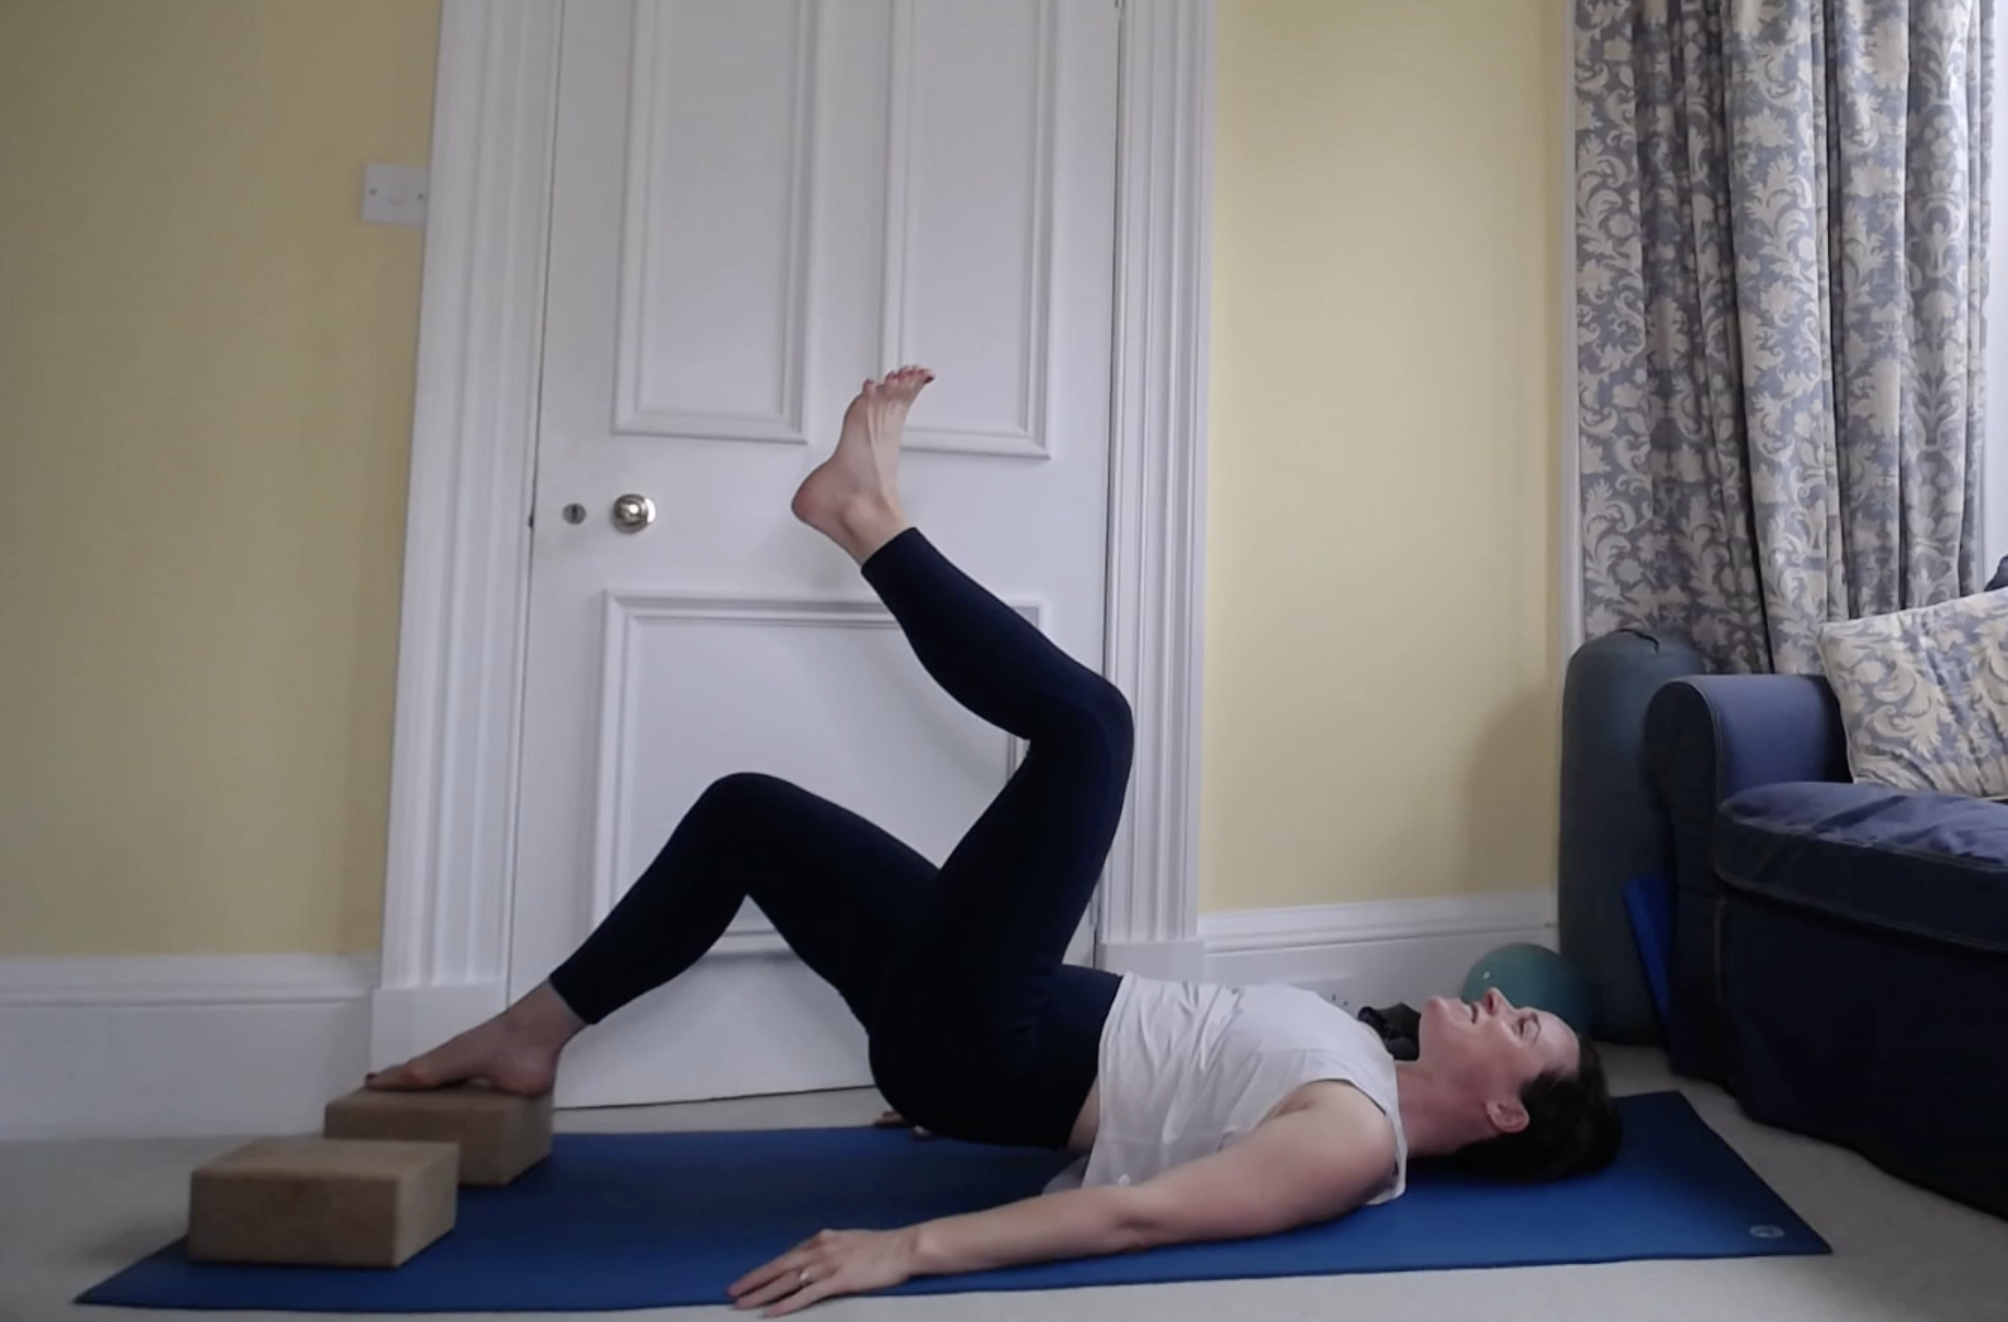
Set up your hamstring bridge. As you exhale, lift yourself into a low bridge, lengthening the tailbone towards the knees, driving through the heels, and keeping ribs and pelvis connected. Press firmly through the left heel and lift the right leg (start bent, can work to straight), and hold for 3-5 breaths. Repeat with the second side.
Tabletop Hamstring Curl
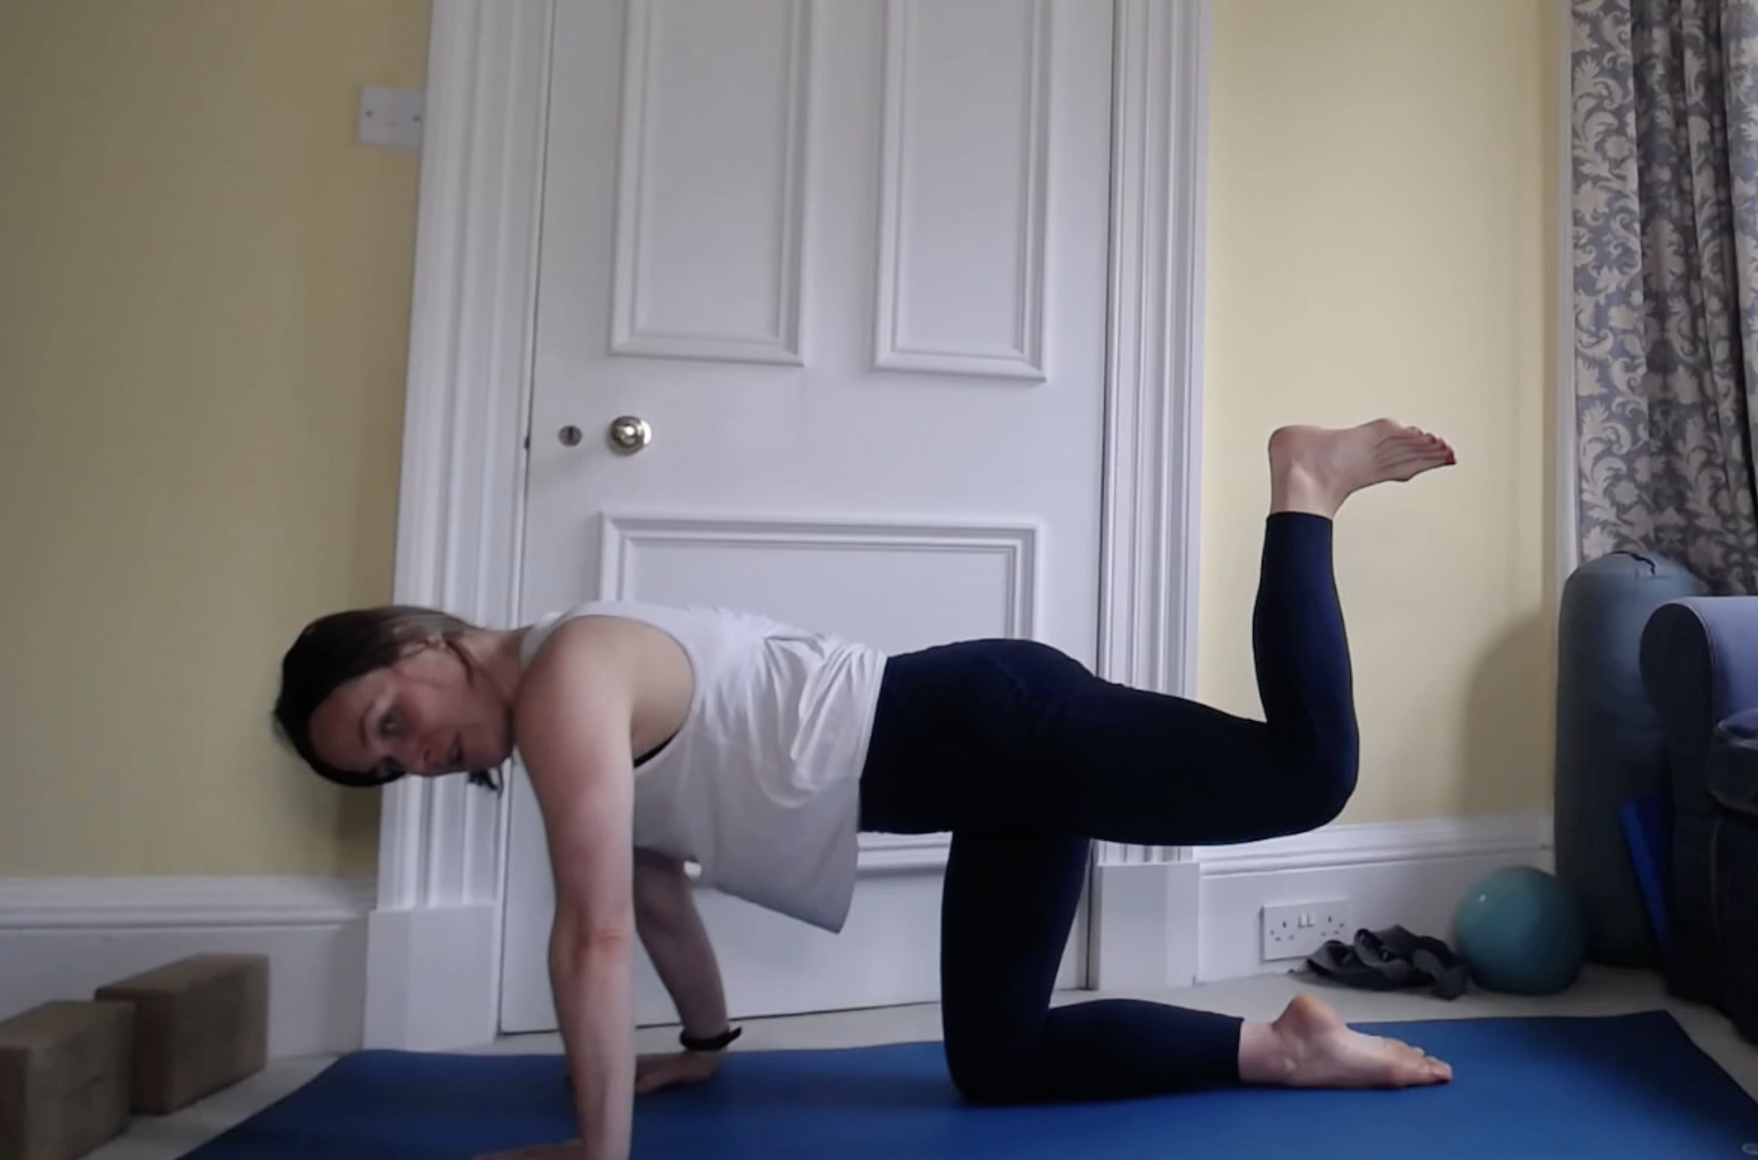
Come into a tabletop position. Press the ground away through the hands, and connect pubic bone to sternum, keeping the lower back long. Squeeze the right heel to the bum, flexing the foot, and begin to lift the right leg while keeping the pelvis stable. Only lift as high as you can without letting the lower back arch, and pulse 5-10 times. I find this one very humbling as it makes me realise how much movement I borrow from my lower back versus true hip extension!
If you’ve read this far, below is a short yoga practice to help you connect to and strengthen your hamstrings, as well as stretch them out. I hope it provides some valuable insight and inspiration to apply to your practice. Simply click the link and enjoy
5 Yoga Poses For Tight Hip Flexors
This month in class we’re focusing on the legs, and this week we’re turning our attention to the hip flexors and quads, opening them in preparation for backbends.
When our hip flexors and quads are tight, it can inhibit our ability to rotate our pelvis backwards over the thighs, thus impacting our ability to backbend comfortably.
So what are our hip flexors? The hip flexors are a group of muscles that work in tandem with our quads to facilitate hip flexion, bringing the knee closer to the hip. We use them every time we walk, run, cycle, climb, play football (insert activity of choice here).
There are five key hip flexors: the psoas, iliacus, pectineus, rectus femoris and sartorius.
The most famous hip flexor, the mighty psoas, is also a deep connector of the upper and lower body. It originates above the joints of the T12-L4 vertebrae, crosses over the sacrum, SI joint and hip, and inserts in the front of the inner thigh bone. It helps stabilise our spine and sacroiliac joints, and can influence the position of our pelvis.
Most of us spend a high proportion of our days sitting, be that at a desk, driving, looking after babies, cycling, even sleeping curled up on our side (guilty!), and as a result the hip flexors and quads have a tendency to shorten and tighten. This impacts everything from the health of our spine and core function, to our breathing mechanics (and as a result, nervous system).
Through our yoga practice we can lengthen and release tension in the hip flexors, helping reduce the risk of injury. Try these five postures to release your hip flexors and quads, and in turn improve our posture, breathing, and connect to our core more effectively
Let me know which one is your favourite, and happy practising!

Reclined Blanket Roll Release Yoga Pose
Reclined blanket roll release
Lie on your back with your knees bend, and place a rolled up towel or blanket under the pelvis (the tailbone should be free). Draw your right thigh towards your chest and extend your left left. You can place a cushion under your head and left foot if needed, as well as use a strap to catch the thigh. Hold for 90 seconds to 2 minutes, breathing deeply. Repeat second side.

Low Lunge with quad stretch
2. Quad stretch
From all fours, step your right foot to the outside of your right hand, turning the toes out about 45 degrees. Bend your left foot towards your left glute, and catch a hold of it with your right hand. Use a strap if needed.

90/90 lunge with side stretch
3: 90/90 lunge with side stretch
From all fours, step the right foot between the hands. Bring both hands to the right thigh, and shorten your stance so that left hip is on top of left knee. Squeeze your left glute to press the pelvis forward, and think about drawing your pubic bone towards your navel, lifting the frontal hip points. From here, reach both arms up to the sky, bring right hand to left wrist and stretch up and over. Hold for 5-10 breaths, repeat second side.

High Lunge with head clasp
4: High lunge with head clasp
From downward dog, step your right foot forward, rising into high lunge. Shorten the stance and bend the back knee. Squeeze the left glute to press the pelvis forward and the frontal hip points, getting into the front of the left hip. From here, interlace the fingers and clasp your hands behind your head. Press the head back into the hands, giving yourself a flattering double chin. This action helps switch on our deep abdominals while lengthening the hip flexors. Hold for 5-10 breaths, repeat second side.

Child's Pose with blanket roll
5: Child’s pose with blanket roll
Saving the best for last, take your blanket and make a small roll (an inch or two thick). Place the roll right up against the hip creases and fold forwards into child’s pose. Have the legs a comfortable width for your body, and add any additional props you prefer (for example, a block or bolster under the forehead, a cushion or block between the heels and sitbones).
5 Key Yoga Poses For Relieving Shoulder + Neck Tension
This month in class, at the request of a lovely Glenogle regular, we’ve been exploring shoulder mobility.
When it comes to the shoulders, due to the screen-focused and often seated nature of our lives, mean that a few common patterns emerge in this region:
Tightness across the front of the shoulders
Tension and weakness across the back of the shoulders
Forward-head posture, leading to neck and shoulder tension
Potential stress-related hunching of the shoulders, coupled with neck and jaw tension
Sound familiar? Trust me, I feel you: when I worked 50-60 plus hour weeks as a journalist, my shoulders and neck were a constant source of tension. It’s a pattern that reemerged with a vengeance while caring for my young children as well, due to all the holding and sitting required in early motherhood.
But there is hope! Through our yoga practice, we can counter the effects of modern life: stretching the areas that get chronically tight; strengthening the postural muscles to encourage good shoulder, neck and head placement; and learning good breathing mechanics to help manage stress.
When working on increasing mobility and releasing tension in the shoulders in our yoga practice, there are a few key things I like to focus on:
Opening the front of the shoulders with postures such as half binds, binds, reverse tabletop, wall clock and the floor version of wall clock
Strengthening the postural muscles of the shoulders and neck through swapping out endless chaturangas for poses such as locust and active cobra (where we float the hands rather than press the ground away to lift the chest)
Incorporate ‘pull’ and ‘press’ motions to build awareness of shoulder and neck placement. For example, these past few weeks in class we’ve been playing with clasping the back of the head with the hands, pressing the head into the hands and purposefully giving ourselves a very flattering double chin to strengthen the neck muscles (and sneakily wake up our deep core at the same time - win win!). We’ve been weaving this into lunges, locusts, tadasana, you name it!
Learning to breathe deeply into the full circumference of the ribs. When we get stressed, we have a tendency to take shallow breaths, overusing the accessory breathing muscles and generating tension in the neck and shoulders.
Weaving in plenty side bends and twists to create space and mobility in the ribs and shoulders, improving our ability to breathe well.
I always feel so great in my body after practising in this way, so I hope you’ve felt the benefits too.
Asana + Self-Worth
Your worth as a yoga practitioner isn’t determined by your asana practice.
I had a conversation with a new(ish) student after class this morning. She’d grown up as a gymnast, then trained in martial arts, but now struggled with shoulder flexion and arm overhead strength.
She’d gone from being able to do handstands, tick tocks, you name it, to losing that range of motion completely due to joint damage.
It was a conversation that resonated with me deeply. My asana practice today is totally different to what it looked like 10 years ago.
Splits, arm balances, inversions were peppered into every practice. I always had a pose I was working towards.
I had definitely been conditioned by certain corners of the London yoga scene to believe that my value as a teacher was bound up in the difficulty of the asana I could do.
Did I enjoy doing those poses? Yes, I loved exploring my physicality and seeing what I was capable of. I liked having a goal, and seeing progress.
But I also pushed myself too hard, too often, and was forever tweaking something or other.
Fast forward to now, age 41 with two young children, a fairly newly diagnosed autoimmune thyroid condition, a prolapse and diastasis later, and it’s safe to say my practice has changed.
During the depths of figuring out what on earth was causing my autoimmune symptoms, which ranged from hair loss and constant joint pain to extreme fatigue, I was completely unable to practise asana. I taught it regularly, but my own practice had shifted to restorative yoga, yoga nidra and chanting.
Navigating prolapse has also meant changes. I still can’t manage abdominal pressure effectively in certain arm balances, and have taken them off the table for now. (Side note: I will share some tips on how I’ve adapted my practice and teaching to accommodate this, as I know many of you will find it useful.)
To cut a long story short, your worth isn’t determined by how your practice looks externally.
Like life, our practice has seasons. There will be times when you feel strong and vital, and times when you have to ease off edge, to explore alternative practices.
To me, the sign of an advanced practitioner isn’t one that can do all the ‘hard’ poses, but one who can sit with the discomfort, who knows when to adapt and ease of edge, who can truly listen in and hold themselves with honesty, kindness and presence regardless of the outcome.

An Introduction To The Yamas
These past five weeks in class we’ve been focusing on the yamas, the first limb of yoga on Patanjali’s Eight-Limbed Path, as set out in his ancient philosophical text, The Yoga Sutras of Patanjali. Read more about the yamas here…
These past five weeks in class we’ve been focusing on the yamas, the first limb of yoga on Patanjali’s Eight-Limbed Path, as set out in his ancient philosophical text, The Yoga Sutras of Patanjali.
Most of us discover yoga through the third limb, asana, yet stay for something deeper. It’s so important to recognise that our yoga doesn’t just take place on our mat. There is no point being able to handstand or get our legs behind our head if we’re cruel, hurtful or passive off of it.
There are five yamas in total (ahimsa, satya, asteya, brahmacharya and aparigraha), and we can think of them as offering us a moral code for living, inviting us to consider our relationship with the world around us and how we interact with it, so that ultimately our decisions and actions come from a more conscious place.
There is a mantra: Lokah Samastah Sukhino Bhavantu (may all beings everywhere be happy and free). How can our yoga practice guide us towards creating a world in which this is possible, to stand up for what is right and for those that do not have a voice? The yamas (and the Sutras) can help illuminate this path.
Let’s explore the five yamas in more detail…
1: Ahimsa (non-violence or non-harming)
Ahimsa means non-violence or non-harming, on and off the mat.
In terms of our physical practice, we can interpret this by accepting ourselves completely, by listening to our body and its edges. We can learn to enjoy and challenge our physicality but not push ourselves to the point of harm. Through this listening, our practice can become sustainable, nourishing and respectful.
We can also notice ahimsa in our thoughts: are you talking kindly to yourself? Do you give yourself compassion and grace when you’re tired, or feeling weak or wobbly? Often the hardest person to be kind to is ourselves.
Off the mat, notice how you talk to, and think about, others. Are you kind in your words, actions and thoughts? Could you perhaps make more ethical and sustainable choices when it comes to food or clothing? Even little actions can have big impact.
2: Satya (truthfulness)
Next we have Satya, or truthfulness. Sat means true nature, unchangeable and pure.
As humans, we have a tendency to be completely bound up in our thoughts, emotions and moods. They are extremely changeable and cloud our experience, preventing us from seeing the reality or truth of situations.
If we identify ourselves with our thoughts and emotions (ie I’m a terrible person… ; I always do this etc…) then we never see things as they really are. Instead we are defining ourselves by how we are feeling in that moment.
Honesty, or truthfulness, begins with ourselves; creating space and stillness to witness rather than become tangled in the stories we tell ourselves. Through our yoga practice we create space and distance around our thoughts and emotions; through this space we can then begin to still the fluctuations of the mind, or chitta vritti nirodha.
Creating space between our thoughts and our reactions/actions means we start to act from a place of truth rather than fear and conditioning. By constantly reminding ourselves that we are not our thoughts, we create a gap between who we think we are (ego) and who we really are (atman).
Satya is also closely linked to the first yama, ahimsa. Our yoga practice is here to serve, not to harm, so be truthful with where you’re at physically and don’t force shapes that aren’t right for your body. Practice, with acceptance, for the body you are in today.
3: Asteya (non-stealing)
The third yama is asteya, or non-stealing. Now, I’m not suggesting we’re all going around committing petty crime, so how do we interpret this yama in real life.
Well, we can think about what drives the need to steal, literally or metaphorically: a sense of lack; that you don’t have enough or aren’t enough. We crave, desire and want to fill a perceived void.
The most pertinent place I - and am sure most - witness this arising is when scrolling through social media, then finding yourself wishing that you had someone else’s perceived professional success, lifestyle, wardrobe, or even asana practice.
Yet through consistent and steady practice we begin to awaken to the realisation that we already have all that we need; that we are where we need to be and we are enough, as we are, here in this moment. We can recognise our wholeness and accept ourselves as we are.
Try this next time on your mat: notice if you catch yourself thinking you ‘should’ do or be able to do a certain pose. Pushing unhealthy boundaries and contorting ourselves into shapes that don’t match where we’re at physically or energetically robs us of the present. Can you allow yourself to be open and accepting to the practice as it is right now. Ultimately, our physical practice is never about the poses we do but the awareness we can bring to them.
4: Brahmacharya (right use of energy)
The fourth yama is brahmacharya: celibacy, or behaviour that leads us towards the divine.
How can we apply this in modern life, I hear you ask? One way we can interpret brahmacharya is as the ‘right use of energy’, and consider how we use and direct our energy.
Instead of chasing quick fixes, fleeting yet transient pleasures such as alcohol, drugs, shopping etc, yoga encourages us to invest our energy in finding peace and happiness from within.
As humans, a huge amount of our time and energy is spent worrying about things we can’t control or don’t matter in the long run; or trying to please others rather than stay true to ourselves.
Yoga is anything but a quick fix, and never a linear route; often in our practice we’re forced to sit with thoughts and emotions that are challenging and uncomfortable, yet liberating once we allow ourselves to witness them.
Through our practice we can start to learn how to invest our energy in the right way. We can cultivate a more tender and honest attitude towards ourselves and our needs, listening to what our bodies really need and noticing places, people or situations that drain our energy.
Personally, when I think about how brahmacharya applies to my life and practice right now, I notice how much my practice has shifted since having children.
Most days I simply don’t have the inner resources to do the long and vigorous practices of my twenties and early thirties; instead I need something more sustainable, nourishing and above all that fits in with family life. Short, sweet and simple is often the order of the day.
Does your practice reflect your energy levels? It’s so important to have a practice that nourishes and sustains us, rather than depletes us.
5: Aparigraha (non-greed or non-attachment)
Last but not least we have the fifth and final yama aparigraha, or non-attachment.
This yama teaches us to take only what we need, to keep only what serves us, and to let go when the time is right.
One of the central teachings of Bhagavad Gita, Krishna says: ‘Let your concern be with actions alone and never with the fruits of action. Do not let the results of action be your motive, and do not be attached to inaction.’
So how can we interpret aparigraha on the mat?
Often when we’re practising, we get caught up chasing postures, competing with ourselves or those around us, giving into internal monologues and desires; fixating on the outcome rather than the present moment and action.
Instead, aim to show up consistently without attachment. Practice because you love practising, but also practise on the days when you’re met with resistance. Have goals, but acknowledge that our practise, like life, has seasons, and our physical capability will change. Think about what really keeps you coming back to your mat, time and time again: because it brings you home to yourself and reminds you of your innate wholeness; that you are enough as you are, in this moment.
Ultimately, aparigraha teaches us that we can’t only seek positive experiences: that we need to experience and accept life in its totality. We can’t control life, and it is always in flux. Just when we think we have everything sorted out, something will come along to change things up. When we recognise and accept this, we are able to live more peacefully and freely.

Yoga To Relieve Lower Back Pain in Pregnancy
Lower back pain is a topic that comes up frequently in our opening circle chats at pregnancy yoga. Read on for some tips on how to manage it in your practice…
Lower back pain is a topic that comes up frequently in our opening circle chats at pregnancy yoga.
During pregnancy we release a hormone called relaxin, which helps soften the ligaments (and also our minds) in preparation for birthing our babies.
This, coupled with the natural postural changes and extra weight necessary for growing a baby, can create instability in the pelvic girdle, affecting the lower back.
Focusing on creating stability in the hips and being mindful of our shifting posture, as well as releasing tension, can be really helpful in relieving lower back discomfort.
Here are five things I love to include in class to alleviate lower back pain:
TVA ACTIVATION
Our transverse abdominis, or TVA, is a deep core muscle. It’s like a corset that wraps around our waist, and one of the most important muscles to prevent back pain.
Try this: Come onto all fours, hands under shoulders, knees under hips, padding the joints as needed. Place a block or pillow between your thighs. Inhale into your back ribs, and as you exhale, make a ‘ssshing’ sound and imagine you were drawing the two front hip bones towards each other. Repeat a few times, then once you feel comfortable, start to add in raising alternate arms, keeping everything else as still and stable as possible.
HIP STABILITY
Relaxin does an incredible job creating the softness necessary to birth our babies but the added mobility can impact our sacroiliac joints. Doing work to stabilise and strengthen the hips can make your body sing again!
Try this: Stand with the feet hip width apart, place a block or pillow between your thighs. Inhale and come into chair pose, exhale press the ground away and return to standing. Repeat 5-10 times, inhaling to lower, exhaling to return to standing.
THORACIC ROTATION
During pregnancy we want to avoid any deep twists that compress the growing uterus, but that doesn’t mean we want to avoid twisting altogether as it is a movement that is vital for spinal health. Restriction in the mid or upper back is often felt further down the chain in the lumbar – taking time to do gentle rotation can make the world of difference.
Try this: Come to a comfortable crossed legged or kneeling position, elevating the pelvis on a cushion or block. Inhale, lift the arms overhead, exhale take a gentle rotation to your right, lifting up and out of the lower back, keeping the belly soft and pointing forward, and turning from the chest upwards. Repeat on the other side. This isn’t about coming into a deep twist, but instead getting gentle motion through the middle and upper back.
PSOAS RELEASE
Your posture changes in pregnancy to accommodate your growing belly, with the curve of the lower back becoming more pronounced. This increased anterior tilt of the pelvis can create tightness in the hip flexors and tension in the mid back as the body compensates. Releasing the hip flexors can be so beneficial in freeing the spine.
Try this: Stand on a block or low step with one leg, holding onto a wall or railing for support. Let the opposite leg dangle down and swing it back and forth, like a pendulum. Do for about 30-60 seconds, then switch sides and repeat.
CALF RELEASE
Our heels connect to our sitbones, and tension in the backs of our legs can pull on the sitbones and SIJ, creating discomfort. Releasing your calves can be really helpful if you’re suffering from lower back pain and also aids restless legs.
Try this: Stand on a low step, holding onto a wall or railing for support. Keep the balls of the feet on the step, then lengthen one heel towards the earth. Hold for 30-60 seconds then switch sides.
Disclaimer: This post is for informational purposes only. Please check with your healthcare provider before starting any exercise during pregnancy.
Enjoyed reading? Practice pregnancy yoga with me every Tuesday, 6-7pm, at the Lifecare Centre in Stockbridge. Book here.

Pelvic Girdle Pain In Pregnancy? Try This...
Are you experiencing Pelvic Girdle Pain (PGP) during pregnancy? Here are some ways you can adapt your yoga practice…
Are you experiencing Pelvic Girdle Pain (PGP) during pregnancy? Here are some ways you can adapt your yoga practice…
While not harmful for baby, PGP can cause a range of uncomfortable symptoms, such as pubic pain, hip pain, groin pain, and lower back pain.
It can be worse when standing on one leg, walking, going up and down stairs, or moving the legs to get in and out of the car.
I would always recommend a pregnant student experiencing PGP sees their GP and a physio first to get a proper diagnosis and treatment, there are still many ways we can support them in class, focusing on creating stability in the pelvic girdle to offset the impact of relaxin, which the body produces to soften the ligaments in preparation to birth our babies.
Here are five ways I like to support my students with PGP in their yoga practice:
1: Less External Rotation
Swap poses with a lot of external rotation, such as sukasana and baddha konasana, for those with more internal rotation, such as virasana, kneeling on a bolster, hugging the bolster with the legs to connect to the midline for stability in the pelvis.
2: Build Hip Stability
Swap deep squats (malasana) for chair pose with a block between the thighs, or if you’re still comfortable on your baby, bridge pose pulses with a block between the thighs. Again the block helps generate midline stability, and chair can help build strength in the legs for labour and birth.
3: Adapt Your Core Work
Swap bird dog for ‘block’ dog arm raises: instead of lifting alternate arm and leg at the same time, get creative. From all fours, place a block or cushion between the inner thighs. Inhale to prepare, exhale squeeze the block, lifting pelvic floor and gently hugging baby to spine, while lifting alternate arms. This is a great one for challenging the core and pelvic floor: try to keep everything else as still and stable as possible!
4: Shorten Your Stance
Shorten your stance in standing postures. Relaxin can make us feel like we can go deeper into poses, exacerbating instability. Keeping the feet closer together can help mitigate this.
5: Embrace Chair Yoga
Use a chair for support during standing postures such as warrior 2 and side angle. Adapting our practice during pregnancy doesn’t make it less valid; it means you’re learning how to truly listen to and honour your body, which is a skill that will serve you so well during pregnancy and postpartum.
Enjoyed reading? Practice pregnancy yoga with me every Tuesday, 6-7pm, at the Lifecare Centre in Stockbridge. For more information and booking, click here.

5 Poses To Prepare Your Pelvis For Birth
These are 5 of my favourite yoga poses to help prepare your body for birth…
Did you know your pelvis is designed to expand during childbirth?
Our pelvis is this incredible bowl-like structure comprising four main bones: the ilium (hip bones), which meet at the pubic bone, the ischium (sit bones), sacrum, and the coccyx.
Relaxin, a hormone released during pregnancy, softens the ligaments, enabling the joints to widen and creating even more space in the pelvis.
When we labour in upright, active positions (think supported standing, swaying, all-fours, squats, lunges), the sacrum and tailbone are free to move, maximising the space available for baby to rotate and descend through the pelvis.
These are 5 of my favourite yoga poses to help prepare your body for birth. We practise these regularly during our pregnancy yoga classes so that when the time comes to birth your baby, you can instinctively move into the positions that feel right for you.
1: Hip Circles
A wonderful way to balance the pelvis, releasing tension and increasing mobility. Come onto all fours, padding your knees with a blanket. Start to circle the hips clockwise, the circles can be as big or small as you desire, and get creative. After a minute or so, change direction. Close the eyes or soften your gaze to really drop into your body and breath, and connect to what feels good for you and your baby.
2: KIKO Hip Rocks
KIKO, or Knees In Calves Out, is a wonderful pose to lengthen and release the pelvic floor. The internal rotation of the thighs here also helps increase the diameters of the pelvic outlet (bottom of pelvis), creating more space for baby to be born. To do it, come onto all fours, keeping the knees under the hips, but take the heels wide. Inhale to rock back, sending the sit bones towards the heels, exhale to rock forwards. Again, close your eyes, get into a rhythm, and if you notice a lot of pelvic tension feel free to linger where you get a release.
3: Rocking Lunges
These are great from lengthening the inner thighs and pelvic floor, which are connected. The asymmetrical nature of the pose can also help create space for baby to engage and journey down during labour. To do these, from all fours step the right foot to the outside your right hand, turning the toes out about 45 degrees. Bring the foot far enough forwards so that it is fully grounded. Inhale to rock forwards on a slight diagonal, bending the front knee, exhale to rock back. I like to have my hands on blocks for this to keep the chest lifted and create a bit more length in the front of the hips, but you could also rest the hands on a chair for support.
4: Rocking Squat
This helps lengthen and release tension in the pelvic floor, and open up the pelvis for birth. Come into a squat, placing cushions under the heels if they want to lift, and have the hands on blocks. Rock side to side, relaxing the jaw and sighing deeply as you go.
Disclaimer, please do not do deep squats if you have been diagnosed with placenta previa or a low lying placenta, and avoid after 36 weeks.
5: Calf Release
Tightness in the calves can create tension further up the chain, around the sit bones and sacrum. Releasing them can help mobilise the sacrum for birth and help alleviate lower back pain. To do this one, simply find a step, stand on it, and lengthen one heel towards the earth. Hold the stretch for 60-90 seconds, then switch sides.
Enjoyed this post? Practice pregnancy yoga with me every Tuesday, 6-7pm, at the Lifecare Centre Edinburgh. Click here to book.

3 Ways To Prop Your Chaturanga
Chaturanga is a posture that is so key to vinyasa yoga yet one that takes a huge degree of strength, skill and precision to execute well. The shoulder joint, unlike the hip, is largely comprised of muscle and ligaments, therefore learning to load bear as yogis is something we shouldn’t rush into.
I read an interesting article recently, in which the author (Jenni Rawlings, click here to read) calculated that she’d done over 100,000 chaturangas in her yoga lifetime. There are 50 chaturangas in ashtanga yoga, and often 20-30 in your typical vinyasa class.
Chaturanga is a posture that is so key to vinyasa yoga yet one that takes a huge degree of strength, skill and precision to execute well. The shoulder joint, unlike the hip, is largely comprised of muscle and ligaments, therefore learning to load bear as yogis is something we shouldn’t rush into.
In fact, my teacher Jason Crandell recommends practising regularly for one-two years before attempting the full version of the pose, arguing that it is far better and more sustainable for your practice long term to build strength and skill in other variations first.
Personally, I have scaled back the chaturangas in my classes. These days I’m a firm believer that less is more, and that postures such as cobra, locust and forearm plank have just as much to offer (often more) when it comes to creating balanced strength in our bodies, helping counteract the rounded shoulders that often come as a by-product of screen-based modern life.
Still, that doesn’t mean we should avoid chaturanga. Let’s just learn how to execute it well while under less load first, then progress it as we get stronger and more skillfull at it. Here are a few of my favourite ways to use props to do just that.
With all of these variations, focus on keeping the shoulders either at the same height or slightly higher than the elbows (so the shoulders don’t drop into extension), and drawing the shoulder blades down and together (depression and retraction). Both of these actions help keep the shoulders stable and safe during weight bearing.
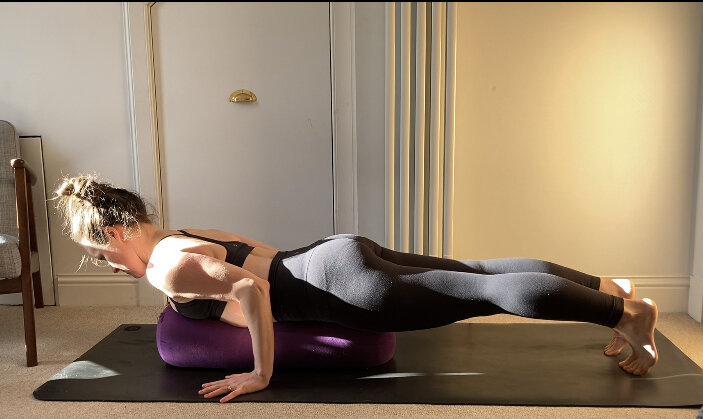
Chaturanga With A Bolster
I absolutely love this variation and teach it in all my chaturanga workshops. Simply get a bolster, place it under your torso and come into chaturanga. From here you can work on refining (drawing the shoulders down and together, hugging the arms in, lengthening the tailbone and lifting the hip points, engaging the legs and glutes etc) and building muscle memory while being completely supported. It also helps you find that strong line of energy where the shoulders, spine and pelvis are all connected and working together, as opposed to the shoulders dipping below the elbows and the lower back collapsing.
Chaturanga With A Strap
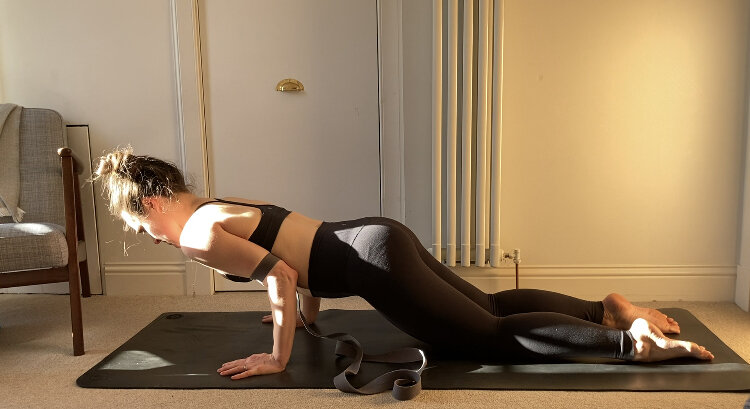
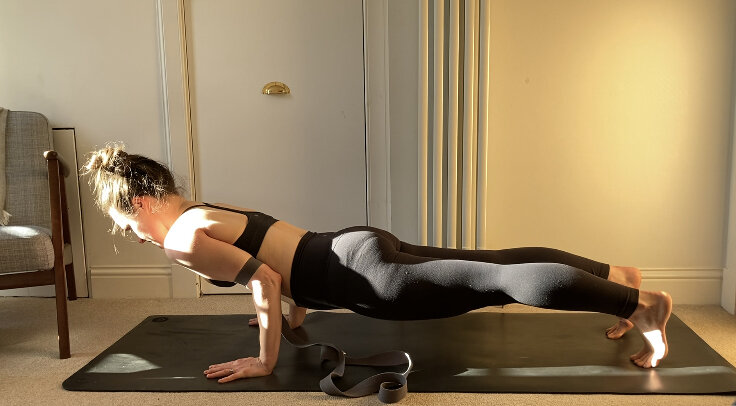
This one is fantastic as your upper body is supported by the strap and it stops you extending the shoulders (when the shoulders dip below the elbows it puts them in a more vulnerable position), yet you can really work on powering up the glutes and legs. Make a shoulder-width loop with your belt: you want it to be wide enough so that the arms can come alongside the body, but tight enough that you can feel the adduction (hugging in) of the arms. Focus on drawing the shoulders together and down, keeping the front of the shoulders elevated. Start with the knees down and work on lifting and reaching back through the legs and feet.
Chaturanga With Blocks
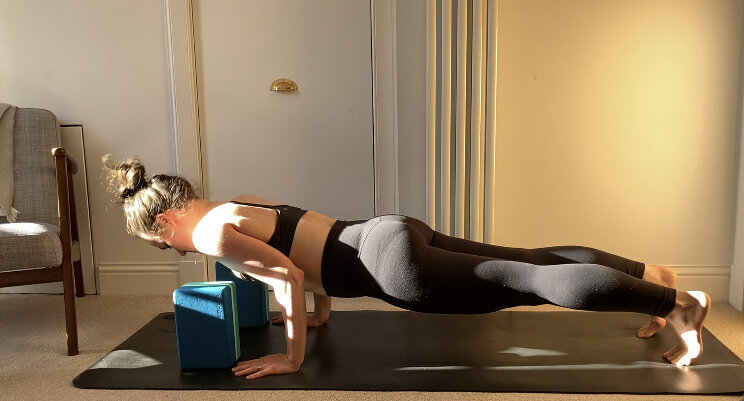
This is one I teach often in my drop-in classes, and is a great way to build strength, as well as understand how to keep the frontal shoulders slightly elevated and prevent them moving into extension. Get two blocks, set them on the tallest height shoulder-width apart. Come onto all fours, place your hands behind the blocks and walk the knees and inch or two behind the hips. Bend the elbows an inch and push back up, gradually increasing how far you lower towards the blocks as your strength builds. Keep lengthening the tailbone, lifting the hip points and maintaining core engagement - no dumping into the lower back please! When you feel strong enough, lift the legs and repeat again, lowering an inch or so and building up. You’ve got this!


HIP FLEXOR & QUAD STRETCHES TO PREPARE FOR BACKBENDS
When we backbend, we want to prepare the body by opening the front (thighs, hips, shoulders and chest) and strengthening the back (hamstrings, glutes, paraspinal muscles) to create an even, spacious and expansive arc. Here, we will focus on postures that help open the hip flexors and thighs: the iliopsoas and quadriceps.
When we backbend, we want to prepare the body by opening the front (thighs, hips, shoulders and chest) and strengthening the back (hamstrings, glutes, paraspinal muscles) to create an even, spacious and expansive arc. Here, we will focus on postures that help open the hip flexors and thighs: the iliopsoas and quadriceps.
The iliopsoas and quadriceps get a bad rep in yoga: the majority of us come to the practice with some form of tightness or restriction in this region from activities such as sitting for work, running, cycling, hiking, looking after children… you get the picture.
Yet the psoas plays a key role in our daily lives. The only muscle in the body that connects spine to legs, it attaches the upper body to the lower body and is involved in pretty much every movement we make, including walking and breathing.
Located deep in the core, it attaches to the diaphragm, the 12th thoracic vertebra (where the lower ribs begin), the lumbar vertebrae and discs, before travelling through the pelvis to the inner thigh bone. The psoas is also closely connected to the central nervous system via the fascial network.
Yet when it comes to backbending, tightness in the psoas – and quads – can inhibit the practitioners’ ability to rock the pelvis backwards over the legs, moving the spine into extension, so it’s vital to create space in this region before working with this family of postures.
Here are some of my favourite postures to release the hip flexors and quads. We’ll explore these and more in my upcoming workshop, Spacious & Easeful Backbends, Saturday 6 March, 2-4.30pm at Eastside Yoga Edinburgh. Click here to book your space (go to courses).

HIP FLEXOR RELEASE OVER BLANKET ROLL
Get a blanket or towel and roll up until it’s about 3in diameter (you can increase or decrease as suits). Lying on your back, place the blanket roll under your sacrum. Keep the left leg extended and draw the right knee into the chest, and out to the side slightly. Focus on sensing the front of the left hip and letting everything soften. Hold for one minute or more.

LOW LUNGE WITH PELVIS IN NEUTRAL
Come into a short lunge, front foot under knee, back knee under hip. Pad up the back knee if needed. Lengthen your tailbone towards the earth and lift your frontal hip points up. Hold for 5-10 breaths then switch sides.

LOW LUNGE WITH LATERAL STRETCH
As above, but elevate the arm on the same side as the back leg and reach up and over, feeling the length from the frontal thigh, through the side seam of the body, all the way up to the shoulder. Hold for 5-10 breaths then switch sides.

QUAD STRETCH
Come into a low lunge but this time let the pelvis soften towards the earth. Walk the front foot out to the edge of your mat, turning the toes out slightly to create more space. Bend the back leg towards you, then reach the arm on the same side as the front leg up and back to catch a hold of the back foot or ankle. If you can’t reach, use a strap, scarf or towel. Hold for 5-10 breaths then switch sides.

PRONE QUAD STRETCH
Lie on your belly and make a pillow for the forehead with the hands, legs together if possible. Lengthen tailbone toward heels and lift hip points, feeling low belly engage and creating space and stability in lower back. From there, bend one leg towards you, hold the ankle or foot (again use a strap if you can’t reach), hold for 30 seconds to a minute then switch sides.

KING ARTHUR’S POSE
Come into low lunge at the wall, placing the back shin on the wall. If the quads and hip flexors are tight, start with the back knee further from the wall and work on sliding it in. From there, work on uprighting the spine and chest. You can start with both hands on blocks either side of the front foot, then bring the hands to the front thigh, then work on bringing the spine right to the wall and lifting the chest. Be patient, this one takes time! Hold for a minute or two if you can, then switch.

SUPTA VIRASANA
Start kneeling with a bolster (or two or three - blankets and pillows work just as well) behind you. The tighter the psoas and quads, the more height you will want so embrace the props and build yourself a comfortable platform here! Begin to lean back, supporting yourself with your hands and then forearms. This may be where you stay, or you may feel comfortable leaning back on the bolster. Allow the lower back to drape off the bolster in its natural curve, and try to keep the thighs internally rotated and about hip-width apart. Hold for a minute or two if you can. A beautiful opener for the psoas and diaphragm, and a great posture to do before you teach.

7 WAYS TO PROP YOUR BACKBENDS
This is where props can be a saviour: they provide support and incredibly useful feedback that enables us to build awareness, space and ease in our backbends without creating unnecessary tension or strain. These are a few of my favourite ways to prop backbends. We’ll be exploring this and more in my upcoming workshop, Spacious & Easeful Backbends, Saturday 6 March, 2-4.30pm at Eastside Yoga Edinburgh (to book your space click here - go to courses).
Backbends: if you’re anything like me you have a love-hate relationship with them. I love how open and expansive they make me feel, in both mind and body, yet some days they feel sticky and uncomfortable, the after-effect of: a) 12 years spent as a journalist, hunched over a desk editing copy for hours on end; b) years of cycling to and from work; and c) motherhood and all the baby-growing, -wearing and -carrying.
Most of us, especially during lockdown, feel the effects of our screen-driven lives: a tendency to hunch and round forward is not conducive to extending the spine for backbends. Hip flexors and quads get tight, restricting the pelvis’ ability to rock backward over the thighs, the spine gets stiff and inflexible, the shoulders and neck carry tension.
This is where props can be a saviour: they provide support and incredibly useful feedback that enables us to build awareness, space and ease in our backbends without creating unnecessary tension or strain. These are a few of my favourite ways to prop backbends. We’ll be exploring this and more in my upcoming workshop, Spacious & Easeful Backbends, Saturday 6 March, 2-4.30pm at Eastside Yoga Edinburgh (to book your space click here - go to courses).
Give them a go (try about 5-10 breaths in each and maybe repeat a few times), let me know how they shift your experience by commenting below. Enjoy!
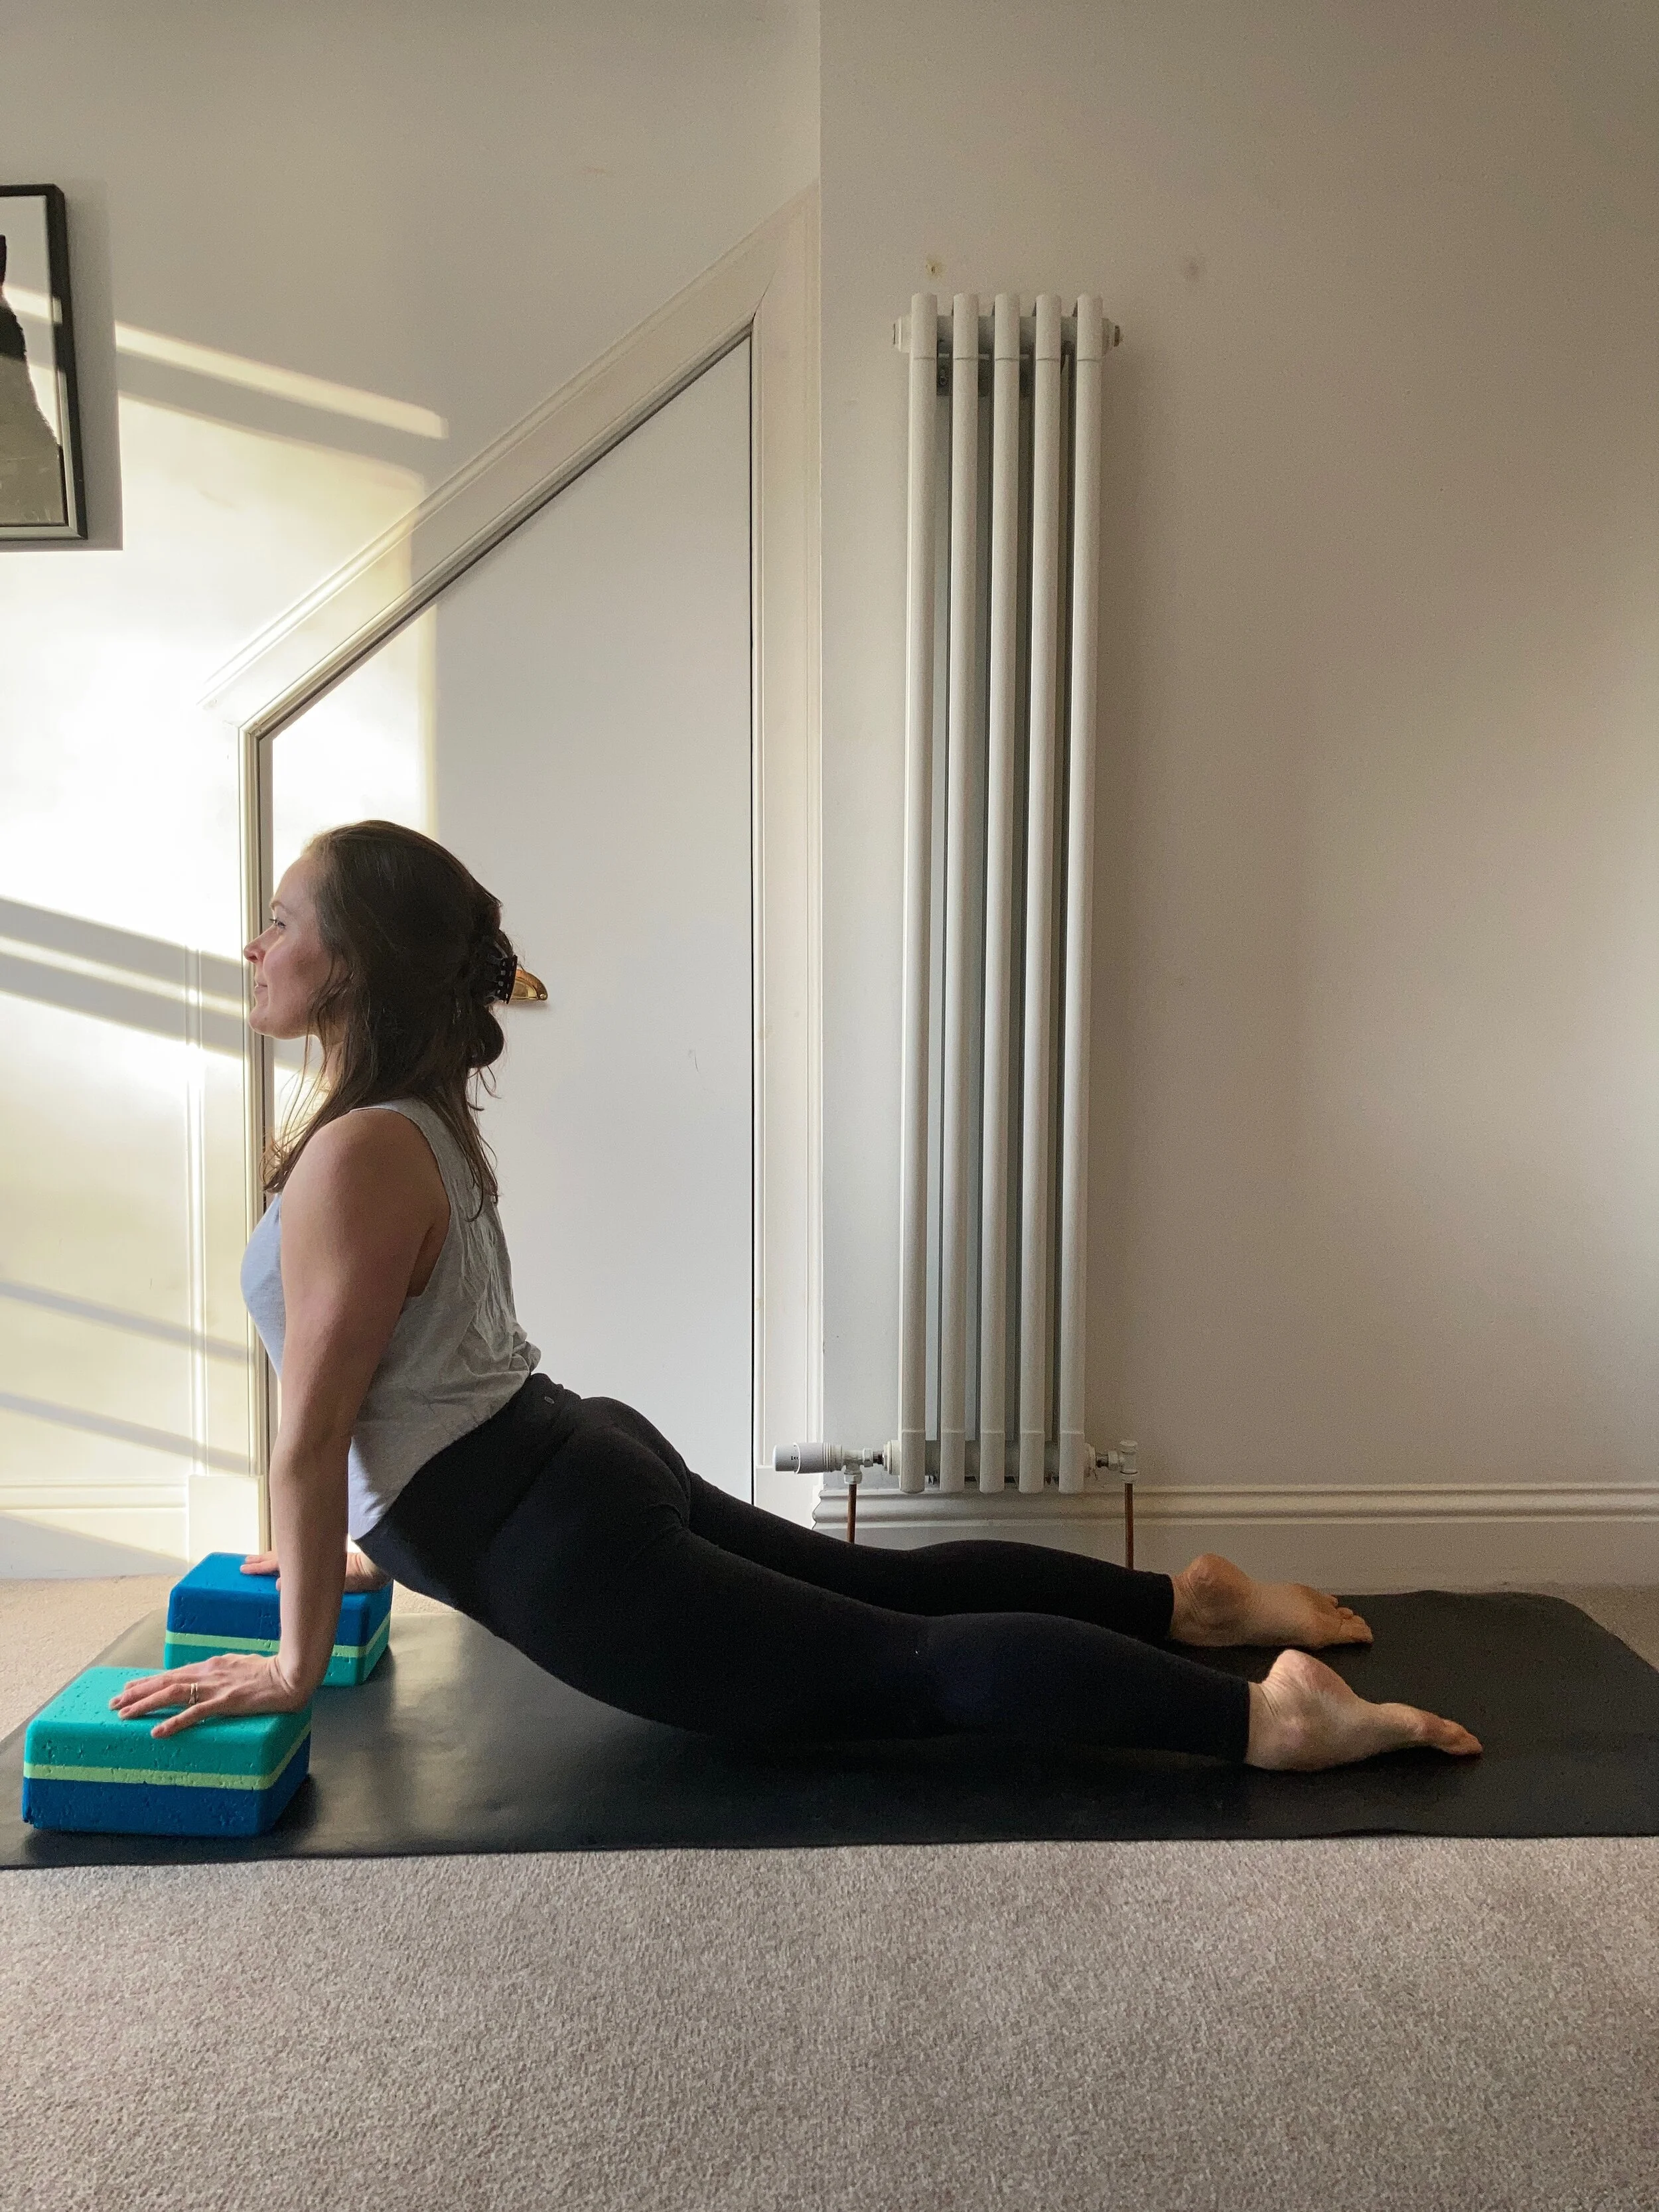
UPWARD DOG WITH BLOCKS
Set up for your usual upward dog, but place two blocks on the lowest setting under the palms of the hands. Press down through the hands and the tops of the feet, firm the legs and prepare for a spacious lift off!

UPWARD DOG WITH CHAIR
I absolutely adore this version of the posture. For me, it really helps me focus on the ‘coiling’ and firming of shoulder blades against the back ribs and external rotation of upper arms, creating lift and expansion in the chest. Try moving between this and downward dog (hands stay in same position) a few times for an alternative vinyasa.

CAMEL WITH BLOCKS
This variation of camel can really help lift and expand the chest, especially if you experience restriction in the front body, such as the quads, hip flexors and shoulders. Let the hips move back with you as you set up, then explore growing up and out and notice any shift in your experience of the pose.

BOW WITH BOLSTER
Another favourite and one I teach in my backbend workshops. Lying on your belly, place the bolster somewhere between the pubic bone and naval (experiment as to what feels most comfortable for you). Bring your hands to the bolster, take a few breaths to settle in, then when you feel ready bend the legs and reach back for the ankles.

BRIDGE WITH BLOCKS UNDER FEET
This is a great option for those who are tighter in the quads and hip flexors as the blocks help elevate and extend the pelvis. Place two blocks on the lowest setting hip-width apart, then put your feet on them and make your way up into bridge.
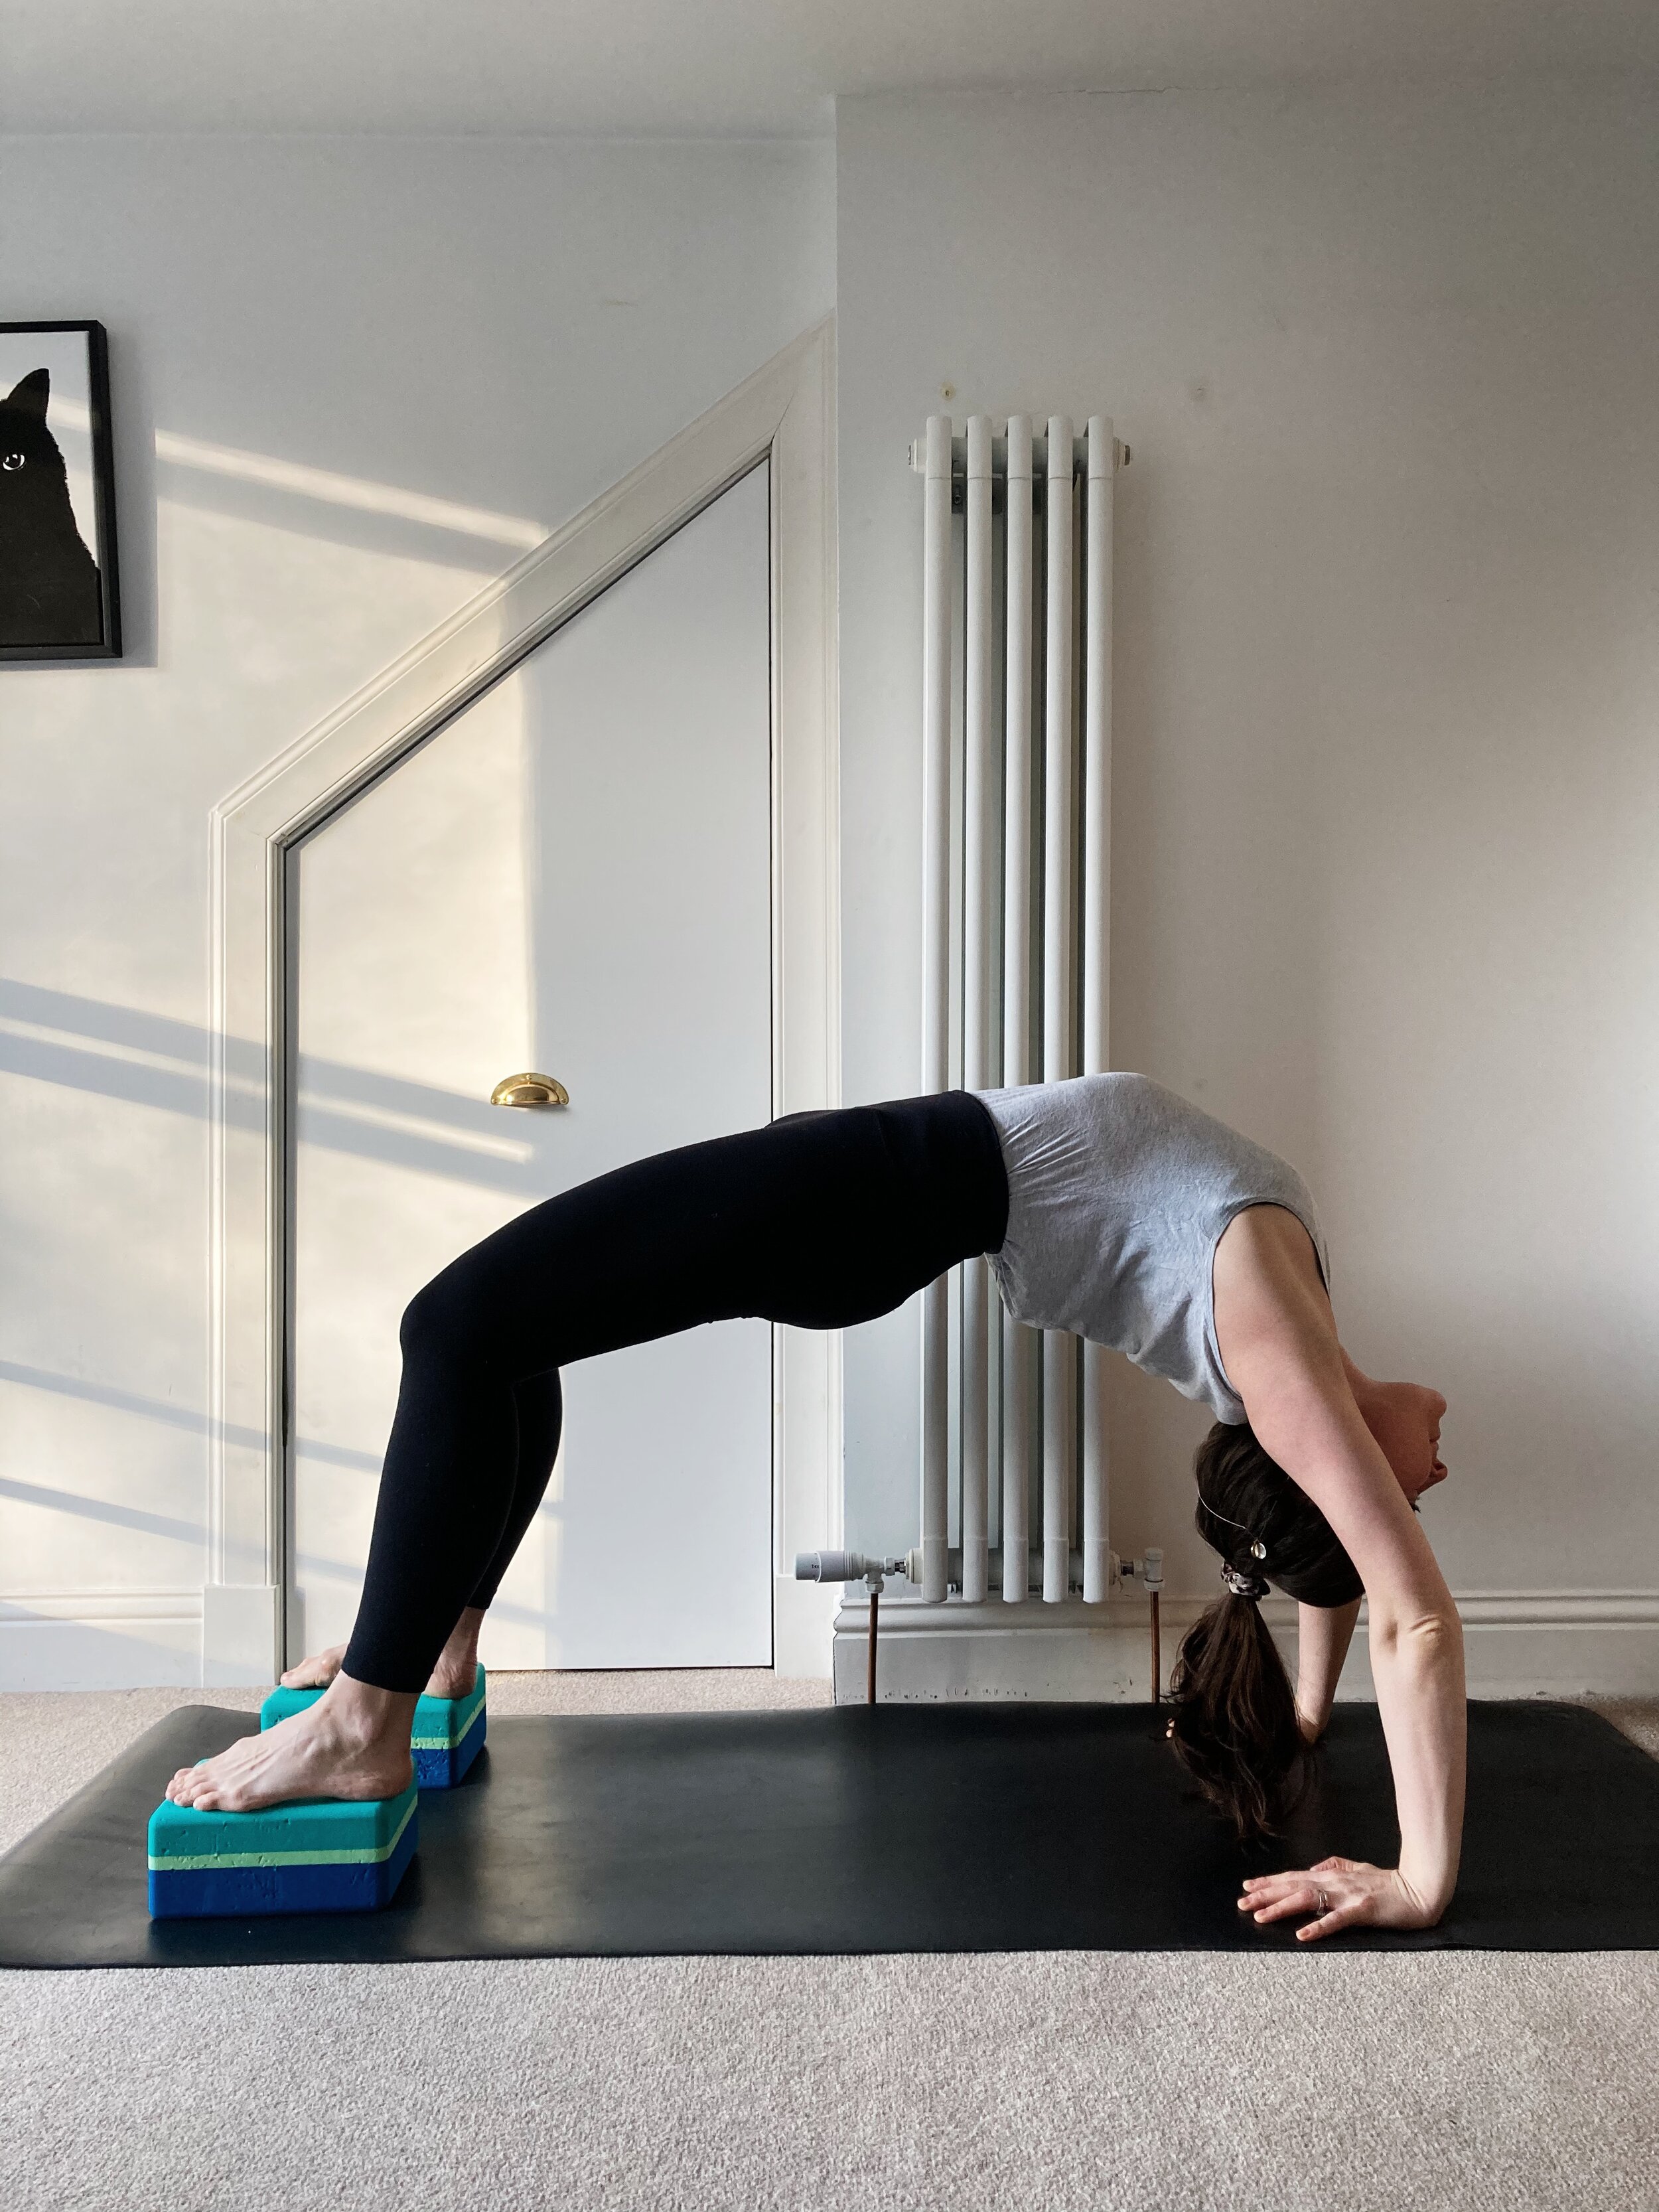
WHEEL WITH BLOCKS UNDER HANDS/FEET
You can progress this version of bridge by coming up into wheel with the blocks under the feet. Alternatively, for those who are more motion-restricted or lacking strength in the arms and shoulders, placing two blocks under the hands, about shoulder-width apart, again creates an elevated platform and additional space to help lift up into wheel. Press down through the heels of the hands to rise up.


THE KEY ACTIONS OF SPACIOUS & EASEFUL BACKBENDS
Backbends are my go-to family of postures when I’m feeling tense and in need of an energetic and emotional boost. When done with patience and a steady approach, backbends are rejuvenating, revitalising and can provide us with a great sense of clarity, spaciousness and openness. They open up the entire front body, open the diaphragm and lungs, create strength and flexibility in our spines, all of which boost our vitality and resilience.
It’s been a while since I’ve posted on my blog (juggling teaching and toddler-mum life with a pandemic put the brakes on all my best writing intentions!) but I’m back and excited to start sharing more of this beautiful practice with you on here again.
Our focus for March is backbends, and we kick off the month with one of my favourite workshops to teach: Spacious And Easeful Backbends, Saturday 6 March, 2-4.30pm at Eastside Yoga Edinburgh (book your spot here).
Backbends are my go-to family of postures when I’m feeling tense and in need of an energetic and emotional boost. When done with patience and a steady approach, backbends are rejuvenating, revitalising and can provide us with a great sense of clarity, spaciousness and openness. They open up the entire front body, open the diaphragm and lungs, create strength and flexibility in our spines, all of which boost our vitality and resilience.
However, when we’re tight, unprepared, or overly forceful, we can wind up creating unnecessary tension, strain and even agitation and overstimulation.
The secret to successful backbending is cultivating balanced sensations throughout the spine, as well as the shoulders and pelvis (and arms and legs). You want to distribute effort evenly between the lumbar, thoracic and cervical spine.
The lumbar and cervical spine naturally have more range of motion, but we want to feel an even sensation throughout the spine, rather than compression and discomfort in one region (most commonly the lumbar or cervical). It can therefore also be really helpful to focus on mobilising the thoracic to minimise this (I’ll share my favourite thoracic openers soon), especially if you experience a lot of restriction here.
These are the key actions that form the foundation of all backbends and what I’m looking to create when I practice them:
Ground and firm the legs: The legs are the pillars of the pelvis and create a stable base from which to lift and lengthen the spine
Internally rotate the thighs: This broadens the back of the pelvis and helps create space and length in the lumbar. If you or your student has a greater natural degree of internal rotation, allow for a bit of external rotation to create balance in the pelvis.
Move the pelvis up and back over the thighs: Think about lifting the front of the hips up and away from the thighs and lengthening your tailbone towards your heels, to minimise compression in the lumbar.
Press the shoulder blades against the ribs: Like the pelvis, the shoulder blades are also a fulcrum to facilitate movement. Firm them against the back ribs to help lift and open the chest. This also helps distribute the backbend more evenly throughout the spine.
Remember to breathe: Go slow, go steady. Notice the pace and texture of your breath as you practice backbends, and use that as an indicator as to the physiological impact of your practice. Moving fast or forcefully will create unnecessary tension in body and mind.
Start by applying these techniques to prone backbends such as cobra, sphinx and locust to build awareness and sensitivity, then work on building deeper backbends such as wheel and forearm wheel from there. Take time to balance and calm the nervous system afterwards by doing a few gentle forward folds (for example: sukasana, baddha konasana) and twists to round out your practice before savasana.
Backbends are a family of postures that require a lot of patience, integrity and balance, but when they feel even and integrated, they are a wonderful tonic for mind, body and spirit.

Why We Should All Learn To Lean In
‘Accept that you are held and supported and love [...] so lean into that and allow yourself to be held just a little.’ These are the words of my yoga teacher and mentor, Naomi Absalom. She shared them right before I had knee surgery and, honestly, they couldn’t have come at a better time. Confession: I am a workaholic. I find it hard to slow down and accept help, and I’m sure I’m not alone here. How many times have you shut out those around you so that you can just get the thing done? I think most of us are guilty of being blinkered in life at times. We’re so focused on achieving the end goal that we often miss the support network directly in front of us. READ MORE…
‘Accept that you are held and supported and love [...] so lean into that and allow yourself to be held just a little.’
These are the words of my yoga teacher and mentor, Naomi Absalom. She shared them right before I had knee surgery and, honestly, they couldn’t have come at a better time.
Confession: I am a workaholic. I find it hard to slow down and accept help, and I’m sure I’m not alone here. How many times have you shut out those around you so that you can just get the thing done?
I think most of us are guilty of being blinkered in life at times. We’re so focused on achieving the end goal that we often miss what is directly in front of us. I’ve lost count of the amount of times I’ve zoomed in on the micro details in order to get something done and lost sight of the bigger picture; forgotten that in fact, I am not an island, and that we are all in this together. Whether you apply this scenario to work or beyond, I’m sure you’ve experienced it too.
These past few weeks have been incredibly eye-opening. Rather than resisting this enforced period of rest and slowing down, I’ve kind of just accepted it. It is what it is. Injury sucks, yes, but like most things in life, it will pass. Instead of stressing about what I can’t do, I’ve felt an unusual sense of calm (in a work capacity at least, there have been a few episodes of frustration regarding travelling across London in rush hour, as my husband can attest).
This past fortnight I completed my advanced teacher training with Jason Crandell (hang on a minute, that’s not resting, I hear you say – bear with me). Normally, I would be itching to flow and test my body’s capabilities, but I knew I had to rest and let the surgery do its thing.
Each day I set myself up on blankets and bolsters in the corner of the studio and simply listened and watched how Jason taught, and how students responded to what he was saying. It made me realise there is so much to learn in quietly sitting back and observing. Each day, my fellow coursemates helped me set up with what I needed – water, tea, snacks – and joined me for super-slow hobbles around the block for fresh air. There was no judgement, only support and encouragement. Honestly, I felt so happy and relaxed, something I wish I felt more often.
Coming back to teaching, I was nervous. I felt vulnerable. I questioned whether I was capable of sitting on a chair and teaching from there. Then I decided to send a newsletter out to my regular students to let them know I was coming back. One reply was incredibly touching: my student reminded me that although I was on crutches, they would be my other crutch; my support system.
I think that whatever our roles in life, we forget that those around us are not out to bring us down, regardless of the narratives that run through our minds. I think that most of us need a reminder that sometimes it’s OK to lean in and allow yourself to be held. You don’t have to be your ‘best’, whatever that is. Sometimes you need to accept that you are enough just as you are. When you do, even if it's just for a fleeting moment, it's the most incredibly freeing thing.

Injury And What It Means For Our Yoga Practice
Let me ask you a question: what’s the one phrase you hear time and time again when practising yoga? Listen to your body. And time and time again, what do most of us do? Continue to push on through. Pride and ego take over, and the result is more often than not an injury. The thing is, injuries happen, especially when you commit to a regular physical discipline. As much as we can try to prevent them while practising in a sustainable way, sometimes there is no avoiding injury. To put it bluntly: sh*t happens. So what happens to your yoga practice when you can’t, well, practice?
‘Listen to your body. It is the only place you have to live.’ Jim Rohn
Let me ask you a question: what’s the one phrase you hear time and time again when practising yoga? Listen to your body. And time and time again, what do most of us do? Continue to push on through. Pride and ego take over, and the result is more often than not an injury.
The thing is, injuries happen, especially when you commit to a regular physical discipline. As much as we can try to prevent them while exploring our physicality in a sustainable way, sometimes there is no avoiding injury. To put it bluntly: sh*t happens. So what happens to your yoga practice when you can’t, well, practice?
In my own experience, lots of emotions come to the fore when injured: guilt, anger, frustration, disappointment, restlessness, sadness. But I’m also a firm believer that there is always something you can do. Always. Do not allow yourself to kowtow to the idea that if you have to take a step back from your physical practice for a while, you’re not a worthy yogi.
Currently, I’m on a strict six-week period of rest following knee surgery to repair damaged cartilage and I can confirm I’ve run the gamut of those aforementioned emotions, often all in one day. I’ve found myself questioning my self-worth and my yogic credentials given that I can’t practice asana. But, having spoken to my mentors and fellow teachers who have experienced similar periods of injury, time off asana often offers us the opportunity to explore new terrain in our practice. I'm a firm believer that this is a good thing: it forces us to get out of our comfort zone, and this is where growth happens. Here are my top tips for staying sane while out of action.
LET YOURSELF FEEL
Frustration, anger, disappointment and sadness are all totally normal and understandable emotions while dealing with injury. Don’t deny them. Let me share with you this passage from Cutting Through Spiritual Materialism by Chogyum Trungpa: ‘We must surrender our hopes and expectations, as well as our fears, and march directly into disappointment, go into it and make it our way of life, which is a very hard thing to do.’ Spiritual practices are not about making our lives as comfortable and luxurious as possible, they are about allowing ourselves to see the situations of life as they really are and accepting them with a solid dose of pragmatism.SIMPLE IS BEST
Yoga Sutra 2.46 states ‘sthira sukham asanam’, which translates as ‘yoga asana should be a steady, comfortable posture’. If you can sit, you can practice yoga. Right now, my physical practice consists of seated cat cows (either on a chair or on a block with my legs straight), neck rolls, shoulder stretches, ankle and wrist circles, and gentle twists to mobilise my spine. Simple movements, yes, but it’s often the simplest movements that have the most profound impact. Look at your injury as an opportunity to explore softer practices such as restorative yoga or yoga nidra. They will shape your practice for the better, trust me.ASANA IS JUST ONE ELEMENT
It’s important to remember that yoga – according to Patanjali's Yoga Sutras at least – is an eight-limbed path, asana being limb number three on the route to samadhi (bliss, or enlightenment). If you can’t do asana, there are plenty of ways to explore and deepen your practice, such as pranayama (breathing techniques) and dhyana (meditation). You could even use it as an opportunity to study the yamas (restraints) and niyamas (observances) in more detail, and build upon your knowledge beyond the physical. Personally, I am using this period as an opportunity to work with the yamas of ahimsa (non-violence), by being kind to myself and being mindful not to take my frustrations out on those around me, and aparigraha (non-attachment), reminding myself that a) this is just a phase and it will pass and b) not to attach as much value to my physical practice; that self-worth goes beyond our bodies and physical abilities.
I'll leave you with one of my favourite quotes by Iyengar below. Remember that, ultimately, we use our asana practice to deepen our understanding and awareness of our Self, so that in turn we can be of better service to the world around us. Injury is simply another opportunity to learn and grow.
‘It is through the alignment of the body that I discovered the alignment of my mind, self, and intelligence.’ B.K.S. Iyengar

Don't Hate, Meditate
For me, the 13 March 2018 marked 100 days of meditation. It was a huge personal achievement. Meditation, and being still in general, has always been a struggle for me: I have an overactive, anxious mind that until recently I’d managed to quiet through daily movement. However due to injury, I found myself facing a terrifying and enforced period of rest. My mind went into overdrive: how was I going to deal with this? The solution? Actually committing to a meditation practice...
'The goal of meditation isn't to control your thoughts, it's to stop letting them control you' - Anon
I’ve been meaning to write this post for a while but life, as it has a habit of doing, got in the way. For me, the 13 March 2018 marked 100 days of meditation. It was a huge personal achievement. Meditation, and being still in general, has always been a struggle for me: I have an overactive, anxious mind that runs amok when still, and that until recently I’d managed to fairly successfully quiet through daily movement.
However back in December I had a series of injuries, and suddenly my favourite ways of moving were off the table. I was facing a terrifying and enforced period of rest. My mind went into overdrive: how was I going to deal with this, especially at Christmas? The festive season and all the emotional demands that come with it are hard enough, let alone without my usual ways of letting off steam.
The solution? Actually committing to a meditation practice. Sure, I’d dabbled. I’d done meditation daily on my teacher trainings, I’d done the odd week-long stint here and there, but it wasn’t a daily ritual; a necessity. I’d read somewhere that it takes 30 days to form a habit, so I set myself a goal to meditate every day for 30 days and see what happened. Would it stick? I hoped so. After all, if I had five minutes to scroll Instagram then I had five minutes to meditate and gain some headspace.
I started by using Insight Timer, a wonderful app that has both guided meditations and a timer for when you feel able to go solo, and my favourite meditation teacher Tara Brach has several guided practices on it. I found that first thing in the morning, before I'd even checked my phone, sitting up in bed with pillows propped behind me for support, was the best time for me: too late and before I’d know it the day would slip away from me. Plus, my anxious rescue dog really liked to lie in bed and rest his head on my lap while I did so, which definitely added to the appeal. But if I did miss my morning slot I didn't beat myself up about it, and simply squeezed it in where I could: between classes, popping in my headphones and closing my eyes on the tube, in bed last thing at night (amazing if you struggle sleeping). The trick was to just do it.
For the first two weeks I stuck to guided meditations of about 10-15 minutes long as I felt like I needed the support, but after that I began to fly solo, just sitting quietly for 5-10 minutes, listening to the sounds around me, observing the sensations in my body, catching my mind as it ambled into yet another rabbit hole and coaxing it back to the present. I was gentle with myself, and I think that has been key to making it stick: most days it doesn’t feel like a chore.
Anyway, I don’t profess to be a meditation expert: I have no training in it, only my own experience. But I do know that my anxiety and panic attacks have subsided, and I feel calmer and more grounded. I’m more even and balanced in my response to challenging situations, and that feels good. My friends and family, and even my regular students, have commented on the change. Essentially, things just feel like less of a struggle. I have more ability to just 'be'.
So if you’re thinking of taking up meditation, do it! You will not regret it. Sure, some days are harder than others, but the benefits speak for themselves. I mean, have you ever heard someone say they took up meditation and regretted it? Exactly.
Interestingly, when I posted about my 100-day mark on Instagram, lots of fellow meditators shared their tips, so I’ve decided to share them below. As always, I hope you find it useful, and let me know how you get on.
Niraj Shah, Founder of Meditation Unlocked
‘My tips for sticking to meditation? 1) Schedule it and treat it like an important meeting. Set two alarms if that’s what it takes. 2) Commit to sitting for a few minutes no matter what: it’s getting started that is hardest. 3) Get an accountability partner or someone who will also commit to meditation and message each other when you’re done. Ideally, do it at the same time. 4) Come to a group meditation, such at Meditation Unlocked, to help keep up the motivation and accountability.’
Kate Faithfull Williams, Editor, Health Coach
and author of The Feelgood Plan
‘I always feel better after I meditate, but I struggle with stopping [to meditate] when my head is spinning to actually do it! I start with five mindful breaths. If that’s all I do, that’s OK, but if often leads to more.’
Jennifer Dwyer, Yoga Teacher and Owner of PycMuskoka Yoga Studio
‘I have a few essential oils I use. I find taking the time to slow down, put a drop in my hands, then take three deep breaths and rub on the back of my neck is the perfect prep and grounding to land me in stillness. [There’s] something about the ritual of it. Essential oils are the bell for my daily meditation.’
Jessica Green, Yoga Teacher
‘Blankets and cushions and a regular spot at my altar, lots of palo santo, and not looking at anything else on my phone other than Insight Timer (hard!). [I also use] mantra and pranayama to quiet my mind.’
Tania Stalley, Yoga and Meditation Teacher
‘What works for me right now is meditating on what is relevant in your life at the time, and if nothing comes to mind (that’s probably a good thing!) then simply meditate on ‘what am I experiencing now?’. And definitely the same place at roughly the same time each day. I’ve learnt with all my moving around how valuable routine is.’
MY TOP 3 MEDITATION APPS
Insight Timer
Free guided meditations for everything from trouble sleeping to dealing with anxiety and stress, plus bells and ambient sound for those who fly solo.
Headspace
Great for beginners and sceptics. Its Basics Course is completely free and teaches you the fundamental techniques of meditation and mindfulness.
Third Ear
The first ever sound meditation app created by renowned sound healer and therapist Leo Cosendai, it focuses on harnessing the powerful effect of sound on the human mind to soothe and calm.

5 Ways To Be Kinder To Yourself
Do you ever notice that you think things to yourself, about yourself, that you wouldn't say to your worst enemy? It doesn’t have to be this way. We are not our thoughts, so don’t let negative thoughts define your relationship with yourself. We can either allow negative thoughts to insidiously raze our self-worth, or we can actively choose to flood ourselves with positive energy and build ourselves up from the inside out.
'There is you and you.
This is a relationship.
This is the most important relationship.'
Home, by Nayyirah Waheed
This is a poem I love, and always come back to in times of need. Do you ever notice that you think things to yourself, about yourself, that you wouldn't say to your worst enemy? I certainly do, and these past few days have been an uphill struggle.
I battle with my self-image at the best of times, let alone when I’m on strict bed rest after a knee operation (six weeks with no exercise – say what?!). The dialogue I’ve been having with myself recently has been less than kind, and at a time when self-compassion is needed more than ever.
But it doesn’t have to be this way. We are not our thoughts, so don’t let negative thoughts define your relationship with yourself. We can either allow negative thoughts to insidiously raze our self-worth, or we can actively choose to flood ourselves with positive energy and build ourselves up from the inside out.
Next time you catch your inner critic bubbling up, ask yourself: would I talk to someone else like this? The answer is probably no. Take a deep breath, reassess the narrative, and instead talk to yourself with compassion, as you would a friend. Your relationship with yourself is so important: you are your home, so make your mind a kind, loving place to inhabit.
Here are my five tips for building a more compassionate attitude towards yourself and others...
1: Tame your inner critic
'If you don’t love yourself, you cannot love others. You will not be able to love others. If you have no compassion for yourself then you are not able of developing compassion for others.' – Dalai Lama
Self-compassion is a Buddhist concept that refers to relating to the Self with kindness. In a nutshell, it's about being gentle, understanding and kind to yourself; about knowing that a bad decision doesn't make you a bad person; about knowing your own worth. The first step towards this is learning to quiet your inner critic. Personally, I have found a combination of CBT and meditation incredibly useful in this, but like most inner work, it's definitely a project in progress. Simple things like wearing your favourite outfit, making yourself a delicious meal, even if it's just for you, letting yourself rest when you're tired, rather than hauling yourself to the gym... they all add up to a kinder mentality towards yourself. Try meditating or practising with this mantra for a week: I am enough. Start sowing those seeds, and watch new roots begin to take hold.
2: Parent yourself
I am not a psychologist, but during my many rounds of therapy, one theme that kept recurring was learning how to parent yourself. When anxiety and fear rear their ugly heads, they are often your 'inner child' calling out for attention. So parent yourself and your thoughts like you would a small child. Listen to and respect these thoughts and feelings, write them down if you need to (I find this really useful when my mind is busy) and give them a safe space to be heard. I find all kinds of things come to the forefront of my mind when I practice. Some days I'll end up on my mat in tears. Vulnerability is OK. This is a key step in building compassion for yourself.
3: Remember, We're All Human
You know those situations where someone looks at you funny, or makes an offhand comment, and you go into a mental tailspin thinking that everyone hates you and the world is against you? Yup, been there, many a time. Yet it's so important to realise that no one is perfect, and more often than not, everyone is in exactly the same boat. The human condition is inherently flawed, but we can use our yoga practice to inspire and promote connection with others. Yoga means to 'yoke' or to join, and is often interpreted as meaning union. Next time you're meditating or practising asana, devote your practice to someone you're struggling with, and see if your reaction towards them changes.
4: Practice Gratitude
When I'm struggling to be kind to myself, I find that writing a gratitude list really helps, even if it's just for a few days. Putting pen to paper and actively focusing on the positives in your life (and there will be some, even if it doesn't feel like it), enables you to live from a place of compassion and kindness. For example, in the run up to my knee surgery I was feeling pretty low about the fact I was struggling to do my regular activities, but I kept telling myself that I was lucky to be seeing a surgeon, I was lucky to be fit and healthy enough to withstand a general anaesthetic, I was lucky to be able to work for such understanding studios and clients and take the time off I needed. There is always a silver lining if you look for it.
5: Be Mindful
Through our yoga practice, without realising it, we are training ourselves to be more mindful and aware of the subtle. Your practice allows you the opportunity to pause and tune in to your self: how are you feeling, where are your thoughts wandering to, how are your energy levels? These are all questions I always encourage you to ask when you step on the mat, and you can use them whenever you have a pocket of downtime in your day. By checking in, we allow ourselves to tune in, and when we listen, we can press pause on the negative narrative and hit play on the one we need to hear.

POSTURE CLINIC: VASHISTASANA B
If I had to pick a favourite yoga pose, one that was a little bit fancy but just also feels amazing in body, mind and spirit, it would be this. To me, Vashistasana B is the perfect blend of strength, balance and flexibility: in it, I feel steady, poised, focused and, well, just totally alive and present. That said, I’m only too aware that not every student enjoys this pose: shoulder issues, hamstring tightness and limited external hip rotation can all inhibit strength and motion here. These are my top tips and drills to gaining ease in Vashistasana B.
If I had to pick a favourite yoga pose, one that was a little bit fancy but also feels amazing in body, mind and spirit, it would be this. To me, Vashistasana B is the perfect blend of strength, balance and flexibility: in it, I feel steady, poised, focused and, well, just totally alive and present. That said, I’m only too aware that not every student enjoys this pose: shoulder issues, hamstring tightness and limited external hip rotation can all inhibit strength and motion here. These are my top tips and drills to gaining ease in Vashistasana B.

Supta Padangusthasana
This pose stretches the hips, hamstrings, calves, groin and thighs. Lie on your back, wrap a yoga strap (or whatever you have that resembles one: belt, towel, scarf, get creative!) around the ball of the right foot, then extend the leg towards the sky, straightening it as much as you can. Press up through the heel of the foot and curl the toes towards you to encourage length through the back of the leg. Hold for 5-10 deep breaths, then switch sides.
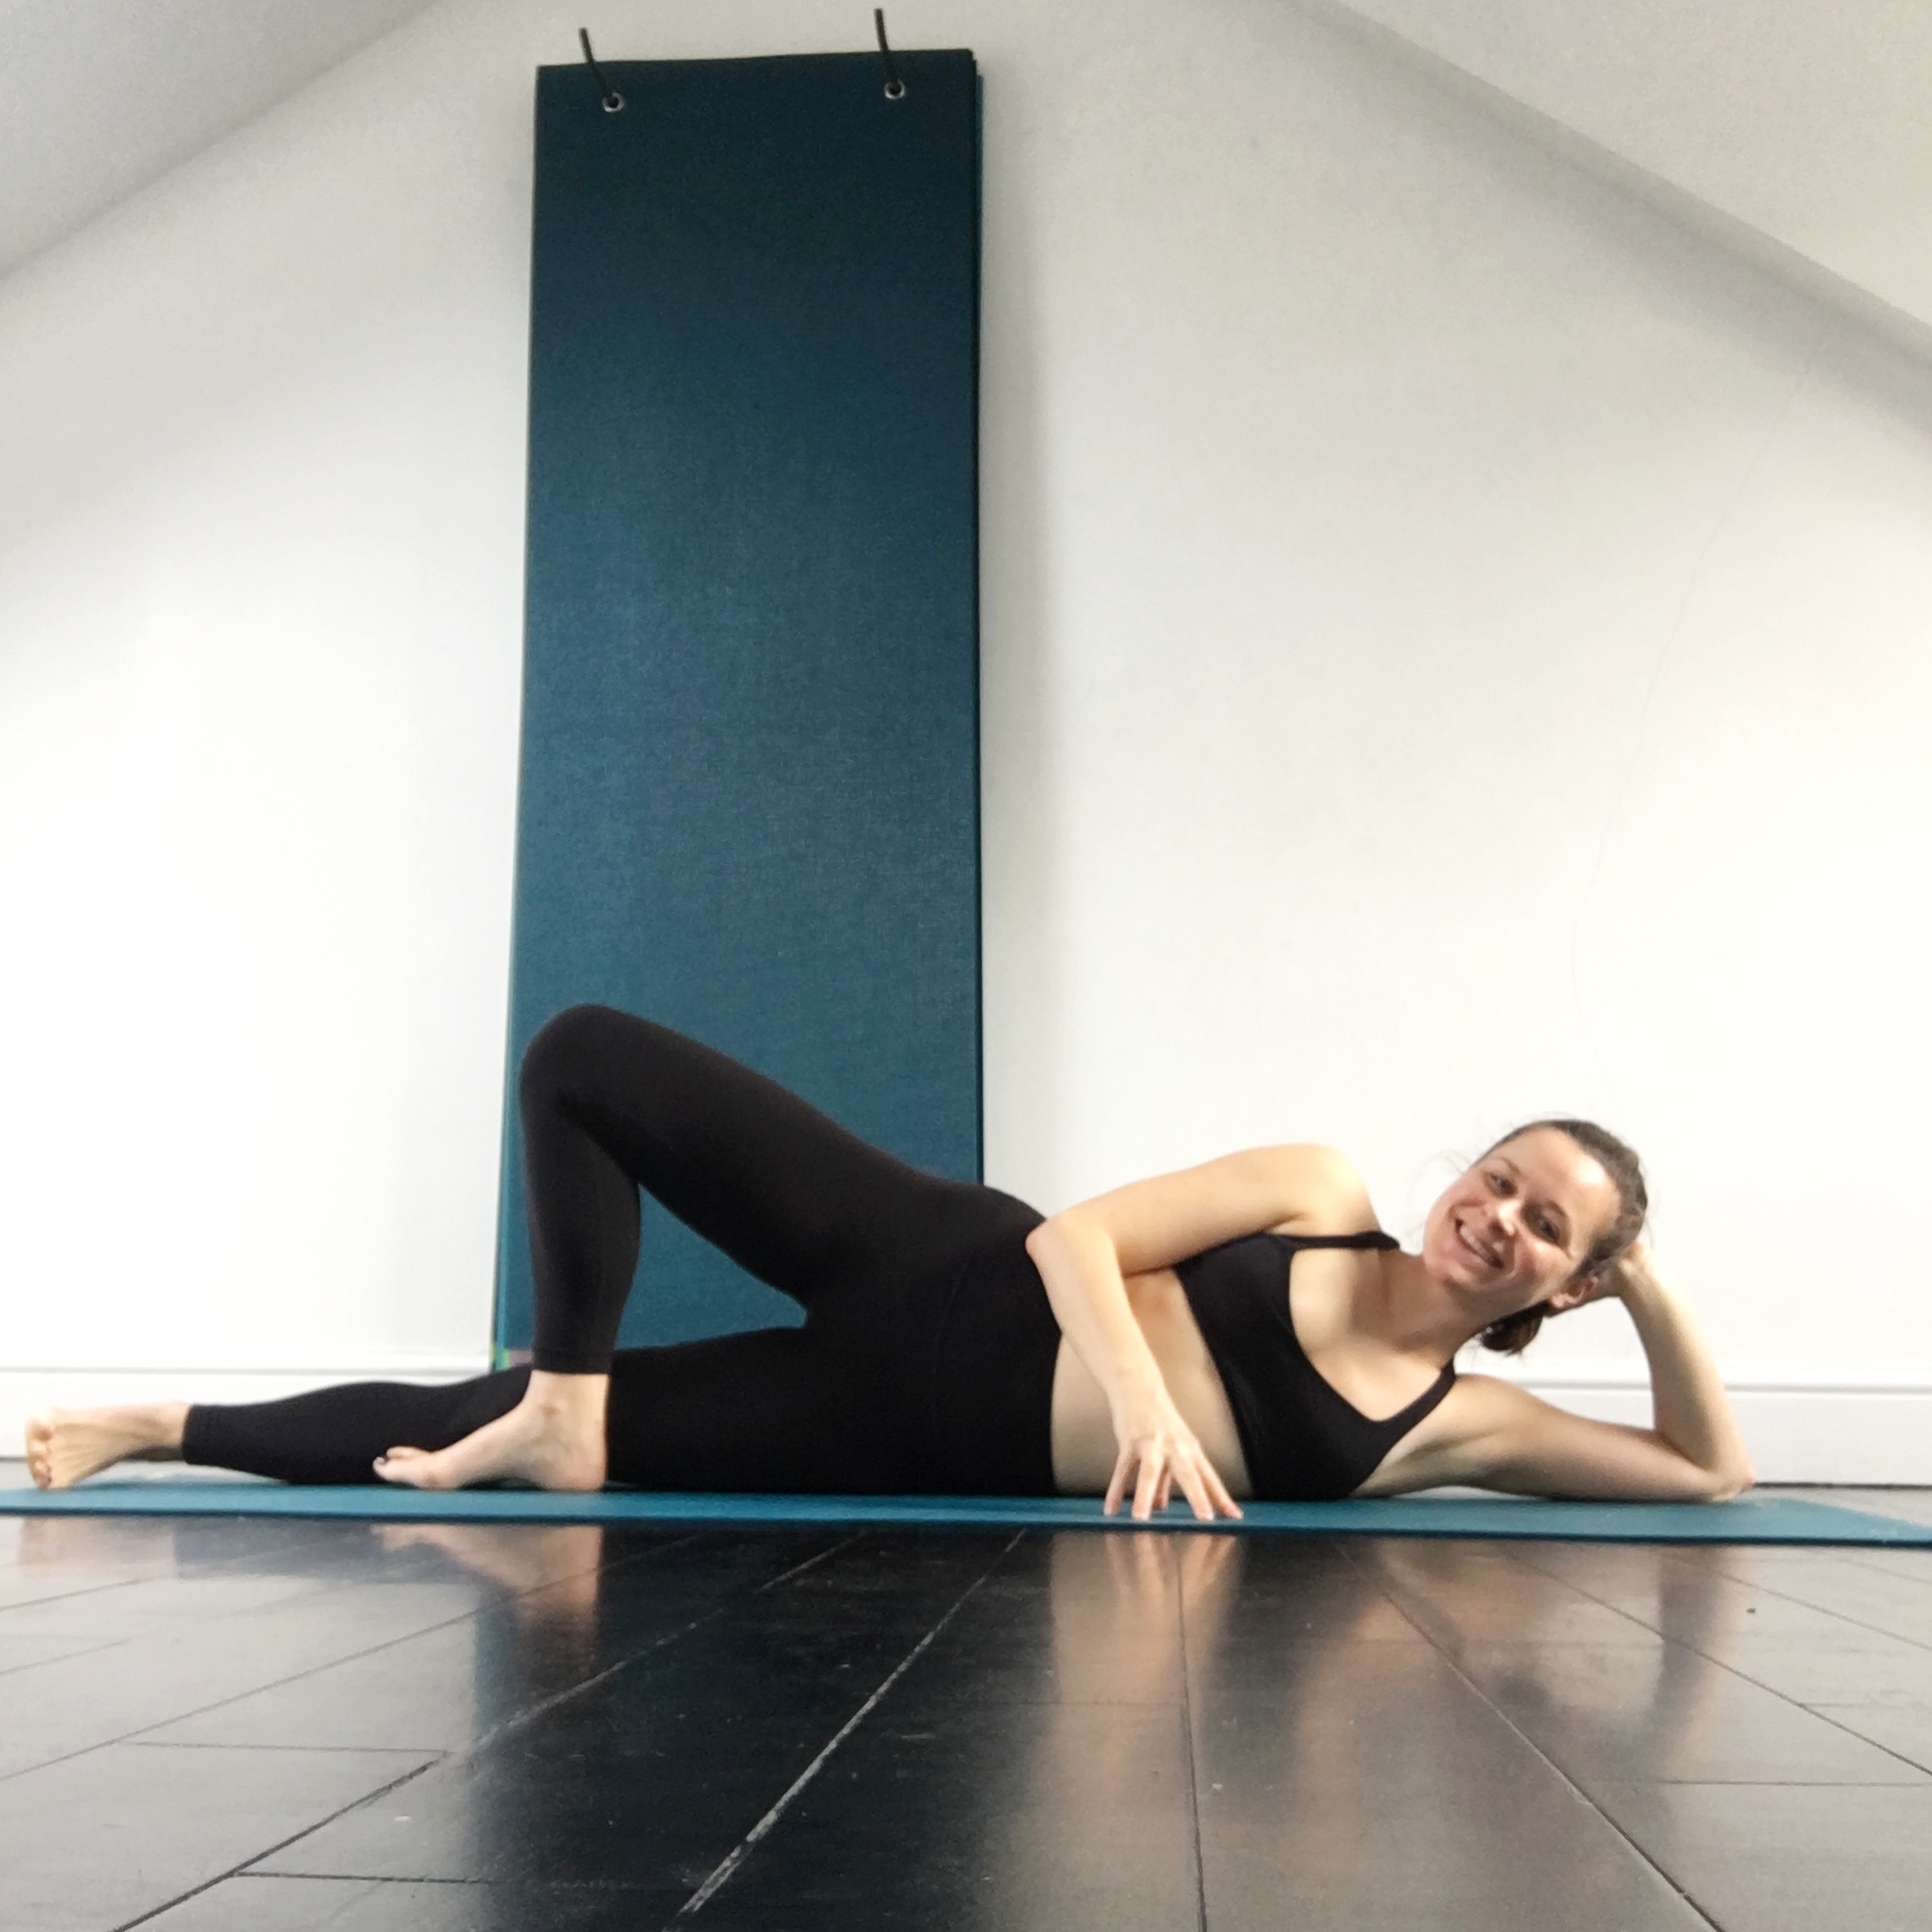
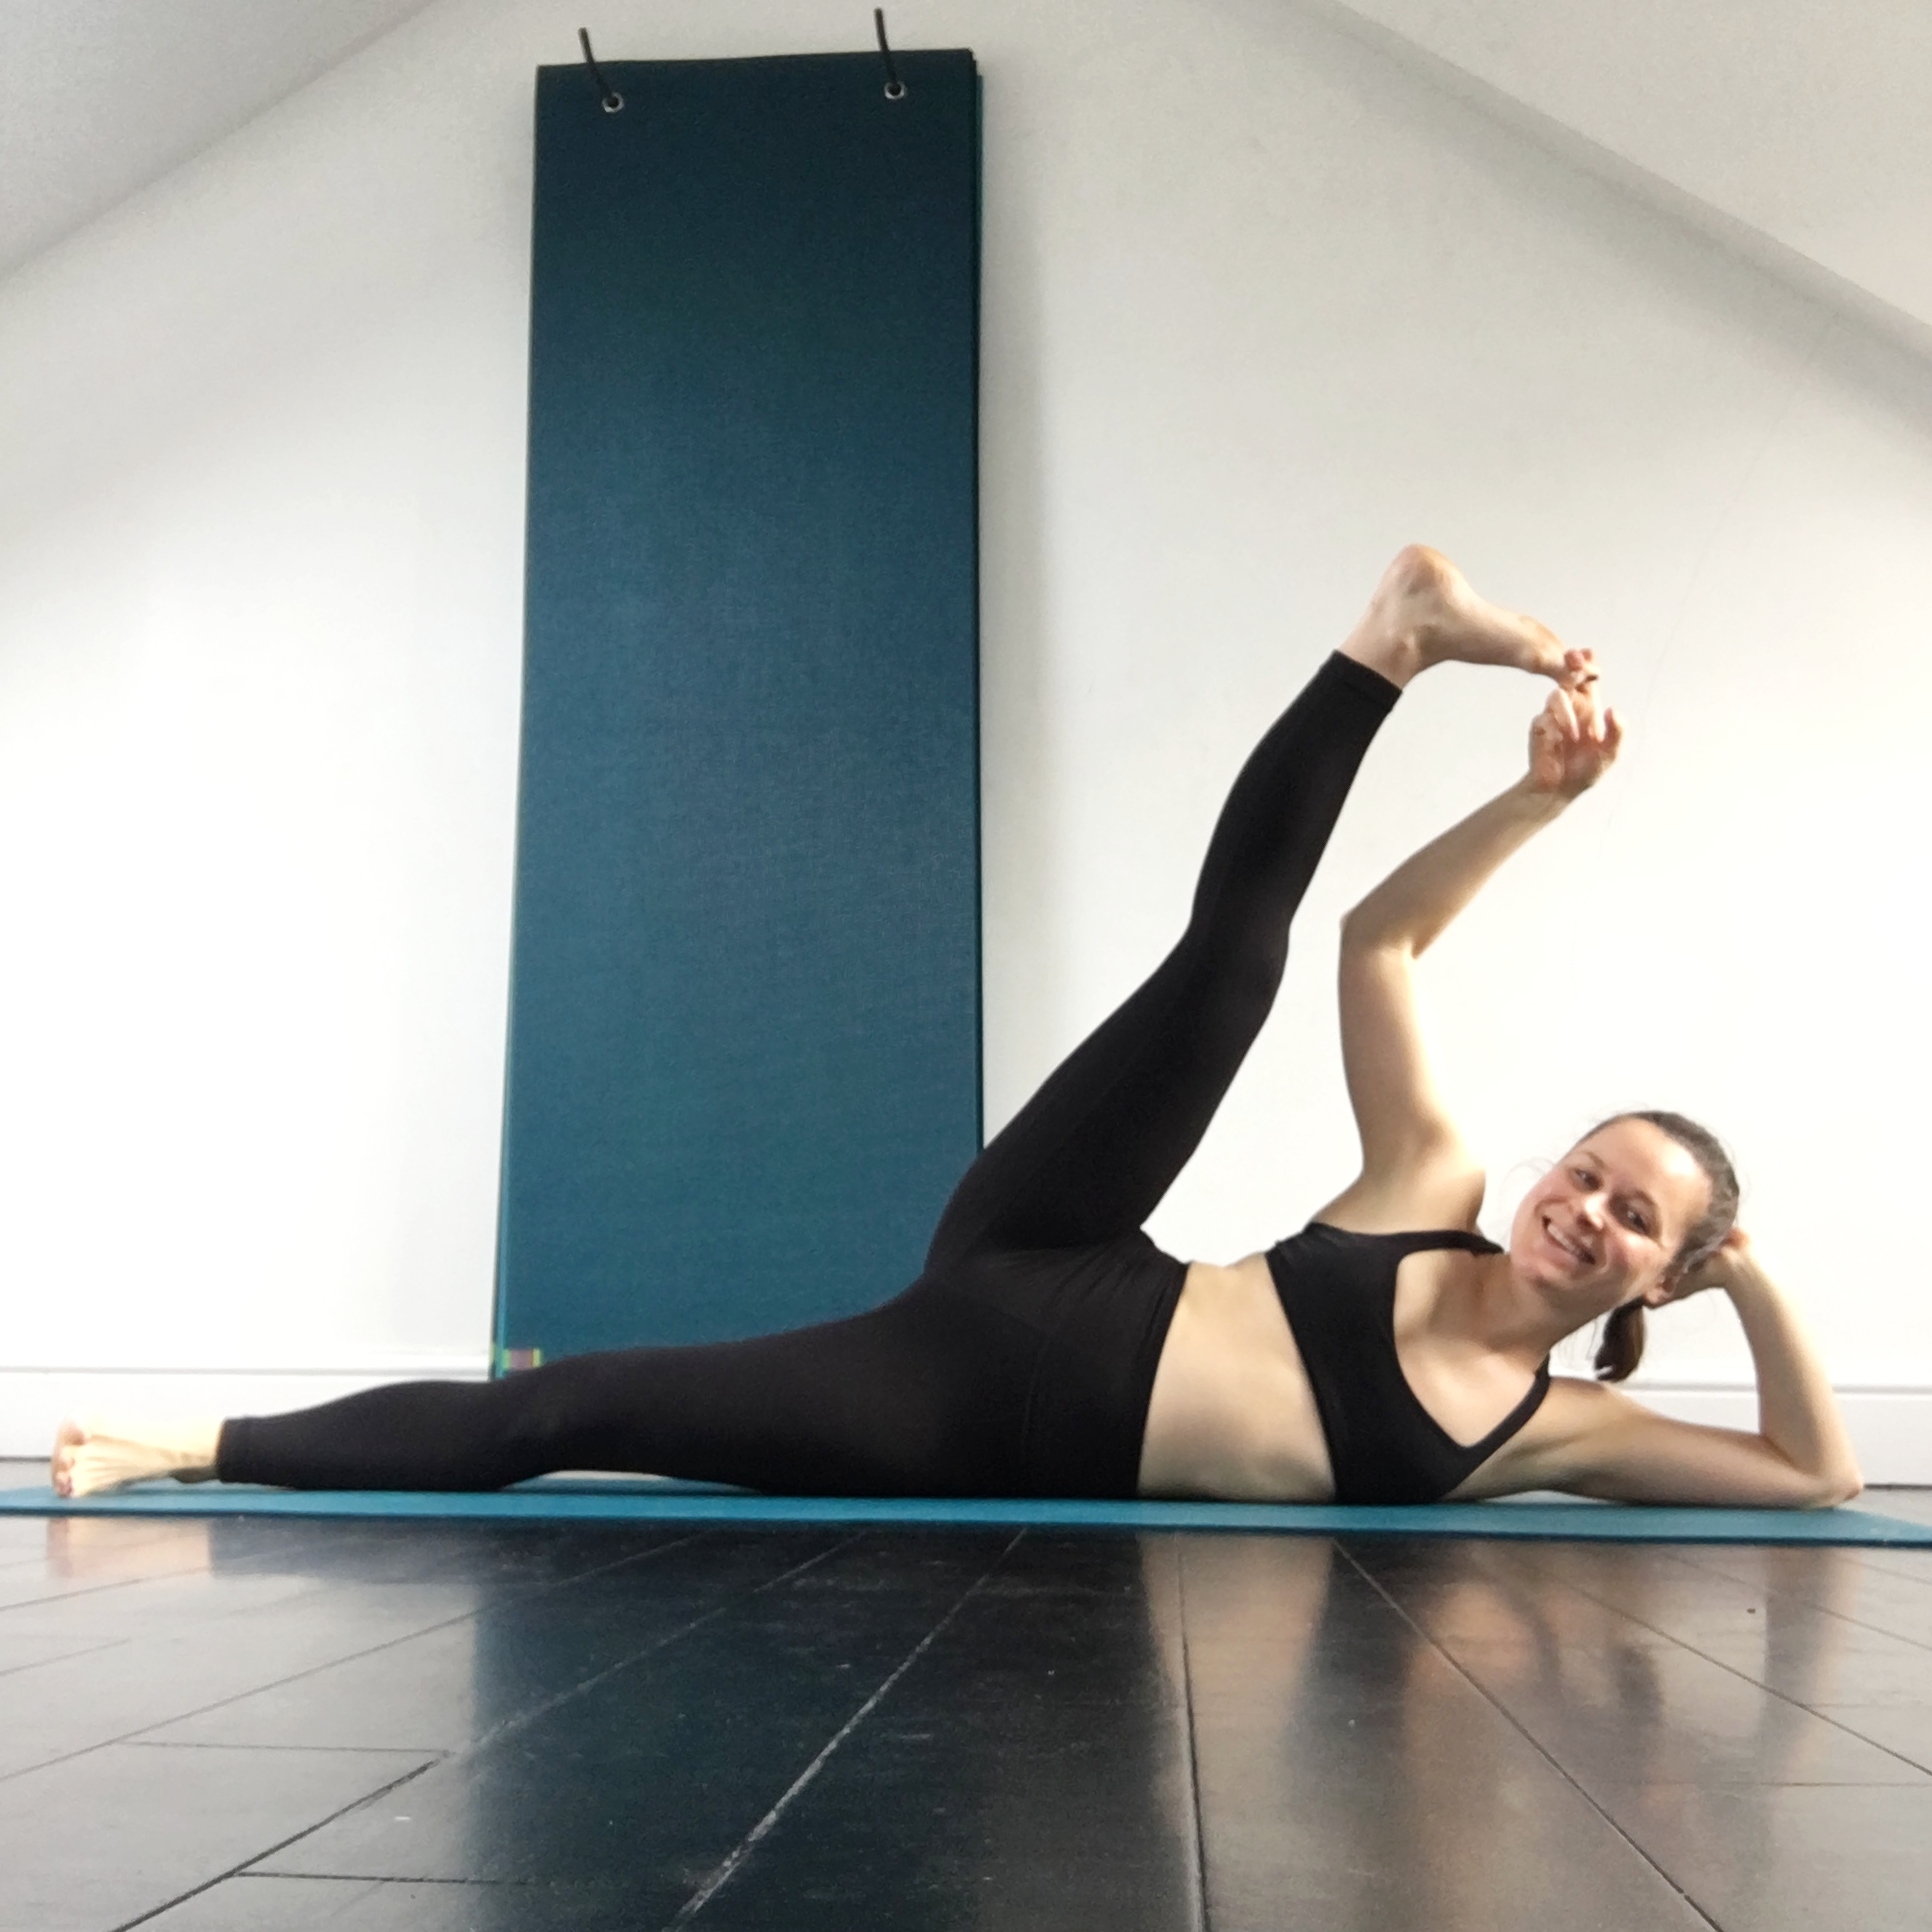
Anantasana
This poses stretches the side body and legs, prepares the hips for external rotation and engages the low belly to stabilise. First, lie on your right side, bend your left leg and place the left foot in front of the right thigh. Lengthening your tailbone towards your foot and lift the front of your hips to engage your core. Hold for 5-10 breaths, then extend the left leg skywards and see if you can catch hold of the foot. If you can’t, make friends with that trusty strap! Hold for a further 5-10 breaths and repeat on the second side.

Modified Side Plank
Come to a tabletop position (feel free to do a few rounds of cat-cow here to mobilise the shoulder joint). Walk the hands forward an inch so they’re just in front of the shoulders, then extend the right leg out behind you. Stack the right hip on top of the left, and ground the right foot behind the left. Next, move the left shin out to the left to create a stable base (see pic, as this one is tricky to cue, even harder to write, but really easy to do!), and reach up through the right arm. Basically, you’re in side plank with the bottom knee down for support. (Note: Why didn’t I just write that?) Hold for 5 breaths each side.

Knee To Elbow Taps
From modified side plank, elevate the top leg, and see if you can tap the top elbow and knee together. Repeat five times each side. This is a great way to fire on the obliques and mobilise the side body.
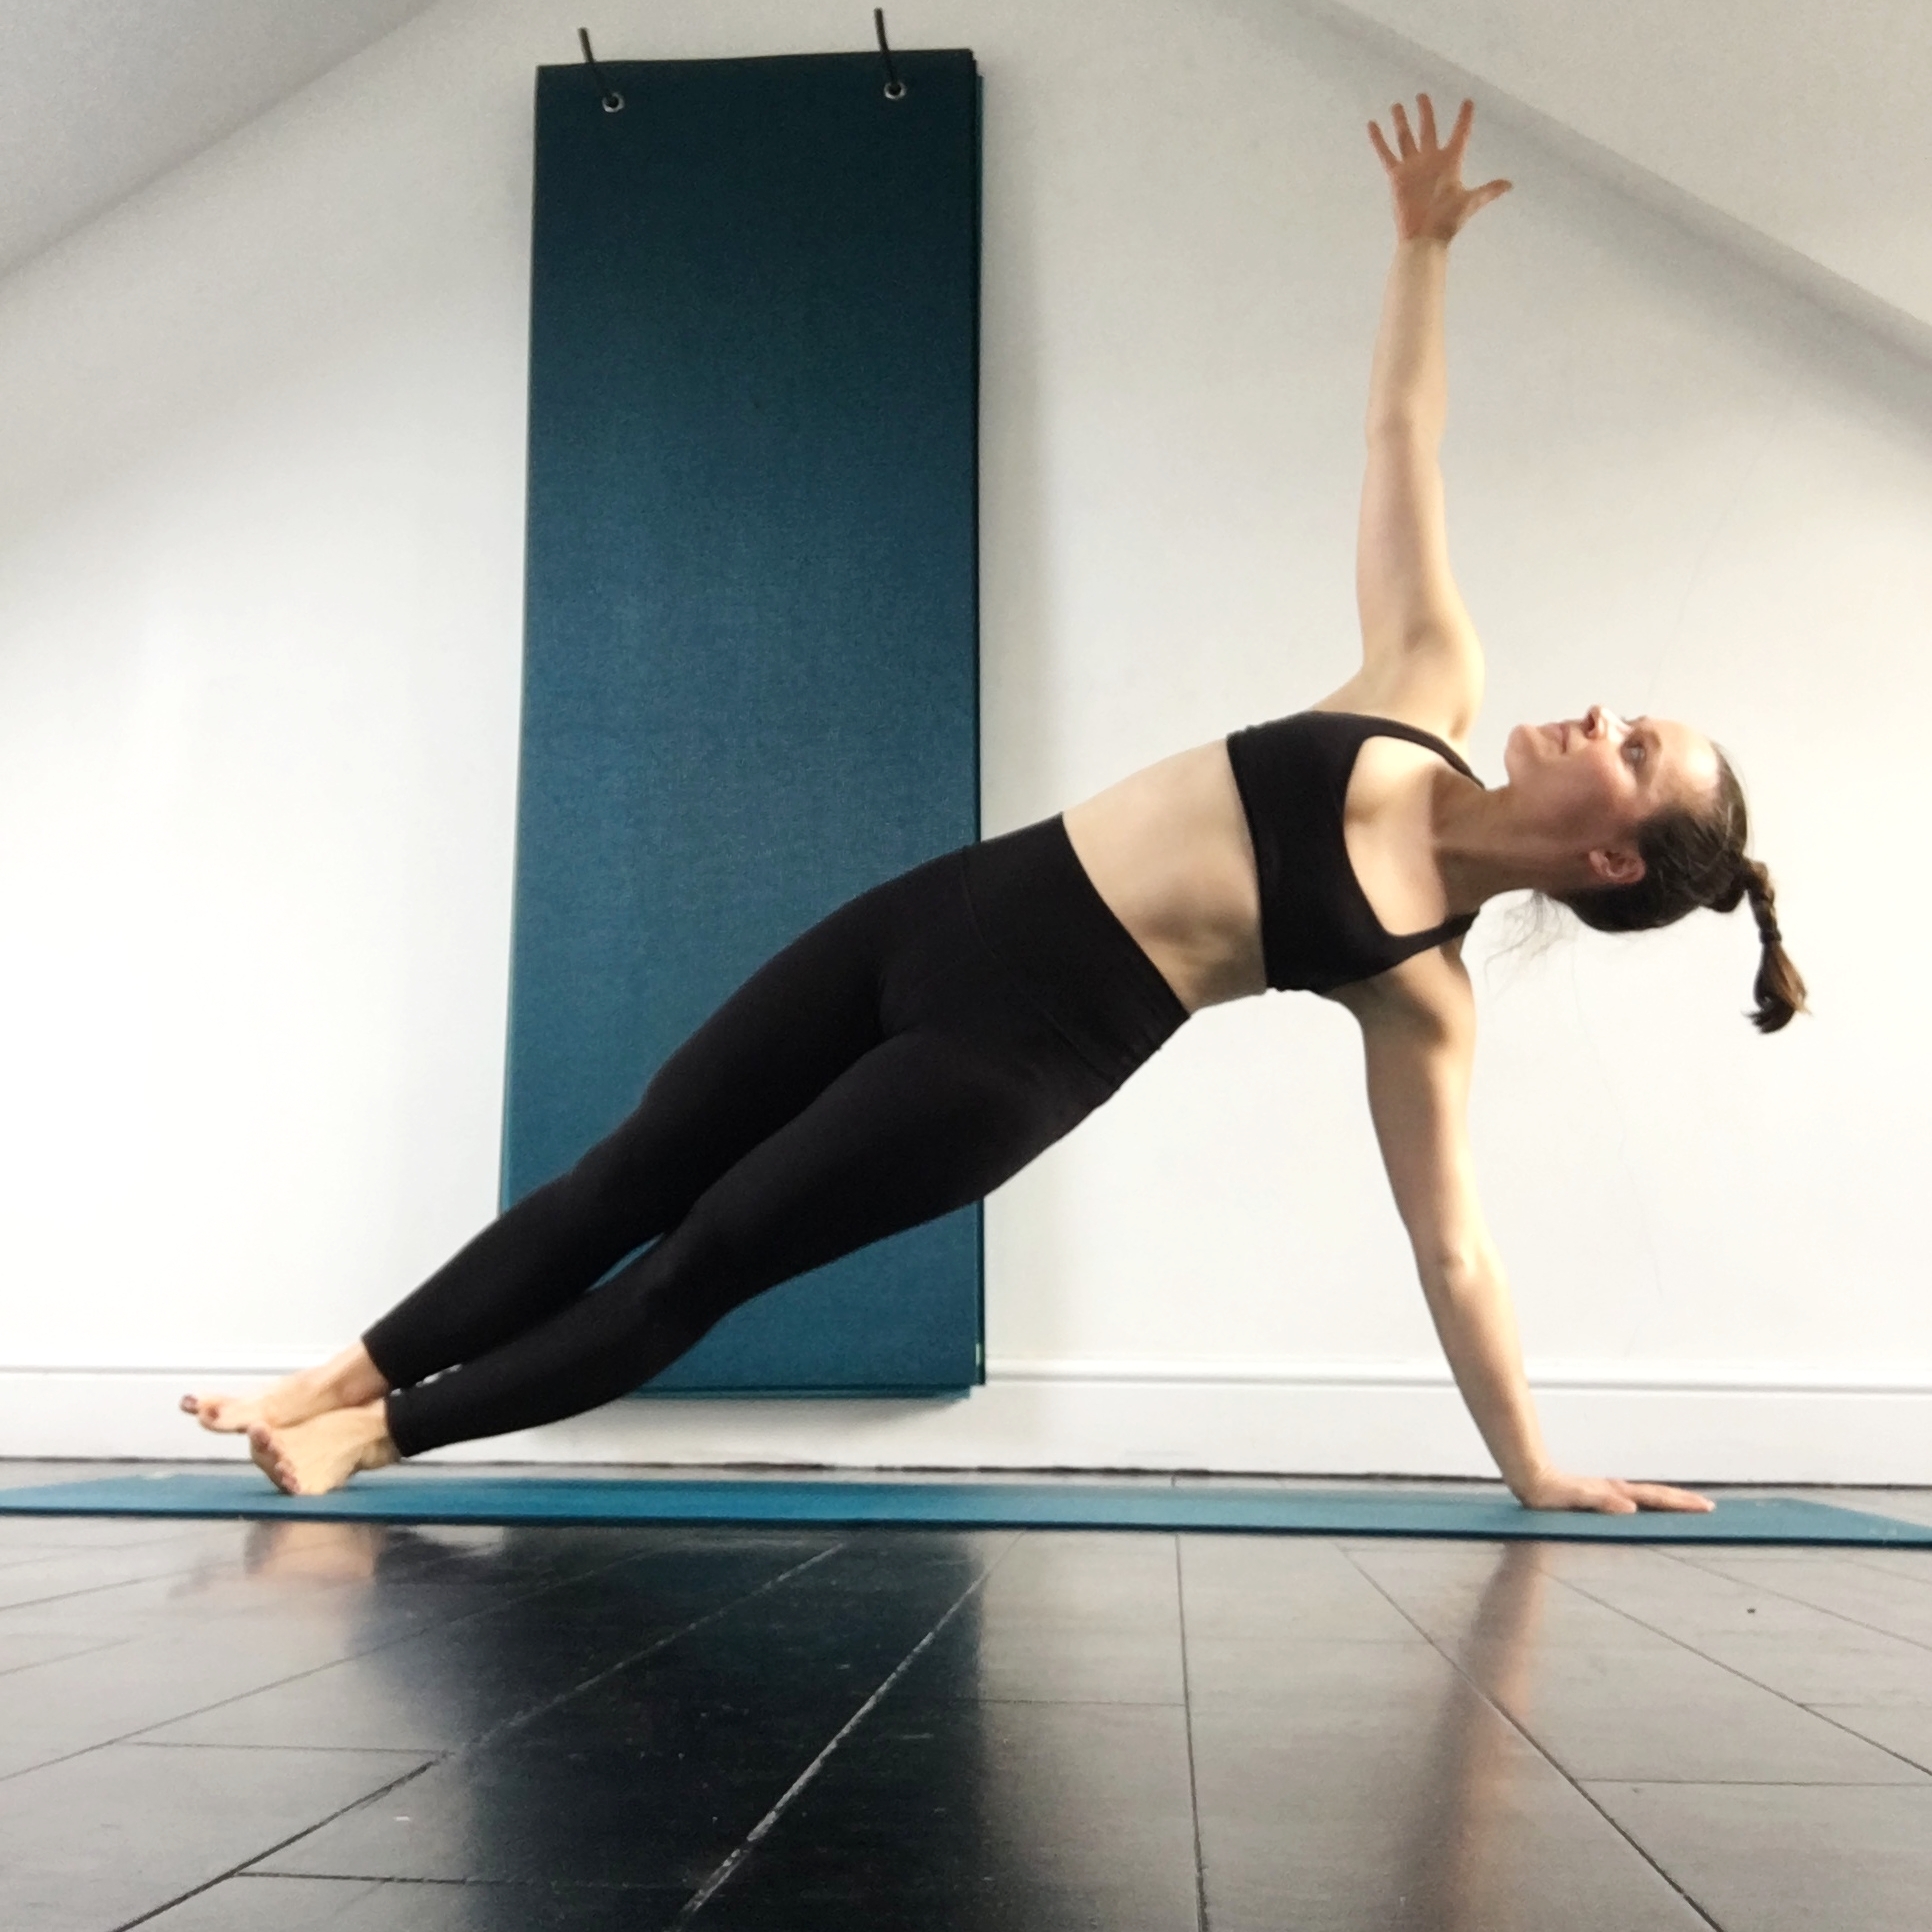
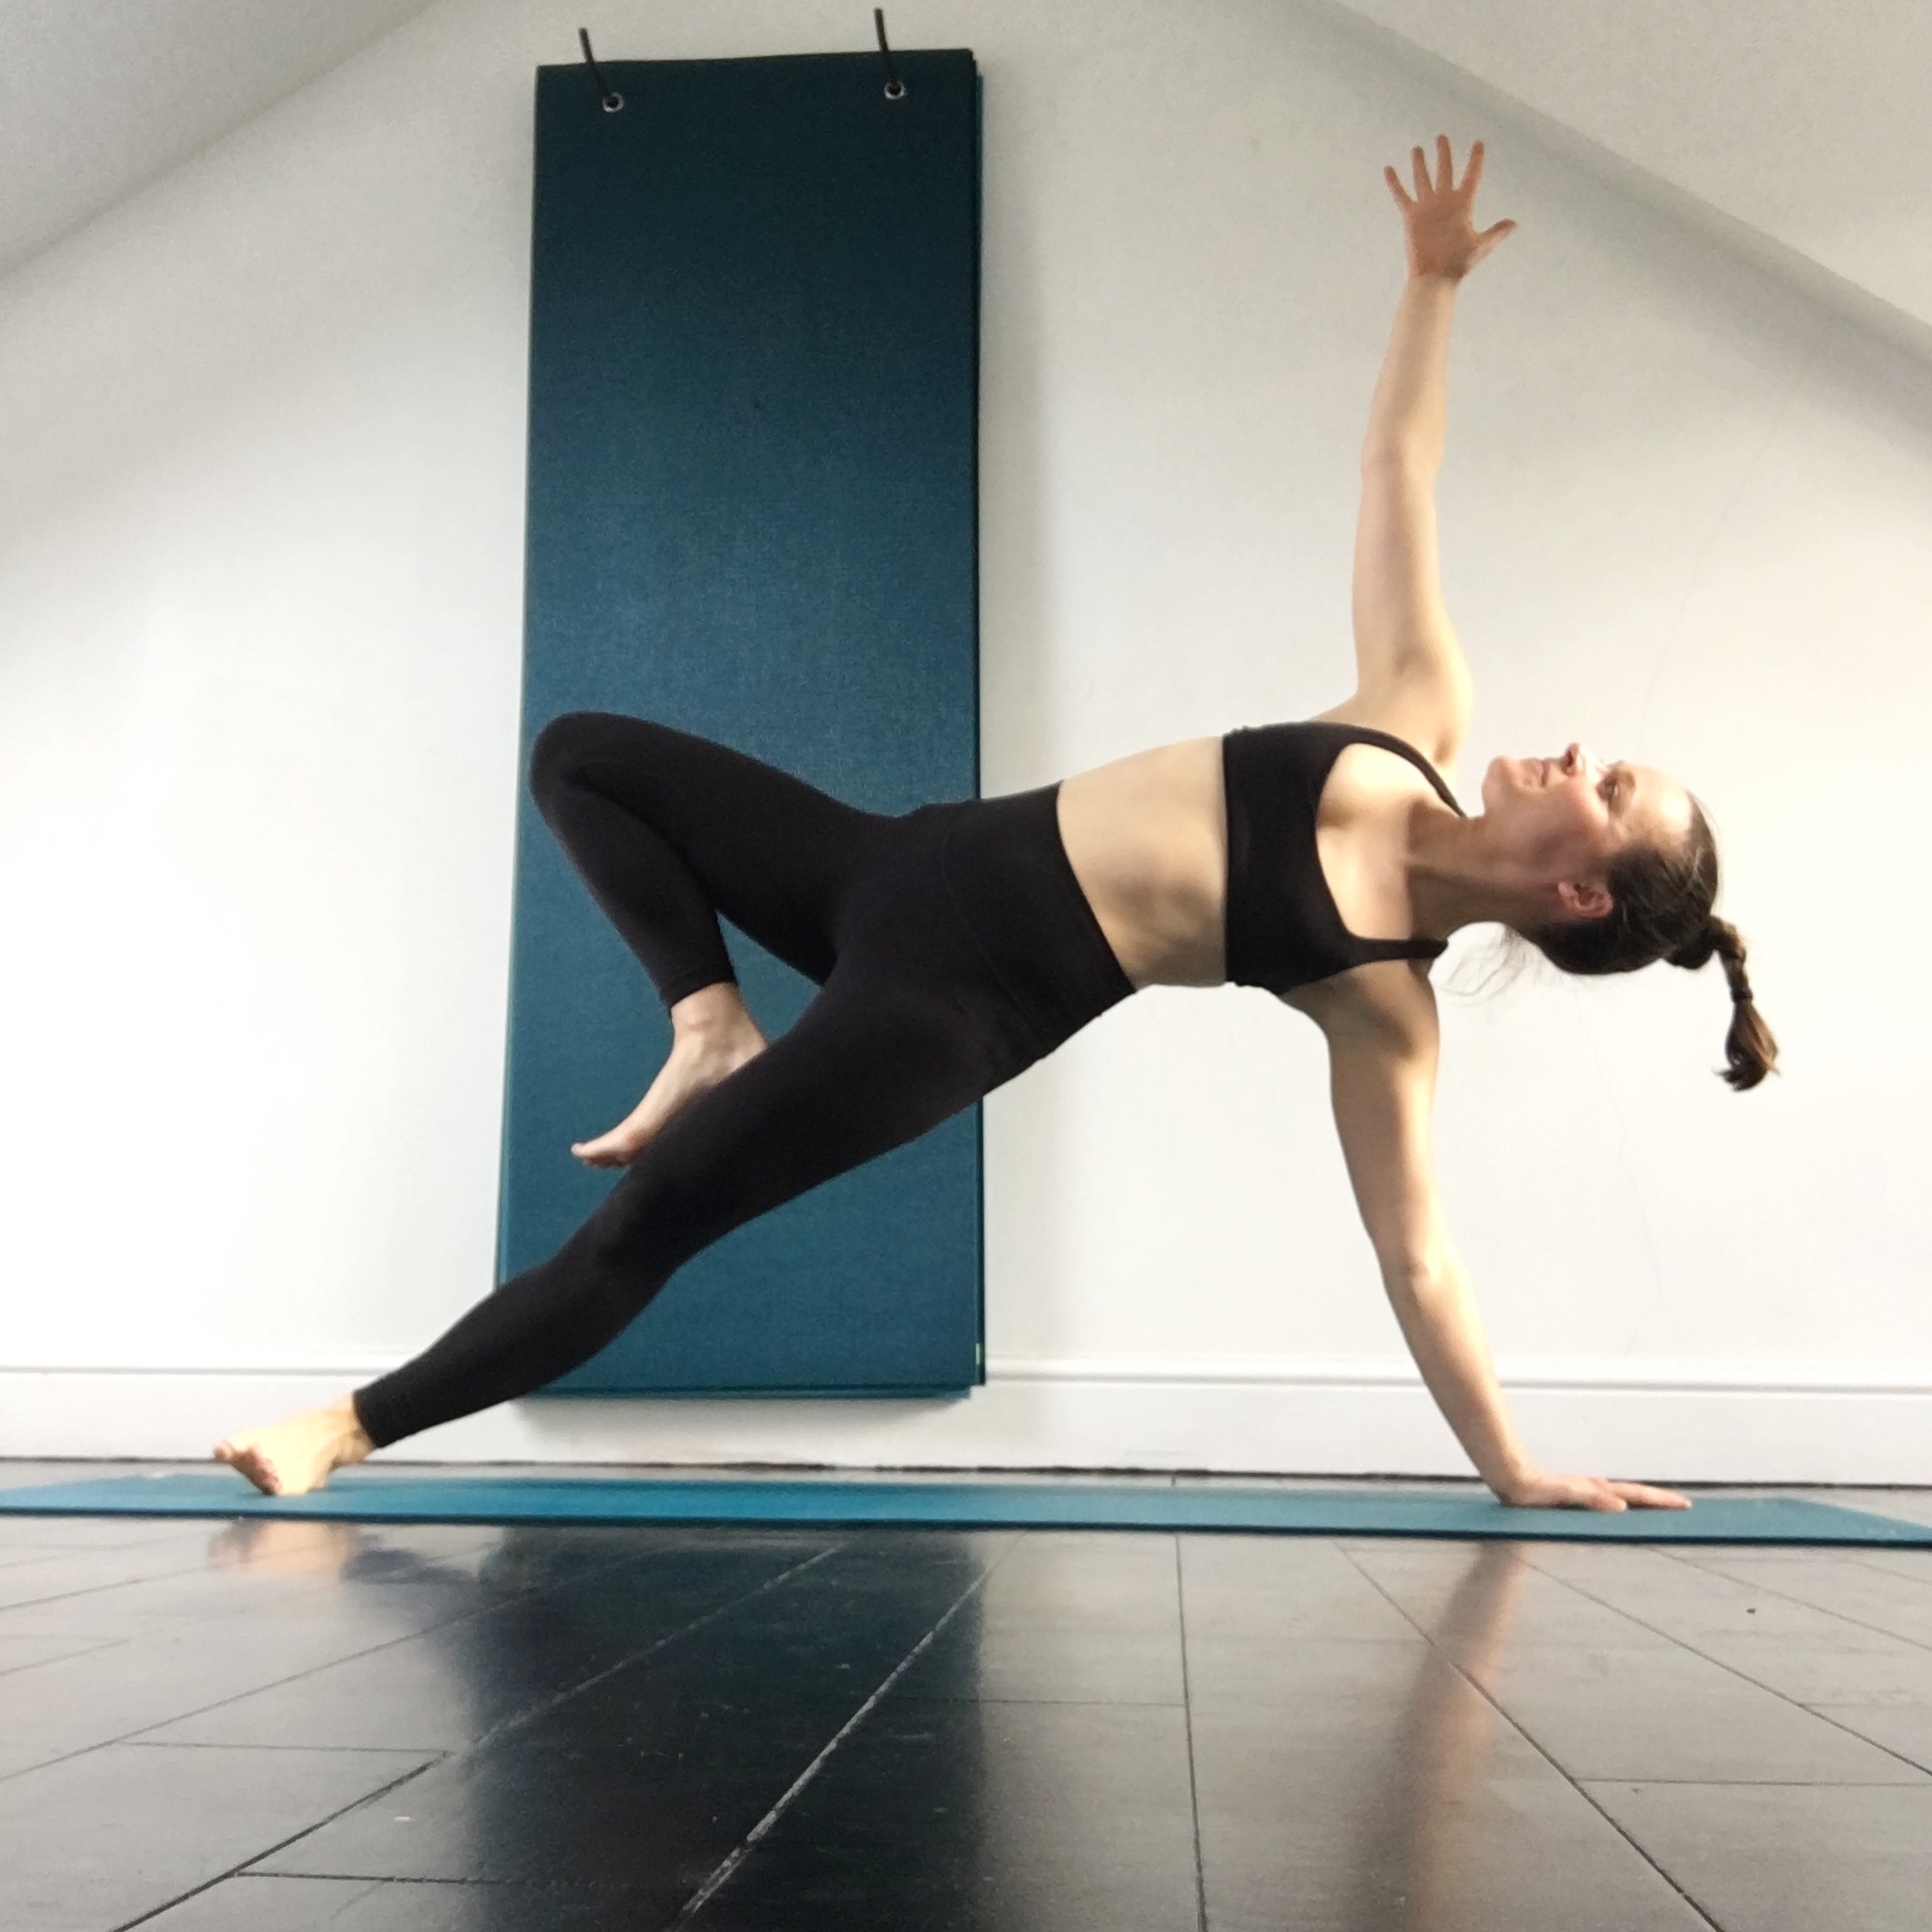
Vashistasana and beyond!
OK, now we’re ready to start exploring side plank, aka Vashistasana, and its variations. From plank, place the right hand in the centre of your mat, just in front of your face. Moving the hand forward slightly brings the shoulder into a far safer position for bearing weight. Next, roll onto the outside edge of the right foot. Stay here until you can comfortably hold for 5 breaths. Once you feel strong in regular Vashistasana, it’s time to play with leg variations. For Vashistasana with a tree leg, simply bend the top knee and place the foot either above or below the knee, then work on opening up the hip. If that feels good, let’s go for that toe! Bend the top leg towards you and catch the big toe with the index finger, middle finger and thumb, then work towards straightening the leg. Resist the pull of gravity and push the ground away from you: root down through the supporting hand and foot (pressing the sole of the foot into the mat if you can), draw the lower shoulder blade down and away from the neck, then lift those hips. Keep your gaze steady on a fixed point, and your breath even. Hold for 5 breaths, repeat second side, then take a very well earned child’s pose.
